Pages

Monday, November 29, 2021

Clean and Simple Layout for Creative Embellishments

Oh yes, I'm still working on that 8 x 8 mini album that was supposed to be a Christmas gift for LAST year!  The good news is that I finished it yesterday!  Hooray!! 

This is really a simple layout but simple is sometimes what you need when your goal is to present a set of photos. I love this set showing how my great niece has grown over time.  It's such a cute way to document how quickly babies grow!


At the top I used Creative Embellishments' word "Cute" from the Boy Word Set and as usual I have heat embossed with Stampendous Aged Ivory Embossing Enamel.  It's such a fast and attractive way to make your chipboard embellishments stand out.


I used Ranger Antiquities Rose Quartz Embossing Powder on this adorable heart chippy.  This powder is completely different from what I used on "cute".  It has a textured finish that I really like.


An adorable baby, some great chippies and a few flowers, that's all it takes to make a great layout!


Products from Creative Embellishments

Boy Word Set - Words

Love Arrow Set

Be sure to join in our challenges; they are always posted on the first of every month.  Thanks for stopping by!


Tuesday, November 9, 2021

Mixed Media with Eileen Hull's Full Size Journal by Sizzix

 This is a little tease because I'm going live with Eileen sometime the week of November 11th to show you how to make a mixed media journal cover using clear gesso, mists and Sizzix Luster Wax.  Til then here's a preview of what we'll be doing.

Here's the front cover.  It's still a work in process but the mixed media part is done.

This is the journal cover in its beginning stages.


And here I masked on some Luster Wax. (Tip, stamp cleaner works great to remove the wax from stencils and fingers.)


Cutting Full Size Journal Covers


Do you sometimes have difficulty getting your steel ruled dies to feed through your die-cut machine?  Here's a tip.  First I want to tell you that you can cut a Full Size Journal with your Spellbinders Platinum 'cause that's how I cut mine.  But, it wasn't the easiest thing I ever did!  I couldn't get the die to feed through the machine.  So, this is how I made it work.  Put the plates so that they extend over the end as in the photo below and feed the opposite end in first.


So, here are the steps in detail (this works with any machine that you're having trouble getting the die to feed)
  1. Cut mat or chip board slightly larger than the journal cover.
  2. Place the die face up on a cutting plate.
  3. Place the mat or chip board on the die covering the journal cover.
  4. Cover with another cutting plate.  Make sure the plates are completely extended over the end of the journal cover part of the die.
  5. Feed the opposite end into your machine.
I hope that makes sense!  It's a little hard to explain and I will go over it in my Facebook Live with Eileen Hull the week of November 14.  I'm not sure of the exact date but I will let you know on my Facebook page.  I will be making the back cover for this journal on the Facebook Live using the same techniques as the cover.  I hope you can join me!

Wednesday, November 3, 2021

Grand Teton Layout for Creative Embellishments

I created this simple layout featuring 3 photos for Creative Embellishments.  You know, sometimes you just need to create scrapbook pages that are actually made to go into a scrapbook!  This one will be a little bulky with the floral vine on the side but it will still fit.


My floral cluster has several layers beginning at the bottom with a swirly chipboard pieces that I have heat embossed with Deep Sea embossing powder. I topped that with painted Leaves Clusters.  I think they make a great bed for the black floral vine that I used.


After placing the swirly border, leave pieces, and floral vine, I fussy cut some flowers from the design paper (Graphic 45 Come One Come All collection) and tucked in here and there.


For the title I used a word, Vacation, chippy and heat embossed it with Aged Spice from the Stampendous Autumn Fling kit.
 

Be sure to join in the November challenge at Creative Embellishments.  You could win a prize!


Products from Creative Embellishments


Other Products

Emerald Creek Baked Texture - Deep Sea


Tuesday, November 2, 2021

Spellbinders Sweet Serenade Notecards Collection by Becca Feeken

Spellbinders Sweet Serenade Notecards Collection by Becca Feeken is so perfect for creating an elegant slim line card.  Here I've used 4 different diecut paper layers to create my card. 


I used diecuts that came with the paper collection (an older Kaisercraft collection, Golden Grove, to embellish the card.  I gave them dimension by popping up with foam and by using a stylus to give shape to the paper flowers and leaves.

The Sweet Serenade Notecards Collection also includes a great stamp sentiment collection.  I used one of the stamps and the accompanying diecut to add a sentiment to my card.


I kept the inside simple and just added a border and flower sticker so that there is plenty of room to write a note.


Spellbinders Products Used to Create this Card


Just a Note Sentiments & Tag Clear Stamp & Die Set from Sweet Serenade Notecards Collection by Becca Feeken


You can view all the Sweet Serenade Collection here


Thanks for stopping by!


xoxo Maggi


Monday, November 1, 2021

Spellbinders Amazing Paper Grace November Dies

 
You're going to love the dies in the Amazing Paper Grace  November Collection!  I made this card using the 3-D Christmas Tree dies in the November APG collection.


There are actually 5 trees that make up this pretty 3D display.  You can stand the trees alone where it shows beautifully from the front or back or you can attach to a card as I did.

I used metallic kraft cardstock on this card and I'm sorry it really doesn't photograph very well.


The dieset also includes two sentiments which look so pretty with the cut out letters.

It's a Dog's Life Layout for Creative Embellishments

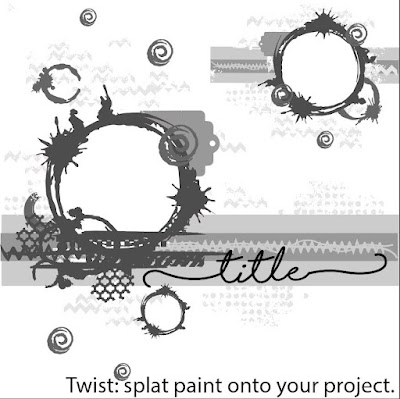
Creative Embellishment's November challenge is up and it's based on this layout sketch with a twist to splash paint onto your prooject.


My Project


I chose my favorite subjects for this layout, my dogs and my husband!


I framed both my photos with the doily frame set, using the largest frame on the bottom photo and the medium frame on the upper photo.  I rubbed them with Sizzzix Luster Wax to make them gold.  I love their wax, it's so easy to apply with your finger or even a small paintbrush.  Once it's dried, it doesn't rub off.

Isn' this such a sweet picture, "a man and his dog".  Tisha is definitely Daddy's girl while Nika is mine!


I love all the grunge pieces at Creative Embellishments; this one's call Grunge Corner. I heat embossed most of it with Stampendous Aged Black and used a little wax on the bottom part.  I love the black powder mottled with gold and silver to give it an aged appearance.

I also used the Heart Bokeh Stencil and stenciled on some hearts,  I don't think that worked out too well as they kind of fade away but I was afraid red hearts would be "too much".


Our dogs are spoiled rotten and we wouldn't have it any other way.  These photos were taken in our motorhome and they ar sharing a seat in the picture above.  Ha, normally they each take a chair leaving us with no where to sit!  So I thought this title was rather appropriate!  It is heat embossed with black embossing powder.


Check out that adorable little dog bone in the lower left.  It's black acrylic and part of a line of laser cut acrylics at Creative Embellishments.    I really love the acrylics!


I used Graphic 45's new Well Groomed collection to make this layout and spashed on some black paint to meet the twist.  It is so perfect for dog and cat projects!

I hope to see your project entered into the November challenge!  Thanks for stopping by!


Products from Creative Embellishments

It's a Dogs Life


LinkWithin

Related Posts Plugin for WordPress, Blogger...