Pages

Thursday, November 30, 2017

Christmas Card for Cheery Lynn Designs

 The Cheery Lynn Poinsettia Strip 6 Piece Die Set makes the perfect poinsettias for cards, not too big, not too small, just right!  The poinsettias perfectly set off the pristine winter scene from Graphic 45's Winter Wonderland collection.

The greeting is a metal piece.  I rubbed some white paint into the etched sentiment to make it stand out and then mounted it on a small die cut from the Nesting Doll- Oval #1 set.


 To make that pretty wreath, I used  the Joy To The World Wreath  set and cut two wreaths from slightly different colored paper and glued them together such that the branches opposed each other.  Then I added some Stickles to mimic holly berries.

I really love sparkle on my Christmas cards so I used a red Wink of Stella pen to brush sparkle all ove the poinsettias.  It's too bad that you can't really see that so much in the photo, but it is there!  The flower centers are some white centers that I purchased and used alcohol ink to color.


 The inside of the card is simple, I used the Merry Christmas Set 2 Piece Die Set for the sentiment and added a border strip.  Easy!

Tuesday, November 21, 2017

Christmas Ornaments with Cheery Lynn Designs

Christmas time is all about family and children in my mind and here is a project you can do with the kids.  These are shaker tree ornaments that are so simple to make.  All you need is our shaker die kits (listed below).  The shaker kits even come with shakers but I opted to use glass beads for shakers in these.

Make two shakers and glue them together.  For the bell, cut the clapper off one so they match up nicely.  Since I used white foam to make the shakers, I took a Faber-Castell Big Brush Pen in green and inked all around the two shakers.  You could use any ink to color the edges.

Embellish the tree top and the bell with a small flower from the Floral Bouquet Kit 8 Piece Die Set .  Shown here are the reverse sides of the above - these are all ready to tie on your tree.


Cheery Lynn Designs Products Used:


Other Products Used: 

Monday, November 20, 2017

Memories Layout for Creative Embellishments

Last fall we met good friends in Nashville, TN and while there we toured the Jack Daniels distillery.  I captured this photo in the tasting room, I think Jen and Ken were enjoying themselves.  

I used several different pieces of chipboard from the Creative Embellishments store.  There are so many different styles to chose from, you're sure to find lots that you need!

I used Stampendous Aged Ochre embossing enamel on the title strip that is from the Small Moments Border Words set.

The two corner chippies are Flourish Page Corner 5 and I heat embossed those with Stampendous Aged Spice embossing enamel.  These flourishes go so well with this Stamperia Time is an Illusion paper collection.  I love using corner pieces like these as I think they often pull everything together.


I love the Acorn Clusters, they are so perfect for embellishing a fall layout.  I gave the chipboard some color with Lindy's mist.  I use mist because it doesn't fill in the etchings on the chipboard.  


Creative Embellishments Products Used:

Thanks for joining me today, I appreciate it.  Be sure to stop by the Creative Embellishments blog and join in our November challenge.  You could win a $50 gift certificate to the CE store!


Thursday, November 16, 2017

Friends Layout for Creative Embellishments

Hi Creative Embellishment fans!  Today I'm sharing a layout with a photo of some special Graphic 45 friends taken on my trip to Seattle last August.

I used the Infinite Rectangle Frame to focus the eye on the photo.taken at a great restaurant in Portland.  Yummy food!  The frame is lightly finished with gold embossing powder.

I used a piece of the Floral Lace Border and painted it with acrylic vintage white.

Underneath the flowers I used Flourish 15 that has been finished with Lindy's Mists.  I used the entire flourish with this cluster but on the other two clusters, I cut the flourish apart and tucked in pieces here and there.

I used papers from Graphic 45's Penny's Paperdoll Family to create this layout.  On the background I did some stenciling with the Metal Stencil.  Then I dotted on some glue and sprinkled in some Mini Prills.

I hope you'll join in our challenge this month. All you have to do is upload your project to our blog.
You could win a gift certificate to the store!  The monthly challenge post is the first post on the blog.  And, don't forget to stop by the store and see the new products that Nicolle is always adding!

Sunday, November 12, 2017

Tutorial using Sizzix's ScoreBoard XL Die - Cantilever Sewing Box by Eileen Hull


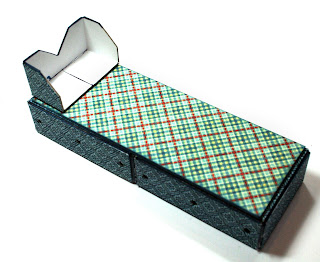
I adore this little box, it is so cute and useful too!  It has 6 little drawers that are perfect for tucking away small pieces of jewelry, sewing notions, any little thing that needs a home.  I used Sizzix's ScoreBoard XL Die - Cantilever Sewing Box by Eileen Hull to make this sweet box.

 It opens up so effortlessly to reveal 6 little drawers that are about 2" x 3".


I'm gifting this to my Mom as she was an amazing seamstress and she has this very chest in life size that stands on the floor.  

You can easily make this box, here's what you'll need:

Sizzix Adhesive Sheets or any adhesive sheet
Sizzix Matboard or any medium weight chipboard
Glue
36 small brads
Ink
Paper - I've used Graphic 45's Penny's Paper Doll Family collection

Tutorial

Step 1: Cut 2 sheets of paper and 2 sheets of mat/chip board to 6" x 12". You will  need several sheets of Sizzix Mat Board or any medium weight chipboard.


Step 2:  Apply adhesive to the mat board being sure to burnish the adhesive down.  Then, adhere the paper right side up to the mat board.  Place the design paper side down over the die and run through your machine. (You will need the Sizzix extended platform for this step.)   Die-cut everything on the die two times.  You should have all the pieces you will need at this point except for 4 drawers and a bottom which we'll cut in step 8.


Step 3:  You can use additional sheets of Sizzix mat board or use smaller scraps as I have to cut the remaining drawers.  Use only the drawer section of the die and cut 4 more drawers.


Step 4:  You should have 6 drawers, 2 lids, 2 leg sets, 4 long hinges and 8 short hinges as shown in the photo.


Step 5:  Ink around all the pieces.  I like to use a Faber-Castell Big Brush pen to get in the scored grooves, a Sharpie also works.  DO be careful not to let the pen slip!


Step 6:  I decided to also cover the inside of the boxes.  If your inside is a nice white color you may wish to omit this step or you could paint the inside.

To cover the inside with design paper, die-cut 6 drawers using just the drawer part of the die.  I used adhesive sheets to adhere to the inside box.

Adhere the paper to the bottom first and then the sides.

Step 7:  Next, form the boxes by gluing the sides together using a fast drying glue or hot glue.  I found hot glue easier to use but it is a bit messy. You can use a rubber band to hold the sides together until the glue sets up. 

Step 8:  Assemble all 6 drawers.

Step 9:  Cut a piece of chip or mat board and a piece of design paper to 2 1/8" x 6" to use as a base for the drawers.

Step 10:  Adhere the design paper to the chip or mat board.

Step 11:  Apply Scor-tape or other adhesive to the narrow side of a box (side without the holes).  Also apply Scor-tape to the underside of the base in Step 10.


Step 12:  Adhere two of the boxes together as shown below.  Then adhere the two boxes to the base.

Step 13:  Fold the leg assembly on the score lines and ink.  Adhere to the bottom of the base as shown.

Step 14:  Use small brad to attach the 4 long hinges on the outer corners as  shown.  Attach 4 short hinges to the middle as shown.

Step 15:  Stack two boxes on top and attach the hinges as shown.

Step 16:  Stack the remaining two boxes and attach the remaining 4 hinges as shown as well as attaching the other hinges.  Attach a brad through the 4 empty holes on each side.

Step 17:  The two remaining pieces are the lids. (Sorry I forgot to photo this step)  Ink all around and fold on the score line.  Apply Scor-tape to the small tab and insert into the top box so that it forms a cover as shown below.  Then embellish as you desire.


Thanks for joining me for this very long post!  Christmas is coming and it is past time to think about your special handmade gifts.   one off my list.  Oh dear, time is flying by too fast!!!

Have you seen Eileen's Journal Treasury?  It's a great book packed full of journal ideas and it's on sale!  It's also a great gift idea, just click on the image for more information.


Journal Treasury

Friday, November 10, 2017

Cheery Lynn Designs Gift Tags


Give your gifts that extra special something with a handmade gift tag! I used a variety of  Cheery Lynn Designs dies to create these quick, but oh so cute gift tags.


On this tag I used two ovals from the Oval Scalloped LG Stackers Nesting Dies 6 Piece Die Set and topped that with a Christmas tree diecut  with the Christmas Tree Shaker Die.  The "to & from" words were diecut with the To And From Gift Envelope set.  Then I punched a hole at the top, added an eyelet and ribbon and its ready to go.  Gift tags need to be quick and easy and this sure fits the bill.

Here's another tag that is built on a white scalloped oval diecut with the Oval Scalloped LG Stackers Nesting Dies.   Then I layered on a red  Royal Scandinavian Oval Doily , next a blue layer cut with Nesting Doll- Oval #2 5 Piece Die Set and finally topped with Patches The Snowman .

Now this moose is one of my favorites!  He's from the Merry Christmoose set.  He's layered over patterned paper diecut with the French Flair Pierce And Cut Tool  and the red cardstock base is diecut with the Horizon French Flair Boutique Stacker Frames.


Here's a view of the back of each tag.  The fun thing about tags is that you can use your scraps.   Imy scraps are from Graphic 45's Winter Wonderland collection and I was so happy to have a used for all those little pieces of my cherished Graphic 45 papers!


Cheery Lynn Dies Used:


Wednesday, November 8, 2017

Oh Henry! layout with Creative Embellishments

I love this photo of me,  fellow Graphic 45 designer Annette Green, and Henry the G45 office dog.  We had such a grand time visiting the Graphic 45 offices and playing with Henry.  I've used Creative Embellishments chipboard, wood veneers and flair buttons to embellish my layout.   I used my favorite Graphic 45 collection, Raining Cats & Dogs.  AND guess what?  Raining Cats & Dogs is being released again as a Deluxe Collector's Edition.  Yippee!!  It'll be shipping early November so if you missed it first time around, you've got a second chance!


Here you can see the adorable paw print and Love flair buttons along with the wood veneer dog dish and bone.  I used a little alcohol ink on the flair buttons to age them a bit and on the veneer, I just used a little mist for color.

I used a Circle Doodle Frame to focus on my photo.  These are such fun and playful frames with their random doodles.  On the riht side you can see another paw print flair button.  These are great for adding that little something extra to your projects.
I placed my title over a Washi Tape Shape Cluster that I misted with a little gold Lindy's.  It sets off the title perfectly!


We always have a fun monthly challenge going on, be sure and stop by our blog to find out all about it.  The challenge post is always the first post on the page.


LinkWithin

Related Posts Plugin for WordPress, Blogger...