Pages

Tuesday, December 29, 2020

Snowy Layout for Creative Embellishments

It's my last project for the year and I have to tell you, I sure hope 2021 is a big improvement over 2020!  Wow, what a disasterous start to this new decade!

I created this layout for Creative Embellishments (CE) featuring my first two standard poodles, Chena and Chili.  They were quite the pair and loved to play in the snow.  I think they would have stayed outside all day long if I had let them!

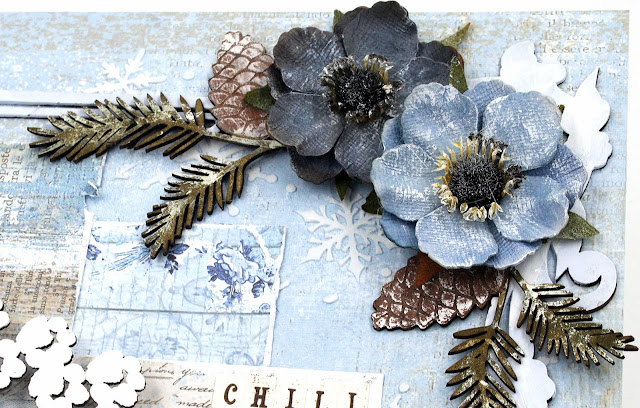
To create my snowy scene I started with paper from the Stamperia Blue Land collection and stenciled snowflakes on the background with a CE stencil.  Next I painted a large floral frame with blue and white paint, muddling the colors together.  I created some paper layers and topped with my photo that is popped up with cardboard to add dimension to the layout.


I use a paw print frame, painted white, to accentuate the photo.


I used pine cone clusters as the base for my floral clusters.  They were first colored with Lindy's mists and after the mists dried, I dry brushed with white paint.  I like to use mist as a coloring agent because it does not fill in the etched lines on the chipboard and doesn't cover the design elements.  I topped the clusters with flowers that have also been dry brushed with white paint.


To add to the snowy look, I randomly added white painted snowflakes around the layout.


Products from Creative Embellishments


Chipboard Snowflakes 


HOW TO ENTER THE CHALLENGE

 Be sure to check ou the monthly challenge on the Creative Embellishments Blog because  you could win a great gift certificate to the store!  To find the monthly challenges just click on the pink search icon on the upper right side of the page and enter "challenge" in the search box and the challenges will pop up.  Here are the rules:
  • Create a NEW project layout, mini album, tag, card, canvas, etc….as of  December 1st, 2020.
  • It is required that you mention in your blog post that you are playing along at Creative Embellishments together with a link back to our blog page. Please make sure to reference our challenge. Please, no old projects. (meaning projects from previous months that may fit the challenge) Please share only new projects.
  • Please add your entry to the inlinkz tool below to be eligible for the prize. You have until the last day of each month 11:55 pm eastern time to enter.
  • Simply add a link to your FB photo (if you do not have a blog) featuring your challenge entry. Let us know how you were inspired by the photo.
  • Combining with other challenges is permitted.
  • We would love to see you USE AT LEAST 1 OF CE products on your projects but it isn’t required to play along.
  • WINNERS will have 2 weeks to claim their prize. The winner will be announced on this post the day after the challenge ends. Keep an eye out to see if you are a winner.

Thanks so much for visiting, I appreciate it!  Wishing you a very Happy New Year!

Maggi xoxo


Tuesday, December 8, 2020

Eileen Hull Designs Roundup of My Favorite 2020 Projects

This month Eileen's Design Team is doing a roundup of their favorite projects for 2020.  While it is great fun to go back and look at these projects, picking out a few favorites is hard!

I'll start with this Gift Box that is perfectly sized to hold a teacup.  Picking out my most favorite project wasn't too hard, this Teacup Gift Box is the clear winner.  After that I love them all the same!  Kinda like kids, you love them all but sometimes for different reasons! Click on the link below for all the details!

Teacup Gift Box


I love this Trinket Box because it is so feminine and you know I'm a sucker for flowers, lots of flowers!  Click on the link to discover a little trick that makes this go together really well.

Trinket Box


I love making Halloween anything and this Pocket Journal was loads of fun.  In the tutorial I show you how to make pages and pockets.

Halloween Journal and Page Ideas


I really, really, love Eileen's Pocket Notebook die because it's such a great size.  Here's a nature themed journal and that photo of the bear on the front?  I took that picture in Katmai National Park.  Click on the link below for all the details and some more bear pictures.

Nature Themed Pocket Notebook


Although 2020 has been the year that should not have been, at least Eileen has brought us much joy with her new dies!  Stay tuned for 2021, it's gotta be better.  And best of all, new dies are coming!!

xoxo Maggi

Wednesday, December 2, 2020

Kitchen Decor with Creative Embellishments

Creative Embellishments has added some great home decor products like this 6.7" x 11.9" mason jar.  It's made from 3/16" thick plywood and is laser cut.

I painted the jar with black chalkboard paint thinking that I could use this as a menu board or just to write little notes.  You could put a magnet on the back and attach it to the fridge! 


I love this chipboard title because the cook always needs an appreciative kiss or two, right? It's colored with Stampendous Aged Hunter Embossing Enamel.


 I colored the lid with Prima Metallique Wax - Old Silver.  I wanted to be sure that the detail etching in the lid was still visible after coloring so I didn't want to use paint as paint usually fills in the etchings.  Mist might have worked also but I really like how the wax worked with the wood.

Add a gingham checked ribbon and a flower to complete this country look!


HOW TO ENTER THE CHALLENGE

 Be sure to check ou the monthly challenge on the Creative Embellishments Blog because  you could win a great gift certificate to the store!  To find the monthly challenges just click on the pink search icon on the upper right side of the page and enter "challenge" in the search box and the challenges will pop up.  Here are the rules:
  • Create a NEW project layout, mini album, tag, card, canvas, etc….as of  December 1st, 2020.
  • It is required that you mention in your blog post that you are playing along at Creative Embellishments together with a link back to our blog page. Please make sure to reference our challenge. Please, no old projects. (meaning projects from previous months that may fit the challenge) Please share only new projects.
  • Please add your entry to the inlinkz tool below to be eligible for the prize. You have until the last day of each month 11:55 pm eastern time to enter.
  • Simply add a link to your FB photo (if you do not have a blog) featuring your challenge entry. Let us know how you were inspired by the photo.
  • Combining with other challenges is permitted.
  • We would love to see you USE AT LEAST 1 OF CE products on your projects but it isn’t required to play along.
  • WINNERS will have 2 weeks to claim their prize. The winner will be announced on this post the day after the challenge ends. Keep an eye out to see if you are a winner.

Thanks so much for visiting, I appreciate it!

Maggi xoxo


Tuesday, December 1, 2020

December Challenge at Creative Embellishments

Time for the last challenge of 2020 at Creative Embellishments!  The biggest challenge of the year has just been getting through it, but I guess that's another story...

Anyway, here's the inspiration photo for the challenge and the twist is anything goes!


My Take on the Challenge


I'm stil working on that mini album and I admit that I am not so sure it's going to get finished in time.  There's always next year right??  Again, I used a large frame on this 8 x 8 page.  I love big frames; they seem to pull everything together. I used white embossing powder on the frame as I usually do.


The words are heat embossed with Stampendous Red Tinsel embossing powder.  Love how that gives the words a sparkly effect.


Thanks for stopping by!


Creative Embellishments Chipboard


HOW TO ENTER THE CHALLENGE


 Be sure to check ou the monthly challenge on the Creative Embellishments Blog because  you could win a great gift certificate to the store!  To find the monthly challenges just click on the pink search icon on the upper right side of the page and enter "challenge" in the search box and the challenges will pop up.  Here are the rules:
  • Create a NEW project layout, mini album, tag, card, canvas, etc….as of  November 1st, 2020.
  • It is required that you mention in your blog post that you are playing along at Creative Embellishments together with a link back to our blog page. Please make sure to reference our challenge. Please, no old projects. (meaning projects from previous months that may fit the challenge) Please share only new projects.
  • Please add your entry to the inlinkz tool below to be eligible for the prize. You have until the last day of each month 11:55 pm eastern time to enter.
  • Simply add a link to your FB photo (if you do not have a blog) featuring your challenge entry. Let us know how you were inspired by the photo.
  • Combining with other challenges is permitted.
  • We would love to see you USE AT LEAST 1 OF CE products on your projects but it isn’t required to play along.
  • WINNERS will have 2 weeks to claim their prize. The winner will be announced on this post the day after the challenge ends. Keep an eye out to see if you are a winner.

Thanks so much for visiting, I appreciate it!

Maggi xoxo


Friday, November 27, 2020

Comfort & Joy - Journal the Holidays with Eileen Hull and her Design Team

Comfort & Joy

Join Eileen Hull, the design and educator teams on the Facebook Eileen Hull Facebook Fan Club page for fun and inspiration all during December!  It's time for some Comfort & Joy after this crazy depressing year!


Thankfully 2020 is rapidly winding down right?  I imagine that for many of us, the holidays will be different and maybe a little lonely.  I will be missing my family and the gatherings that we usually have at Thanksgiving and Christmas.  I'm used to cooking big holiday meals and this year I'm cooking for just two.  🙍

We need some fun in our lives so all of us at Eileen Hull Designs put our heads together and came up with an event that you can participate in as much or as little as you'd like. It's a challenge of sorts and we'd like to see you to make a Holiday Journal for this season using any of Eileen Hull Design's book dies.  Your journal could include activities, photos, recipes, shopping lists, daily thoughts, etc.  Really, it can include anything you want; after all, it's your journal!

Every Monday, Wednesday, and Friday between November 27th and December 23rd there will be a post in the Eileen Hull Fan Club from one of Eileen's team members with a prompt for a journal page.  These prompts are meant to get your creative thoughts flowing and give you page ideas for your Holiday Journal.  It might be in the form of a blog post, Facebook Live, recorded quick video, or a Facebook post in the group.  It's up to you to take it from there and we can't wait to see what you come up with, so please share your covers and pages with us in the Eileen Hull Fan Club.

My Journal Cover

I used Eileen's Pocket Notebook die and an older Graphic 45 collection, St. Nicholas  to create my journal.  I'm not much for ink, stamps and mixed media.  I am a paper person and I love to mix patterned papers.


I chose a black base pattern for the outer covers and a red patterned paper for the inside.  Then I added more patterned paper layers.  On the front I added a green layer and then a fussy cut of Santa from the collection.  


I added 3 labels to the cover, Memories, Traditions, and Moments.  I cut them on my Cameo and they are easier to read in real but just didn't photo all that well, sorry.   I placed the words on a strip of solid paper and then popped it up so that the words would stand out.


Some Tips for Assembling Your Notebook:

  1. Begin by cutting matboard slightly larger than the size of your chosen notebook covers.
  2. Select your papers, cut the same size as in step 1 and place adhesive to the back of the papers.  I like to use Eileen's adhesive sheets for this.  Peel the back off the adhesive and adhere the paper to the matboard.  Do the same for both sides of the matboard.  I find that putting the adhesive on the paper rather than the matboard works better.
  3. Place the side down on the journal die that you want for the front cover and run the paper covered matboard through your die-cutting machine.  You will need to cut a front and a back journal cover.  If you are using directional paper, pay attention to the direction.
  4. Now start adding paper layers and embellishments to your covers!


I hope to see you on the Facebook Eileen Hull Fan Club page!  Thanks for stopping by my blog today!


Tuesday, November 24, 2020

Creative Embellishments Steampunk Gingerbread Man

Meet Steampunk Willie!  He's from Creative Embellishments and is made from  3/8" plywood and measures 10" x 11.9".  He's the perfect size for home decor so I  have him on my craftroom door.  He's so cute and makes me smile!


 I used Graphic 45's new Christmas Time Collection to make his vest.  The vest is my own freehand design.  The bow is CE chipboard heat embossed with Stampendous Red Tinsel.


I used a Silhouette cut file to make the hat and used an assortment of Creative Embellishments chipboard gears heat embossed with gold embossing powder to embellish. 


Don't you just love his googles?  They are Creative Embellishments.  I used a 1/2" circle punch for his eyes and buttons.  The googles and all the gears are heat embossed with Stampendous Aged Gold.


The wings are another item from Creative Embellishments large selection of Steampunk items.  I heat embossed this quite some time ago so I'm not positive what I used, but I think it's Stampendous Aged Copper embossing powder.  As soon as the powder melted I sprinked on gold micro beads.


Other Supplies

Silhouette Steampunk Top Hat cut file
Graphic 45 Christmas Time Collection
Feathers
Christmas Red Stickles
Stampendous Aged Gold Embossing Powder
Stampendous Aged Copper Embossing Powder
Stampendous Red Tinsel Embossing Powder
Gold Micro-beads
Cardstock - Black, Khaki
Distress Oxide Ink - Black Soot
Dienamites Holly Die
1/2" Circle Punch

HOW TO ENTER THE CHALLENGE

 Be sure to check ou the monthly challenge on the Creative Embellishments Blog because  you could win a great gift certificate to the store!  To find the monthly challenges just click on the pink search icon on the upper right side of the page and enter "challenge" in the search box and the challenges will pop up.  Here are the rules:
  • Create a NEW project layout, mini album, tag, card, canvas, etc….as of  November 1st, 2020.
  • It is required that you mention in your blog post that you are playing along at Creative Embellishments together with a link back to our blog page. Please make sure to reference our challenge. Please, no old projects. (meaning projects from previous months that may fit the challenge) Please share only new projects.
  • Please add your entry to the inlinkz tool below to be eligible for the prize. You have until the last day of each month 11:55 pm eastern time to enter.
  • Simply add a link to your FB photo (if you do not have a blog) featuring your challenge entry. Let us know how you were inspired by the photo.
  • Combining with other challenges is permitted.
  • We would love to see you USE AT LEAST 1 OF CE products on your projects but it isn’t required to play along.
  • WINNERS will have 2 weeks to claim their prize. The winner will be announced on this post the day after the challenge ends. Keep an eye out to see if you are a winner.

Thanks so much for visiting, I appreciate it!

Maggi xoxo


Tuesday, November 10, 2020

Christmas Cards with Eileen Hull Designs by Sizzix


Do you have your Christmas cards made? Me? ha ha ha, no I don't.  My cards usually end up being Happy New Year's 'cause I just can't seem to get it together!

But today I am sharing two cards I made using some of Eileen Hull Designs dies.
This is a simple layered card using Eileens's Mitten and Credit Card Sleeve & Tags dies.  Gift cards are always appreciated and this year shopping with the crowds is not an option for me.  So I'll be gifting some cards but I like to put those gift cards  in either a fun box or card.  The gift card is inserted in the glove on this card.  Then, there's plenty of room inside to write a personal message.

There are 4 layers: 1) the red card base, 2) ivory cardstock, 3) green striped and 4) Santa's Wishlist.  Those layers make a nice presentation for the pretty glove.


I die-cut a mitten and then used the slot die from the Credit Card Framelits Set and cut a scalloped slot in the glove where a gift card can be inserted.  I decorated the glove with paper ric rac, also cut with the mitten die.  Then I tied a bow and glued at the wrist of the glove.


This is one of my favorite style cards, a step card.  They are fun to make but cutting the card base is a little bit of a challenge.  Here's a template you can use to make a step card.  I used a couple of layers in the center and a cut-apart as a backdrop for Eileen's cheery snowman.

You can't see it much in this photo, but I used Stickles to highlight the berries, pinecones and branches.  It gives the card a really pretty sparkle.  I also popped up the snowman to add some depth to the card.


I cut the snowman pieces and assembled.  I trimmed his stocking cap with Stamperia Arctic Snow. 


Here's a side view of the card so you can see the step.

Thanks for stopping by today.  Be sure to go over to Eileen's blog to see what else the design team has been doing.


Wednesday, November 4, 2020

Clean and Simple Layouts for Creative Embellishments

I'm just now getting back to that mini album I was working on a couple of months ago.  I gotta get my rear in gear 'cause Christmas is coming and this is a gift!

Today I've got a couple layouts to share with you.  They are simple, but made fun and pretty, by using Creative Embellishments chipboard.


This layout celebrates Family and you have an instant title when it's cut out of the frame!


I used a frame from the Together Frame Set on this layout and heat embossed it with Emerald CreekAncient Amber Embossing powder. 


A Pine Cone Cluster colored with Lindy's Mists topped with a festive poinsettia finishes this cheerful holiday layout.  I love how Lindy's adds sparkle to the color.  The poinsettia is brushed with Wind of Stella gold.


Sweet baby's first Christmas.  I think she looks so cute in the center of the wreath.


I used Distress Embossing Glaze in Fired Brick for the Merry Christmas title.  The set that this comes is is really nice as it has 5 titles all in different fonts and sizes.


The bow is embossed the same as the title.  I used two colors of Lindy's to color the Holly Wreath.  I think using multiple colors gives depth and more closely mimics nature.I used a circle from the Love Artist's Trading Coins set to frame the photo and place it on top of the inner wreath.


Both of these layouts are going in an 8 x 8 mini that I'm making.  They are quick and relatively flat so that they will fit nicely in the book.  Thanks for taking a look!


Other Supplies

Graphic 45 Christmas Time 12 x 12 Collection
Tim Holtz Distress Embossing Glaze - Fired Brick
Lindy's Mists: Frosty Forest Green, Ponderosa Pines Green


HOW TO ENTER THE CHALLENGE


 Be sure to check ou the monthly challenge on the Creative Embellishments Blog because  you could win a great gift certificate to the store!  To find the monthly challenges just click on the pink search icon on the upper right side of the page and enter "challenge" in the search box and the challenges will pop up.  Here are the rules:
  • Create a NEW project layout, mini album, tag, card, canvas, etc….as of  November 1st, 2020.
  • It is required that you mention in your blog post that you are playing along at Creative Embellishments together with a link back to our blog page. Please make sure to reference our challenge. Please, no old projects. (meaning projects from previous months that may fit the challenge) Please share only new projects.
  • Please add your entry to the inlinkz tool below to be eligible for the prize. You have until the last day of each month 11:55 pm eastern time to enter.
  • Simply add a link to your FB photo (if you do not have a blog) featuring your challenge entry. Let us know how you were inspired by the photo.
  • Combining with other challenges is permitted.
  • We would love to see you USE AT LEAST 1 OF CE products on your projects but it isn’t required to play along.
  • WINNERS will have 2 weeks to claim their prize. The winner will be announced on this post the day after the challenge ends. Keep an eye out to see if you are a winner.

Thanks so much for visiting, I appreciate it!

Maggi xoxo


Sunday, November 1, 2020

November Creative Embellishments Challenge

Time for another Creative Embellishments challenge.  Can you believe it is November already?  Well let's just write 2020 off as a bad joke on the world and get on with 2021!  Yay, only two months to go.

While you're waiting for this horrible year to come to a close, why not join in the Creative Embellishments challenge?  It's easy, just see the rules at the end of this post.  

Here's the November inspiration photo, aren't the colors gorgeous?  Our challenges always include a twist and this month the twist is to add a favorite quote to your project.


I decided to make a large tag featuring a favorite quote and fall colors.


To create my tage, i first covered a large tag with design paper and then die-cut a rectangle and the quote.  The Distressed Stamps are heat embossed with detail black embossing powder.  I used cardboard to pop up my layers and add dimension to my tag and then tucked the Distressed Stamps under the cut-apart quote.


Then I added a Prima vine and some larger Petaloo flowers. Simple, but effective I think!


HOW TO ENTER THE CHALLENGE


 Be sure to check ou the monthly challenge on the Creative Embellishments Blog because  you could win a great gift certificate to the store!  To find the monthly challenges just click on the pink search icon on the upper right side of the page and enter "challenge" in the search box and the challenges will pop up.  Here are the rules:
  • Create a NEW project layout, mini album, tag, card, canvas, etc….as of  November 1st, 2020.
  • It is required that you mention in your blog post that you are playing along at Creative Embellishments together with a link back to our blog page. Please make sure to reference our challenge. Please, no old projects. (meaning projects from previous months that may fit the challenge) Please share only new projects.
  • Please add your entry to the inlinkz tool below to be eligible for the prize. You have until the last day of each month 11:55 pm eastern time to enter.
  • Simply add a link to your FB photo (if you do not have a blog) featuring your challenge entry. Let us know how you were inspired by the photo.
  • Combining with other challenges is permitted.
  • We would love to see you USE AT LEAST 1 OF CE products on your projects but it isn’t required to play along.
  • WINNERS will have 2 weeks to claim their prize. The winner will be announced on this post the day after the challenge ends. Keep an eye out to see if you are a winner.

Thanks so much for visiting, I appreciate it!

Maggi xoxo


LinkWithin

Related Posts Plugin for WordPress, Blogger...