Pages

Saturday, February 29, 2020

Saturday Showcase at The Funkie Junkie Boutique Blog

Join me at  The Funkie Junkie Boutique Blog where I'll show you how this tag came together using 3-D Texture Fades, 3-D Impresslits Embossing Folders and some other great supplies from The Funkie Junkie Boutique.


Wednesday, February 26, 2020

Metallic Gear Box for Eileen Hull Designs


There are so many great things you can do with Eileen Hull's new Gift  Box die. I decided to make something masculine and a bit grungy this time around.  I love how this turned out, so did my husband!


Cover mat board or chipboard with black cardstock (or you could use black mat board) and assemble the basic box.  Use gold gilding paste or similar along all the edges as shown in the photo.  I used Prima Vintage Gold wax.


Cut 4 pieces of metallic Kraft stock 3 1/2" square and embossed using a Sizzix Texture Fades embossing folder.  These folders give a great deep embossed impression. 


Mist with black mist and use a paper towel to blot the excess mist and set the papers aside to dry.

Then adhere a BasicGrey Magnet set to the scalloped flap.  Peel off the backing paper and press to the box.  That way the magnets on the flap and the box are perfectly aligned.

Now you can adhere the paper to the sides of the box.  The magnet will still hold through the paper. Rub a bit of Aged Brass wax over the gold paper to knock down the shine and give an aged appearance.


Take the small scalloped piece and rub with gold wax; then adhere over the closure flap as shown in the photo below.  You can glue a button, key, use your imagination to the front as an embellishment.  I've had this steampunk key for a while and thought it worked nicely.


Supplies

Sizzix ScoreBoards XL Die - Box, Gift w/Scallop Edges
Idea-ology - Tim Holtz - 8 x 8 Kraft Stock - Metallic
Sizzix - Tim Holtz - Alterations Collection - 3D Texture Fades - Embossing Folder - Mechanics
Ranger Ink - Inkssentials - Dylusions Ink Spray - Black Marble

Prima Art Alchemy - Metallique Wax - Vintage Gold
Prima Art Alchemy - Metallique Wax - Aged Brass
BasicGrey Magnets

This box is so versatile, look how you can make it so feminine and fit for a tea cup.  Here's a link to this post, LINK.


Be sure to stop by Eileen Hull's blog to see all the great projects from her design team, you're sure to see something that will inspire you!

Thanks for visiting, hope you have a great crafty day!


Tuesday, February 25, 2020

Creative Embellishments Chipboard for Dog Lovers!

There's nothing I love better than scrapping my sweet poodles!  Aren't they just adorable, curled up together in front of the fire?

Sometimes it's just nice to make a clean and simple layout and this one fits that bill.  Just a few paper layers and some fabulous Creative Embellishments chipboard is all you need.


I used an older Authentique collection, Companions, to make this.  First I stenciled on some paw prints with the Muddy Paws stencil.  Then I used a few chipboard pawprints scattered randomly on the layout.  I used a paint pen to color the hearts inside the pawprints.


I love this frame and it sure was perfect for the picture of the poodles snoozing in front of the fireplace.


Then I heat embossed the hearts that come with the Paw Prints set and the frame with Ranger Antiquities Chinese Red embossing powder.   Layer up the papers, add the pretty chippies and you’re done!

Supplies
From the Creative Embellishments shop:
Muddy Paws Stencil
A Dog's Life Frame Set
Paw Prints

Other:
Authentique Companions Collection
Ranger Antiquities Chinese Red Embossing Powder

Thanks for stopping by today!


Wednesday, February 19, 2020

Funkie Junkie Blog Leap Year Challenge

The Challenge

Suzz is hosting this super fun challenge, Leap into The Odd, this time around.  She says, "2020 is a leap year which means we will have an additional day in February ending on an odd number of days. The definition of odd is "different from what is usual or expected; strange." My challenge to you is to create something odd or unusual. Also you must tell us what is odd or unusual in your project when you share it with us!"  

When I first read the description, I was stumped so be sure to take a look at all the Funkie Junkie designer's blogs to get some ideas for what is strange and unusual, it really isn't all that hard.

Here are some ideas from Suzz to get you started, use an unusual color on something that is not normal, (example: black heart, black roses, etc).  Include an unexpected pocket, pop-up or hidden fold on your art. Use a funny expression that doesn't go with the tone of the front of the card.
Anything Willy Wonka, Alice in Wonderland, etc. all works (something out of proportion, two things mixed together that don't normally go together etc.)

My Take on the Challenge

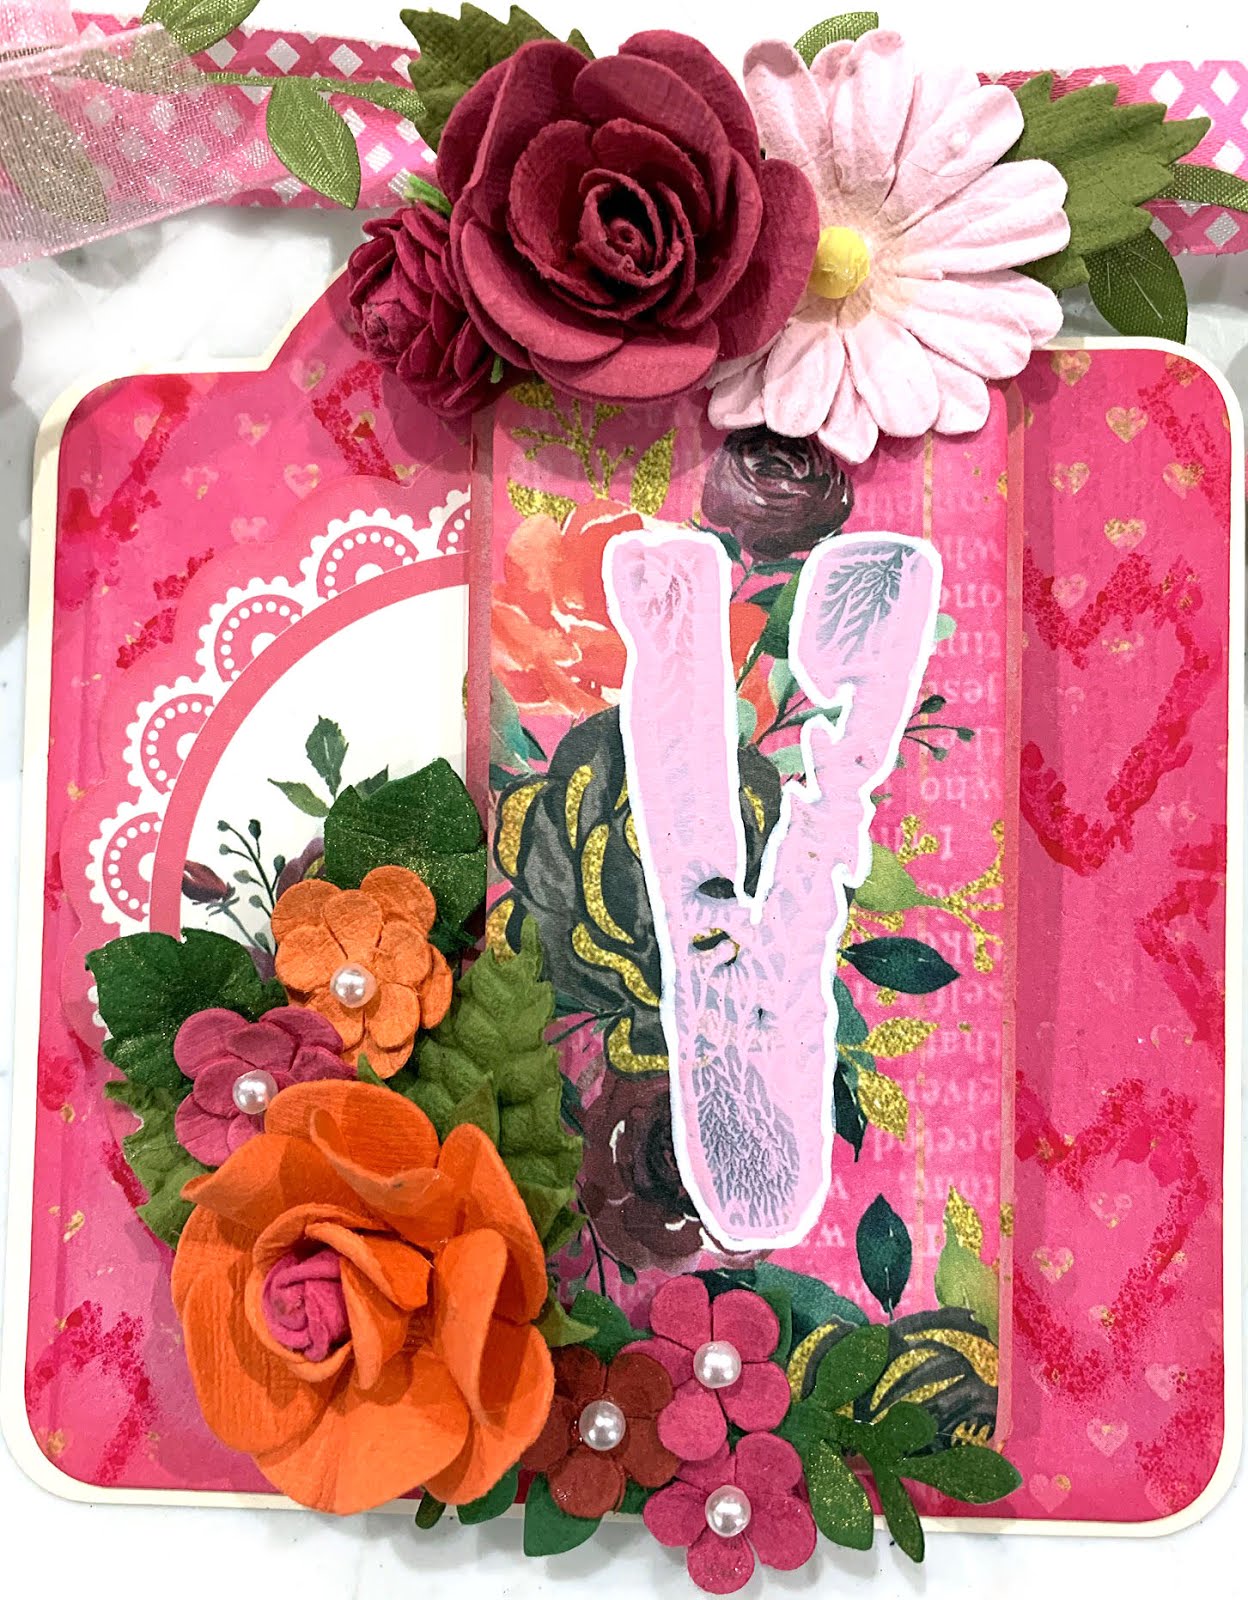
What is odd and unusual about my project?  It's all about metal flowers and petals which we know don't exist in nature but the do look nice in my mind!  In addition to the metal framed roses, I've used metal flowers underneath the roses.


I used a Texture Fades embossing folder to create the focal image of my project. Then I misted it with black mist and  used a paper towel to soak up excess mist.

I will have a tutorial for how this tag was made and the techniques I used on the February 29th Saturday Showcase.  That's a fitting odd date!


I created layers first with a layer of Stamperia paper (Oriental Garden collection), then burlap, stenciling, lace, embossed metallic paper, and finally a baseboard frame and flowers.


How to Enter the Challenge

Create a vintage or shabby chic project and link it up to The Funkie Junkie Challenge Blog Challenge, Leap into the Odd. The Design Team will choose their top four picks, with the winner being invited to be a guest designer in one of our Funkie Junkie Challenges. The other three winners will receive Top 3 badges to display on their blogs. Everyone who enters and follows the rules will be entered into a draw to have the chance to win a $25 spending spree at The Funkie Junkie Boutique.

Challenge Guidelines

The guidelines for entering are simple; create a new vintage or shabby chic project following the challenge theme, link to your post (not just your blog) and also include a link back to this challenge in your post. You can combine our challenge with up to 10 challenges (including this one) to be in with a chance of winning. If you are entering through a public forum (such as Instagram) you'll need to include the words 'Funkie Junkie Boutique Challenge'. Also, please be sure to turn off your Word Verification so our Design Team can leave comments on your blogs. Make sure you follow these rules as unfortunately, we have had to eliminate entrants from the prize draws in the past.
Thanks so much for stopping by today. Be sure to take a look at the creations of my talented teammates, you can see their creations here, at The Funkie Junkie Blog.


Tim Holtz Idea-ology Layers & Baseboard Frames
Stampendous Aged Ivory Embossing Enamel
Creative Embellishments Chipboard Word Create
Little Birdie flowers

Thanks so much for stopping by!  

Monday, February 17, 2020

Creative Embellishments Love tag.


The day for sweethearts has come and gone but I'm still in that love frame of mind and so I used a large Creative Embellishments chipboard tag to create this piece.

The first thing I did was cover the tag with paper from an older Simple Stories collection,  to make the tag.  All the chipboard pieces are heat embossed with Stampendous Chunky White and Aged Gold embossing powders.

This is the grunge heart corner, one of my favorite chipboard pieces and the cherub is an old Prima  piece.


This is a Grunge Circle Frame, layered over a cut-apart from the collection and popped up with cardboard to give the tag dimension.  At the bottom I used a piece of the Dripping Heart Lace border.


Last step was to pull it all together with some pretty flowers and a bow at the top made from white netting.


Large Tags
Grunge Heart Corner
Grunge Circle Frames
Dripping Heart Lace Border

Thanks so much for stopping by today!  Be sure to join in the monthly challenges because, you could win a $50 gift certificate to the Creative Embellishments store, now that is sweet!! The challenge is usually the first post on our blog.


Friday, February 14, 2020

LIttle Birdie Banner


Hello friends, I am so delighted to share my first project as a designer for Little Birdie Crafts!  Since it is February, I thought a LOVE banner would be perfect to show you and Little Birdie some LOVE!
Banners are great decorations for all occasions.

I used a new collection from Little Birdie, True Love for my banner along with chalk paint, mist and of course, lots of gorgeous Little Birdie flowers!


I used square tags for my banner and simply layered on pieces of design paper and some of the punch out doilies included in the collection.  To create my letters, I used some old sponge letters stamps that I've had forever and stamped with Little Birdie's Rose Blush Chalk Paint onto design paper.  After the paint dried, I went around the letters with a white paint pen so that the letters would stand out.  Then I popped up the letter with cardboard to create dimension.


I used Little Birdie mist and a stencil to add hearts to the background on this tag.


I used a pretty satin ribbon to string all my tags together.  Before I added the flowers I glued on a leaf vine ribbon which I think looks so pretty layered over the pink check satin ribbon. I used small clothespins to clip some of the scalloped doilies to the ribbon.


My favorite part of any project is adding the flowers and Little Birdie Crafts has so many beautiful ones to choose from!  I like to use different sizes and colors when I'm embellishing with flowers.

This is my favorite flower that I used with this project. I adore the yellow center and the yellow rosebud peaking off on the side.  One thing I really love about Little Birdie's flowers is that so often the flowers are layered with leaves.
Flowers:
Other Supplies
Graphic 45 Square Tags - Ivory
Graphic 45 Square Tag Die
Distress Ink - Worn Lipstick
MM Foam Letters
Satin Checked Ribbon
Olive Leaf Ribbon
Small Clothespins
Dyan Reavely Paint Pen - White

Thanks so much for stopping by today.   Hope your day is filled with fun!  Maggi


Happy News for Me!

I am thrilled to join the design team at Little Birdie Crafts!  They are an amazing socially responsible  company out of India.

Little Birdie Crafts just recently announced some very exciting news, they have opened a US based warehouse!  I know many Little Birdie fans have been frustrated with the difficulty in obtaining their wonderful products.  Now you can order online through Little Birdie Crafts online website and your order will be quickly shipped from the US.  There are no minimum order quantities either and right now, free shipping on orders over $99.  The new website is great and easy to maneuver.  Click here to visit:  Little Birdie Crafts


Saturday, February 8, 2020

Saturday Showcase at The Funkie Junkie Boutique Blog

Join me on The Funkie Junkie Boutique Blog where I'm showcasing new collections from Ciao Bella with a mixed media tag and 2 layouts. The Funkie Junkie is now carrying Ciao Bella papers and I think you're going to love them.  Just click here to go to The Funkie Junkie Boutique Blog.

I'll also show you how I made this tag.


Wednesday, February 5, 2020

Valentine's Card for The Funkie Junkie Boutique Challenge Blog

The Challenge

It's time for a new challenge on The Funkie Junkie Boutique blog and the theme is Love is All Around Us.  Jenny is hosting this sweetheart's challenge and she says:  "With Valentines Day approaching it's time to share a little love. Create something vintage or shabby chic featuring hearts. Here's a few ideas to get you started."


My Take on the Challenge

I love to make shakers and so I thought a heart shaped shaker was just the thing to use!


I chose a sheet of white cardsotck for my base card and I also die-cut a panel using a Sizzix Thinlits - Bouquet.  It is such an intricate die and make the prettiest floral pattern.   Then I layered on 2 cut-aparts from the Graphic 45 Fashion Forward calendar collection.  I also added a decorative strip inside the card.


Underneath the die-cut panel, I placed a piece of design paper also from Graphic 45's Fashion Forward calendar collection (Fbruary page).  The shaker was made with Cheery Lynn shaker dies but you can make shakers using any nested die set.  Here is a link to a tutorial that I did some time ago, for making shakers with nested dies.


How to Enter the Challenge

Create a vintage or shabby chic project and link it up to The Funkie Junkie Challenge Blog Challenge, Love is All Around Us.  The Design Team will choose their top four picks, with the winner being invited to be a guest designer in one of our Funkie Junkie Challenges. The other three winners will receive Top 3 badges to display on their blogs. Everyone who enters and follows the rules will be entered into a draw to have the chance to win a $25 spending spree at The Funkie Junkie Boutique.

Thanks so much for stopping by today. Be sure to take a look at the creations of my talented teammates, you can see their creations here, at 
The Funkie Junkie Blog.


Supplies from The Funkie Junkie Boutique

Graphic 45 - Fashion Forward - 12x12" Collection


Thanks for joining me today and Happy Valentine's to you!  I hope lots of chocolate and love finds it way to you.


Make a Recipe Holder with Eileen Hull's Display Stand


Eileen Hull's Display Stand has so many uses and I love that it can be situated two different way.

Like this:

Or Like this:


I turned it into a recipe card holder.  My recipes are always getting food and whatever else is flying around my kitchen stuck on them.   I splash water on them and the ink runs, and before you know it, you can hardly read the recipe.

This little recipe holder takes care of the problem as I added a clear plastic sheet to the top so that you just slip your recipe under the plastic.  Now I can read the recipe but its protected from my sloopy cooking!


Here I've got a recipe card under the plastic.  Tab on the right is adhered to the plastic sheet making it easy to lift.  I used washi tape at the top to secure the plastic sheet.


I added a cute little spoon for a fun embellishment.


Supplies


Saturday, February 1, 2020

Love Shaker Tag from Creative Embellishments

The Challenge

'Tis the season of love and chocolate and I've made some tags to attach to my Valentine's surprise.  Here's the mood board, I just took off on the red and pink colors and vintage vibe.


The Tags


I used Creative Embellishments Love Shaker Set on this Graphic 45 regular sized tag. The papers I used are from the Graphic 45 Love Notes collection.

Putting the shaker together for this tag is a little more involved than some, but still not bad.  I first glued 2 Love frame pieces to the base.   Then I heat embossed inside the frame with Stampendous Aged Ivory.  I did this because I thought the frame would not adhere as well to the embossed material and it is really important to get a good seal, otherwise, your shaker material can leak out.

Take the third frame piece and alter (paint, heat emboss etc.).  Then glue it to the acrylic cover and set aside to dry.     It is really IMPORTANT  to let this dry completely because the shaker pieces will stick to the glue if it is not dry. 

The letters "V" and "O" have cut outs that also need to be glued together and adhered to the base piece and acrylic piece.

After everything is dry, add your shaker material inside the base and glue the acrylic assembly to the base.

Again, let this dry before you shake it up!  Now cover the tag, glue on the shaker and add whatever embellishments you like and you're done!


This is a much simpler, layered tag.  I first covered the tag with design paper and then used cardboard to pop up the next layer.  I then heat embossed the circle frame from the Love Artist Trading Coins set with Stampendous Red Tinsel embossing powder.  I loved the glittery effect of this powder.  Then just glue on the circle, add some flowers and pop up the "How do I Love Thee" sticker.  Top with a pretty bow and flowers.  Easy peasy, all done, ready to gift!

Supplies from the Creative Embellishments Store


Other Supplies
Stampendous Frontage Aged Ivory
Stampendous Red Tinsel
Petaloo Flowers


How to enter the challenge
The monthly challenge is always the first post on the Creative Embellishments Blog.  Be sure to check it out, you could win a great gift certificate to the store!  Here are the rules:
  • Create a NEW project layout, mini album, tag, card, canvas, etc….as of  February 1st, 2020.
  • It is required that you mention in your blog post that you are playing along at Creative Embellishments together with a link back to our blog page. Please make sure to reference our challenge. Please, no old projects. (meaning projects from previous months that may fit the challenge) Please share only new projects.
  • Please add your entry to the inlinkz tool below to be eligible for the prize. You have until the last day of each month 11:55 pm eastern time to enter.
  • Simply add a link to your FB photo (if you do not have a blog) featuring your challenge entry. Let us know how you were inspired by the photo.
  • Combining with other challenges is permitted.
  • We would love to see you USE AT LEAST 1 OF CE products on your projects but it isn’t required to play along.
  • WINNERS will have 2 weeks to claim their prize. The winner will be announced on this post the day after the challenge ends. Keep an eye out to see if you are a winner.
Thanks for stopping in today, get our your craft supplies and enter this challenge!

Maggi xxoxo


LinkWithin

Related Posts Plugin for WordPress, Blogger...