Pages

Tuesday, May 31, 2016

The Flying Unicorn Store June kit.


The Flying Unicorn monthly, Your Passion Your Art kit is now bigger than ever - overflowing with all the goodies you desire with all our previous kits rolled into one GRAND collection...

ONE month, ONE kit.

The Flying Unicorn now includes papers, an "Off the Page" project, a mixed media collection, and all the coordinated embellishments in one kit, and at one crazy magical Price of 59.99!!


Get excited and enjoy what the creative team has done with the Flying Unicorn JUNE 2016 Your Passion. Your Art Kit.


Paper - 12x12 and 6x6 for smaller projects

Embellishments - Flowers, Trim, Chipboard


Layouts from the Design Team


Cards


Off the Page and Mixed Art


Are you visiting the Tallahassee area soon?
Stop in and say hello!
Plan a day trip! Crops -Classes-Fun
1168 Capital Circle SE
Tallahassee FL 32301
Tel: 850.270.6366 Toll Free 800.231.7119


Tuesday, May 24, 2016

Graphic 45's World's Fair Layout

I've done another multi-pic layout for you.  It is harder to be "artistic" when you have a lot of photos on your page, but certainly not impossible and really, sometimes it's all about the memories right?  With lots of layers,  some fussy cut elements, and a few flowers, you can still make a great layout, tell a story and preserve your memories all at the same time!

In 2010 my husband and I were lucky enough to be campground hosts at Denali National Park in Alaska.  What a great way to spend the summer and what a grand adventure it was for us!  I thought the beautiful vintage colors of World's Fair went so nicely with our photos that we took at Polychrome Pass.  It is so named because of the rainbow of vivid colors you can see from the Pass, not to mention the occasional bear that strolls through the parking lot.  Yep, there I was following this big grizzly bear around trying to get a National Geographic kinda photo.  What was I thinking?? And I didn't get any National Geographic quality photos either 'cause my hands were shaking too bad!


Petaloo's Botanica blooms in pistachio go so well with this collection!

 Embellish your photo heavy pages with fussy cut elements and use lots of layers underneath your photos to give your layout a lot of WOW factor and pop.


Supplies: Graphic 45 World's Fair 12 x 12 collection:
Envision Expo 4501172
Mind Over Matter 4501168
Balloon Bouquet 4501174
Wonder Works 4501169
Ticket to Ride 4501174
Flower Power 4501171
Tags & Pockets 4501178
Graphic 45 Bohemian Bazaar Kaleidoscope 12 x 12

Other:
Petaloo Botanica flowers pistachio
I am Roses cherry blossoms tangerine
Orange ribbon
Distress Ink - rusty hinge

ColorBox Graphic 45 Decades ink - Bon Voyage Blue

Monday, May 23, 2016

Petaloo and Simple Stories Blog Hop

Today, I'm sharing some Petaloo and Simple Stories goodness.  I always know that summer is on its way when the hummingbirds come back.  During the summer we have hummingbirds every where!  I put out 4 feeders and spend a fortune on sugar keeping these beautiful little jewels fed! (You don't need to buy hummingbird nectar, just mix 1/4 cup sugar to each cup of water, heat until the sugar dissolves and you've got hummingbird nectar. Oh and another thing that is really, really important, keep your hummingbird feeders spotless.  The black mold that can grow on the feeders kills these sweet little birds.  It causes their tongues to swell so that they can not feed and they starve to death.)

OK back to flowers and paper!  Aren't these just the prettiest colors?  Kind of reminds me of sherbert, mmmm, yum.   Petaloo's new Gerber Daisies go so beautifully with this Simple Stories collection, Sunshine & Happiness.

I accented the center paper strip with pink Petaloo burlap trim. I cut a 12" strip in half since I just have the burlap peeking out the edges. I think it adds a nice touch to my layout.

I love these new blooms, they are so delicate looking and they blend so well with Simple Stories papers.

 Check out the velvet teal blossoms.  They are so pretty and they are a great value with 24 pieces in a pack including leaves and jute cord.  They have long stems which I twisted together with some of the leaves creating a small vine.  Then, I just tucked in some gerber daisies.

 I couldn't resist adding this cute little chipboard bird from the collection.  He's such a cute little accent.


Supplies


Simple Stories Sunshine & Happiness Collection:


I really like to make layouts telling a story about our life.  Simple Stories Bloom & Grow collection was perfect for telling a garden story.  You can see that we had a really beautiful garden growing; then the rains began.  It rained and rained and then, you know what, it rained some more.     As soon as the water subsided, we dug up all the potatos. but it was too late, we lost the better part of 100 lbs of potatoes.


At least I have some beautiful Petaloo blooms to brighten up my poor drowned garden photo! I am loving the new gerber daisies.  They are appropriate since I have berry bushes at the back of my garden.

I tucked in some Darjeeling blooms too.  They have always been a favorite of mine.

Take a look at the Flowering Berry Pick.  Those blooms look just like the ones on my blackberry bushes!   I love how the berry picks add that extra texture to my floral clusters.

Supplies

Petaloo:

Simple Stories Bloom & Grow Collection:

Thanks for visiting today.  


Monday, May 16, 2016

Going for Gold with Riddersholm Tailgate Marked from the Flying Unicorn Store

Sometimes I just get a little crazy with the metallic colors and today was one of those days.  I just thought these Ridersholm papers from the Flying Unicorn Store would look great with lots of gold accents.  Scroll down for a tutorial to build this page.


TUTORIAL
Step 1:
I'm using Ridersholm's Tailgate Marked collection and this page is called Poppy.  It will be the base layer of the layout.


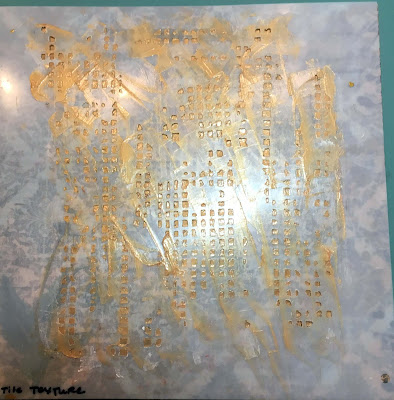
Use a mask to stencil on gold masking paste.  I used TCW's Tile Texture Mask (12 x 12) and Studio 490 gold embossing paste.

Here's how the paper looked after removing the mask.  The effect is subtle but pretty and as the paste dries the gold takes on a really shiny metallic look.

Step 2 - cut layers:
  • Cut a  mat for your photo from Woodland sized slightly larger than your photo.
  • Cut a rectangle 5 x 12" from Farfalla.
  • Cut a rectangle 3.25 x 10.25" from Woodland
Use border punches to punch around the two larger rectangles.  I used Martha Stewart Deco Flowers and Cherish.  Use whatever punches you have or leave plain.  Ink the edges with gold ink or paint.  I used gold StazOn.

Step 3 - Prepare chipboard:

I've taken Creative Embellishments Berries and cut the berries and branches apart making 3 pieces from each piece of chipboard.  
  • Paint the berries with gold paint.  I used Silks Emperor's Gold
  • Stain the branches with mist.  I first dabbed on Lindy's Frost Forest Green which is a great color that goes well with this paper.  After that dried I dabbed on a bit of Lindy's Gator Gumbo Olive which added gold sparkle to my branches.  You can achieve a similar effect with water colors or other paints/mists.  Just look for two colors that are similar to what I've used.
  • Ignore the doily in the photo, I decided not to use it.


Step 4 - embossing the edges:
Now dab on a little embossing ink randomly around the edge of the page.  Then sprinkle on Stampendous Aged Gold Embossing Enamel or something similar, and heat.  It is better to do smaller portions of the edge at a time so that you don't get embossing powder everywhere!

After you've done all the edges, it should look something like this:

Step 5 - prepare the flowers:

I've sprayed Petaloo Black Burlap Blossoms and sprayed them lightly with Prima Empress Gold mist.  This softens the black color and adds a really pretty metallic gold cast to them.

Step 6 - prepare the layers:
Cut cardboard to fit under both of the layers and glue to the back of each piece.  You could also use foam tape.

Adhere and center the smaller rectangle on top.

Step 7 - Assembly:
  • Adhere the layers to the base page about 4" from the top.
  • Chose a title and adhere on the right side of the popped up layers as shown in the below photo.  I've used a Creative Embellishments word chippy painted with Silks Emperor's Gold.
  • I decided to pop up my photo too so put either cardboard or foam tape underneath that.  You will need to put two layers of cardboard at the top of the photo where it hangs off the layered rectangles.

Step 8 - the fun part!
Now its time to add your flowers and embellishments.  Add the flowers as shown on the right building a cluster on the right bottom of the photo and right side.  Tuck in the gold painted berries and the branches.  I also tucked in a cameo from my stash.

You may need to add a little piece of cardboard to your flower, especially for the flowers at the top of the photo because of all the popped up layers.

Floral cluster at the left top of the photo.

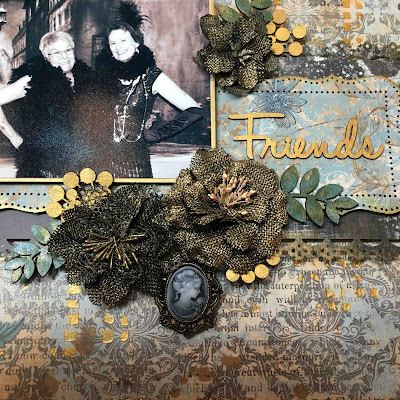
And that's it, all finished!  I love the rich gold look of this page, I think it  makes it look antique to go along with the vintage look of the photo.  The photo is not really vintage, it's me and a friend dressed up in flapper clothes while on a cruise with Graphic 45.  

I love how the gold mist looks on the black flowers.


Supplies - links are to the Flying Unicorn Store:
Poppy
Farfalla
Woodland

Other:
TCW Tile Texture mask - use any texture mask
Studio 490 Metallic Gold embossing paste
StazOn Gold Metallic ink
Martha Stewart punch around the page punches - Cherish, Deco Flower
Creative Embellishments Friends Word Set
Lindy's Starburst Mists:  Gator Gumbo Olive, Frost Forest Green
Stampendous Aged Gold Embossing Enamel

Thanks so much for stopping by today.  


LinkWithin

Related Posts Plugin for WordPress, Blogger...