Pages

Friday, January 31, 2014

Flying Unicorn February Kit of the Month on sale NOW!


We are so excited to reveal to you the February Kit of the Month!

We begin with out MAIN KIT and the INCLUDED off the page project :


You get the latest and the greatest in the main kit to get your creative mojo flowing and we will always include an off the page project ( OTP) that will inspire and sometimes challenge your inspiration- but always creative fun! Our February kit is filled with Your Passion .Your Art !

Welcome to the Mixed Art! Our new add on kit will always come with a canvas and a variety mediums, mists, tools that compliment that main kit.

http://www.flyingunicornstore.com/category_s/1265.htm

Our Mixed Passion add on kit if filled with flowers, ribbons, trinkets and more. Jam packed with embellishments that compliment the main kit.


Small Art. Big Passion is exactly what this new add on kit is filled with. Papers that are on a smaller scale that will compliment the main kit and embellishments that are scaled to compliment the main kit or to entice you to create cards, tags, atc's and so much more !


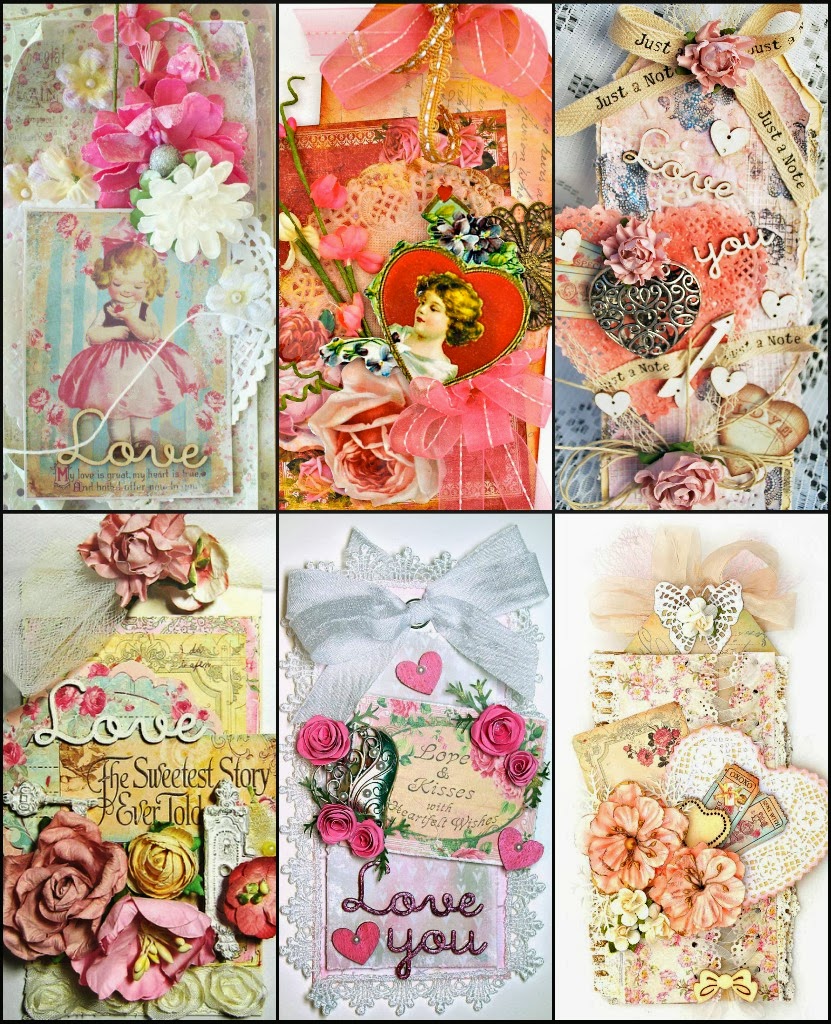
On February 01, 2014 we will spotlight and showcase all the amazing creations from our Guest Designer Aida Domisiewicz - but for now - enjoy the sneak peeks !


http://www.flyingunicornstore.com/category_s/1265.htm
Look at the incredible inspired projects:


Our educational creativeness explodes this month with amazing creations and tutoriasl by Erica,Tammy and Mish.

Join Erica on February 4th 2014 - In our BAP forums to create a gorgeous heart.

Join Tammy on February 6th on our You Tube Channel where she show us some amazing techniques creating a layout.

Join Mish on February 7th in our BAP forums as she created some mixed media heaven using the February kit of the month


February's YOUR ART. YOUR PASSION. IS NOW AVAILABLE! Like the years past - Art should be a passion and not an obligation - so there are no sign ups for our kits and once they are gone they are gone!

Wednesday, January 29, 2014

Leaky Shed Studios and Authentique are teaming up!

Leaky Shed Studio has teamed up with Authentique for a blog hop sure to inspire you to make some great  Valentine's projects using Leaky Shed's Valentine themed chippies and Authentique's fabulous Smitten collection!  
Be sure to stop by both blogs today through Friday to see the design team's inspirational projects.  There are cards, tags, minis, layouts, all kinds of fun projects that are sure to get your imagination whirling!  And there's an awesome giveaway for some lucky winner! 

Here are a couple of sneak peeks of my projects that are on the Leaky Shed blog today!


And now for the giveaway!
What a great package of stunning chipboard!  There's a mini  and lots of other fun pieces including that adorable Cupid piece I've used in my sneak above and those double hearts.  Check Leaky Shed's blog for details on how to enter the giveaway.


Monday, January 27, 2014

Mojo Monday Sketch at the Flying Unicorn

Every Monday we have a new sketch  up at the Flying Unicorn.  Alda did today's sketch and as always, its a beauty!  The Flying Unicorn invites you to use our sketch anywhere but we'd love to see what you do with it.


I used the January KOM and a few things from my stash to interprete the sketch.  I love the Jodie Lee art journal papers that are included in the kit.  They are so perfect for mixed media applications and I've used plenty on this layout.  I used the mask and masking paste from the kit as well as the Lindy's mists and some paint too.    From my stash, I used Viva Maya paint  in olive was used to paint the roman numerals and dabble on the Flying Unicorn flower adornments.

We have some fun challenges running this month and I also did this layout for our January One Little Word challenge.  My word is Change and I've illustrated that with a photo I took at the Bay of Fundy in Canada where the tide changes some 55 feet every cycle.  This photo was taken at low tide, and where the people are standing in the photo would be completely covered with water well over their heads at high tide.  

Then I included a photo of myself and a subword, control, to indicate that I have control of my life and it is up to me to make a change in my life.


Supplies: (From the January KOM unless otherwise noted)
Cardstock: Core'dinations (stash)
Patterned paper: Prima Jodie Lee Art Journal collection
Letters: Doodlebug Design– Just my Type Alphas; Prima Fairy Rhymes alpha stickers (stash)
Flowers: Prima Le Mia, Prima Abbey
Ink: Ranger Archival black (stash), Mixed Media Inx Chiffon
Mist: Lindy's Maidenhair Fern Green, Grab a Guy Gold, Wild Honeysuckle Coral,
Masks: Clear Scraps Shattered Glass
Masking paste: 13 Arts Ayeeda Gesso
Paint: Viva Maya Olive (stash)
Other: Flying Unicorn Metal Adornments, Tim Holtz Idea-ology Word Band, Kaisercraft Journal clear stamp, Prima Mechanicals Vintage Trinkets Roman Numerals
Unknown: Greenery and berries from Hobby Lobby  (stash)

Thanks for stopping by!  I hope you'll five this sketch a try and show us at the Flying Unicorn.

Saturday, January 25, 2014

Let's make a layered mixed media tag - tutorial

We're having an online crop at the Flying Unicorn this weekend!  Come join in the fun and enter my challenge to make a tag, you could win a $20 gift certificate for the Flying Unicorn store!

My challenge is to make a tag, not any old tag, but a Valentine non-traditional layered tag with mixed media.  Whew, that was a mouthful!!

Here are the steps to my tag.  Feel free to scraplift this exactly or modify however you wish!

1.  Start by cutting your base tag.  I like long tags so mine is 8 1/2" long x 3 1/2".  I used Prima Jodie Lee Art Journal paper from the January Flying Unicorn kit for my base.

2.  Now let's do some masking.  I've use a TCW tattered hearts mask and 13 Arts Ayeeda Gesso from the January.  Quickly was your mask off while the gesso is drying.  After the gesso is dry, place the mask back over the hearts and dab on some paints.  I used 13 Arts Matte Lemon and Matte Pink paints from the Flying Unicorn Mixed Arts kit.


3.  Now let's make some of our layers  that we're going to use on the tag.  Cut a frame of some sort that works with whatever image you chose for your tag.  I cut a Spellbinders square frame to go under my image (you can see my image in step 8)   Instead of cutting a frame you can just make a paper layer.

Then tear a paper a little larger that the frame or layer you just made.

Now let's have some fun with embossing powder.  Dabble a little embossing ink here and there on your base tag and around the edges of your frame.  Sprinkle with embossing powder of your choice (I used Stampendous aged gold and silver.)

I love this Leaky Shed cupid chipboard piece and decided to dress it up with Stampendous Shabby White Embossing Enamel.


4.  Ooops!  I left this circle out.  Cut a 2 1/2" circle and add some embossing powder around the edges and heat emboss.  Add a word to the circle if you like.

5.  Let's begin our assembly.  Cut a piece of cardboard to fit underneath the paper layer.  I glued it to the tag so as to be sure the cardboard does not show from the backside of the tag.


6.  Adhere the torn paper to the cardboard hanging it off the side.

Cut a piece of cardboard to fit under the frame or paper layer that you made in step 3.


 7.  Layer the frame over the torn paper.


8.  Layer an image within the frame.  Glue some lace to the bottom of the tag and then add some flowers.  Glue cupid to the flowers.


9.  At this point I thought the tag looked a little too heavy on the left side so I added the circle and the rectangular scrap to the right side.  The rectangle is layered under the base tag and the circle is layered over the base tag.
OK so I have to tell the truth and tell you that I got some ink on my lace by mistake but hey, that's no problem.  Just dab some more ink on the lace and it will look like ot was planned that way!
Add some ribbons at the top and that's it!


 Leaky Shed cupid chipboard


Lots of other challenges going on too as well as games and door prizes, come join us!


G45 LO with Curiosity Shoppe

This was a really fun LO to do. I used G45's Olde Curiosity Shoppe. I made the pine cones using Timmy Tattered Pinecones die. The metal flower has been altered with Aged Bronze embossing poserder. The trees and one of the moose are metal that I've sprayed with a copper brown Tattered Angels mist.

The photo is from a trip my Dad and husband took to the Arctic Circle when we lived in Alaska.


Supplies:

Patterned paper: Graphic 45 Olde Curiosity Shoppe collection: frame - Counting Down 4500426, base - Race for Time - 4500431, black dot - Mecurial Masterpiece 4500425, floral - Exquisite Motif 4500427, postcard - Bazaar of Wonders 4500435
Letters: Heidi Swapp chipboard words
Chipboard: Bo Bunny Kraft Wood Elements Clocks
Embossing powder: Stampendous aged copper embossing enamel
Diecuts and punches: Alterations Tattered Pinecones
Ink: Distress Gathered Twigs, Scattered Straw
Mist: Lindy's Cattail Copper Brown
Masks: TCW Tiny Circles
Masking paste: 13 Arts Ayeeda Gesso
Other: Prima Special Screws 891626, Time Holtz ticket, Darice metal moose and trees,
Unknown: metal flower, burlap

Thursday, January 23, 2014

Layout with Studio 75 Little Black Dress Collection

I love this new collection, Little Black Dress,  from Studio 75, it is perfect for vintage styling! I used this week's Mojo Monday sketch for my layout.


My photo is of an old homestead cabin at Mabry Mill on the Blue Ridge Parkway here in NC.  I love the spinning wheel and the bright skeins of yarn that were spun.  I placed one of my favorite Leaky Shed pieces behind the photo, Clock #3 that I painted with Silks in Emperor Gold.  I cut the piece of the clock that would be hidden underneath the phto and clustered in with my flowers on the right.


Supplies:
Patterned paper: Studio 75 Little Black Dress collection, dark script - 05, light floral 06, dot 07, behind photo - 03
Chipboard: Leaky Shed Studio Clock #3
Embossing powder: Stampendous aged gold on the metal butterfly
Diecuts and punches: Sizzix leafy branch
Flowers: Prima Audrey 571580, Prima Sugar Blooms Melody 549060, Petaloo Mixed Texture Amber 1256 203, Petaloo Botanica faux dried amber 1102 003
Mist: Lindy's Grab a Guy Gold
Paint: Splash of Color Emperor's Gold Silks
Other: Flying Unicorn butterfly Adornment, Tim Holtz film strip

Thanks for stopping by, I really appreciate the time that it takes to visit!!


Sunday, January 19, 2014

Flying Unicorn Chipboard Challenge

Tammy is hosting a chippy challenge at the Flying Unicorn this month and  I did this layout for inspiration. The papers I used are from the January KOM, just love them!  They are Prima Jodie Lee Art Journal papers.

For this challenge you had to use 3 different sized chippies and they had to be treated in some fashion.  I used 6 chippies, just because I'm excessive, :-)!  I used Leaky Shed Studios chippies.  The large round chippie and the floral corner chippier were painted gold.  The gears were heat embossed with Stampendous bronze aged embossing enamel.  The butterfly is sprayed with Dylusions white linen mist.  Notice that the butterfly wings are kind of curly.  This is a fun thing to do, soak your chippie in water just long enough that you can separate the chipboard into layers.  Then let the layers dry and mist, paint, etc.  Its really a cool technique to use on chipboard is really is great with wings.

I did some masking with Timmy's Rays mask and TCW's mini paint lids.  I used Stamper's Anonymous grunge stamps to stamp the two different black patterns you see.  Then to finish it all I dabble teal and white paint here and there with a sea sponge.


 Here you can see the layers I created by separating the chipboard.


Supplies:
paper: Prima Jodie Lee Art Journal, black cardstock
Letters: Doodlebug Design-Just My Type Alphas;
Chipboard: Leaky Shed Studio Ring Frame Large, Flower Corner Small, Spring Butterfly small, Watch Parts
Embossing powder: Stampendous aged bronze embossing enamel
Diecuts and punches: Lucky 8 Lace Kerchief
Flowers: Manor House, Petaloo,
Ink: Ranger Black Archival
Mist: Lindy's Maidenhair Fern, Grab a Guy Gold, Wild Honeysuckle Coral
Masks: Tim Holtz Rays, TCW Paint Lids
Masking paste: 13 Arts Ayeeda Gesso
Paint: Splash of Color Emperor Gold, Claudine Hellmuth Classic Teal & Blank Canvas; 13 Arts Matte Coral
Other: Stamper's Anonymous Ultimate Grunge stamp; Kaisercraft Journal clear stamp

LinkWithin

Related Posts Plugin for WordPress, Blogger...