Pages

Thursday, August 28, 2014

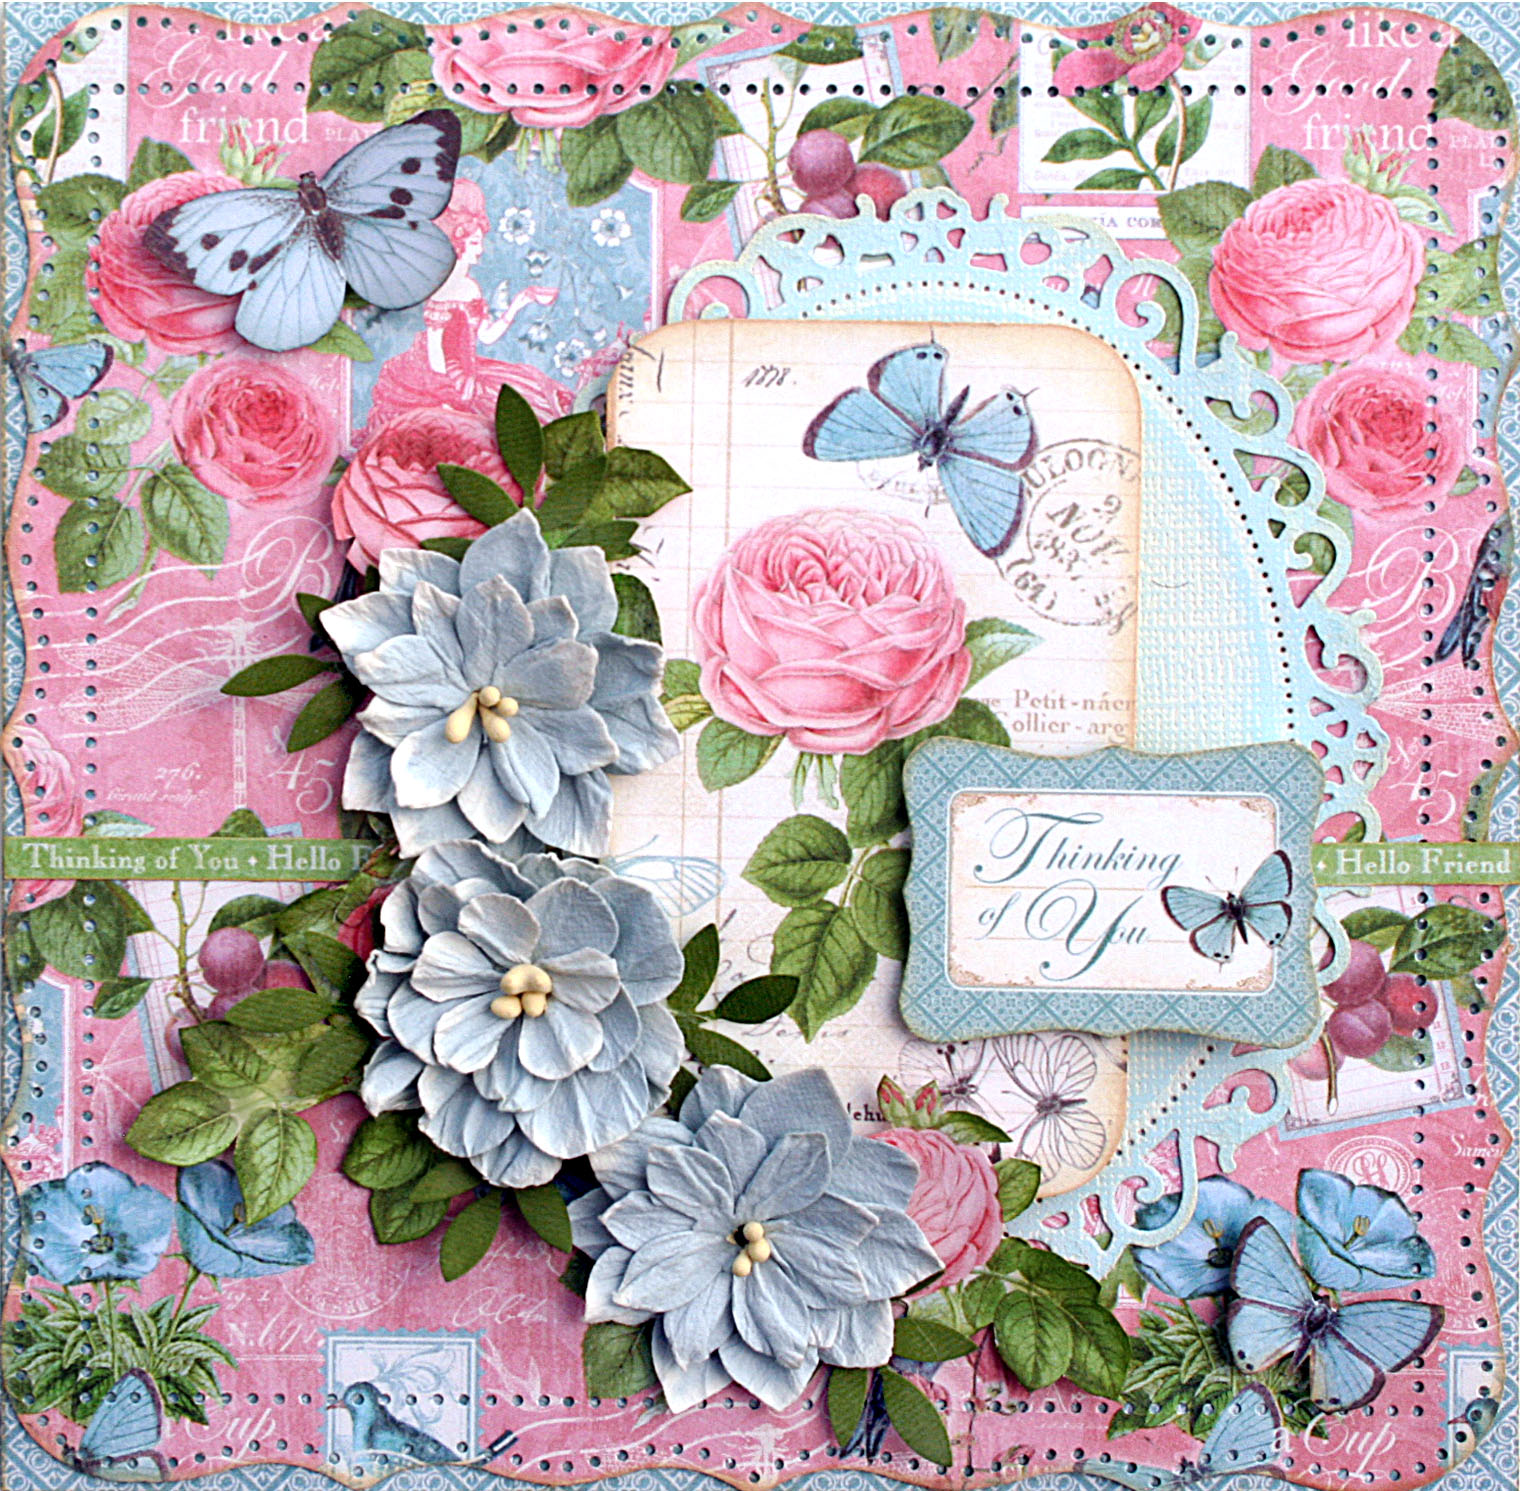
Graphic 45 Botanical Tea card

If you know me very well, you know that I don't "do" cards, however, I decided that 2014 would be my year of THE CARD!  Meaning that I was going to make cards and get comfortable with doing so.  So over the last several days I have made 3 cards and I am finally getting the hang of it and finding it to be a pleasant experience.

I used Graphic 45's Botanical Tea 8 x 8 collection pad for this.  I find the smaller size works easier for me in making cards and tags.  Even then, this is a large card at 6.5" square.


I fussy cut some of the flowers from the collection to layer underneath my Petaloo flowers.  I also fussy cut a couple of the butterflies.


I like to pop up my layers on my cards and tags and you can see that effect in this photo. 

Supplies

Botanical Tea 8 x 8 Pad 4500888
Botanical Tea Tags & Pockets 4500892
Core'dinations Cottage Porch cardstock
Petaloo Teastained Blue Dahlias
Spellbinders Floral Ovals die
Prima Dry Sand ink
Martha Stewart Cherish and Leaf Branch punches


Thanks for stopping by my blog, I do appreciate it!


Wednesday, August 27, 2014

Fabscraps Oh Sew Beautiful

Oh Sew Beautiful is such a lovely romantic collection!  Here I've torn and distressed the papers to give it all a shabby look.  Laces from my stash help accentuate the shabby chic look.


For this project you will need:

  • Fabscraps Oh Sew Beautiful paper collection:  C68 001, 008 x 2, 002,
  • Chipboard piece DC68 002 Stitch in Time
  • Fabscraps stencil Square Stripes DS010
  • White mist such as Dylusions white linen
  • Embossing powder
  • Ink
  • Laces, flowers, diecut frame
Instructions:

  1. Cut a piece of C68 008 Haberdashery about 9 x 10.75", tear a small strip from all the edges, distress and ink.   Stencil over the entire page with Fabscraps stencil DS010 and a white mist.
  2. Cut out an oval about 6 x 9" from Stitch in Time 001.  Adhere to the lower right side of the paper in step 1.
  3. Glue lace all around the oval.
  4. Cut Floral Pattern 002 10.5 x 11.5"  Distress and ink the edges.
  5. Distress and ink the edges of 2nd sheet of C68 008 Haberdashery.  Glue a wide piece of lace to the left side.
  6. Assemble the papers as shown in the photo, curling the left top corner of the smaller Haberdashery paper.
  7. Use embossing powder to ecover the Stitch in Time chipboard piece DC68 002.  Adhere to the left side of the layout.
  8. Mount photo on a diecut frame or simply mat your photo.  Use foam to pop up the photo and adhere in the center of the oval.
  9. Add flowers and embellishments of your choice.


Monday, August 25, 2014

Fabscraps Industhrial Chic Layout

I love love love Fabscrap's Industrial Chic collection! It is just perfect for so many things!  On this layout I've used one of Tim Holtz's Found Relatives as my photo.  I used an old Fiskars punch to make my vintage photo frame and a WRMK Lucky 8 punch to cut the circle.  That is definitely my favorite of the Lucky 8 punches.


I've used two of Petaloo's burlap blossoms, they go perfectly with this paper and the Fabscraps rose I made.


The floral vine is a Memory Box diecut, Caserta Blooms,  that I've painted with Art Anthology paints.

Love that little Fabscraps clear chest sticker tucked in there!


For this layout you will need:

  • Fabscraps Industrial Chic paper collection:  C67 - 001 Wood Chic, 002 Wood Chic 2, 007 Steel Chic, 008 Steel Chic 2, 006 Paint Chic
  • Fabscraps Chipboard piece DC67 008 Decorative Border
  • Fabscraps Sticker sheet ST67 001
  • Fabscraps Journal Box MC67 001A
  • 4" white doily
  • Embossing powder
  • Embellishments - flowers, diecut vines, lace, bling
Instructions:

  1. Cut an 11.5" square from the center of Wood Chic 001forming a 1/4" frame. 
  2. Ink the frame and then glue the frame to the outer edges of Steel Chic  007 as shown on my layout.
  3. Cut an 11" circle from the remaining  Wood Chic  001 paper.  (I used a WRMK Lucky 8 Frilly Lace punch to cut my circle)  Adhere this circle to the base paper, Steel Chic 007.
  4. Cut a 4 x 8" rectangle from Paint Chic 006, border cut or distress and ink  the edges. 
  5. Cut a mat for your photo using Steel Chic 2 008, distress and ink the edges.
  6. Cut a 3.25 x 6.75" rectangle from Wood Chic 2 002, border cut or distress and ink  the edges.
  7. Layer the papers from steps 4, 5, and 6, as well as a doily, as shown.  Use cardboard or adhesive foam to pop up the photo.
  8. Paint or heat emboss the chipboard decorative border, DC67 008.  I used Stampendous Aged Aqua embossing enamel.  Layer a scrap underneath the chipboard and adhere to the right of your photo.
  9. Assemble rose(s) from Fabscraps Journal Box MC67 001A using the directions printed inside the packet.
  10. Remove the chest from Fabscraps Sticker Sheet ST67 001 and stick to a white piece of cardstock, then fussy cut out the chest.  Pop up and place on the layout underneath the chipboard.
  11. Add rose(s), flowers, lace, vines, bling as desired.
Thanks for your visit!


Sunday, August 24, 2014

Creative Embellishments challenge with Graphic 45 French Country!

Creative Embellishments' August challenge inspiration photo made me think of blooming sunflowers and their rich colors.  Here's the inspiration photo provided by Creative Embellishments and a link to the challenge .


I collect chickens and roosters and I love sunflowers, what could be more perfect for this challenge than Graphic 45's French Country collection?  I made a gift box by altering a plastic lettuce box. The twist for this month's challenge was to use a song title as a title on my project.  Thank you Alice in Chains for recording a song titled Rooster, it's a perfect for my project!  I've also added a subtitle, Le Coq which is the rooster in French.  I used Creative Embellishments' icicle border  as grass by turning it upside down and painting it green with Silks.

These lettuce boxes make great gift boxes don't you think?  


I must confess, I am hooked on making these boxes and I've a tutorial for making a similar box here along with some other examples.

Thanks for stopping by!


Saturday, August 23, 2014

Altering a plastic lettuce box - video tutorial for Swirlydoos Scrapbook Kit Club

The other day in the Swirlydoos Kit Club forums we were discussing uses for plastic boxes that come from the grocery store with lettuce and such in them.  I've been saving these lettuce boxes for a while now with the plan to alter them and that conversation prompted me to get with it!

This first box I've altered using the Swirlydoos Kit Club August kit of the month, Wistful Blues.   Below is a step by step video tutorial on how I altered this box.  Enjoy!


***
Here's another box I did,  this one done with Graphic 45's By the Sea Collection.  Lots of fussy cutting on this one.


***

Here's one more, this one  I altered using Marion Smith's Garment District collection.  Love this collection so much, there are so many wonderful images to fussy cut.


I want to see what you can do with your plastic boxes.  It really doesn't take long to do these and they are really pretty and unique ways to box your gifts.


Friday, August 22, 2014

More August KOM projects

Today I'm sharing with you some more projects I created with the August scrapbook kit from Swirlydoos Scrapbook Kit Club, Wistful Blues. This kit is such a delightful collection of paper designs from Riddersholm, Bo Bunny, and Kaisercraft.  It's sure to give your creativity a jump start! 

All of the Swirlydoos kits are created from the latest and greatest products on the market and if you're looking for a kit club, I encourage you to give Swirlydoos a try!  Mention my name, Maggi, when you subscribe and you're first kit will be discounted 10% AND you'll receive a coupon good for 30% off your entire purchase in the Swirlydoos store.

I love this photo of my Dad when he was a teenager riding his bicycle in the tobacco field.  I cut a piece of Blue Fern chipboard from their Tangier Panel and embossed it with aged embossing powder and placed that over some rough cut burlap.  The splats were made with Lindy's capped with an old baldy cap.


Random punching around the edges completes the masculine and aged look.

Supplies:
Cardstock: Kaisercraft Toffee
Patterned paper: Bo Bunny Somewhere in Time collection - Passage 16401415, Kaisercraft Key to My Heart collection - Flattered
Chipboard: Blue Fern Studios Tangier Panel
Embossing powder: Stampendous aged marine blue embossing enamel
Flowers: Prima Jute Jovial
Ink: Mix'd Media Inx Patina, Peridot,
Mist: Lindy's Cattail Copper Brown
Masks: TCW Well Rounded
Masking paste: 13 Arts gesso; Prima
Other: Papermania Chronology label plate. burlap

***

I love Steampunk and had fun "punking" up this layout.


I randomly applied copper embossing powder to the flower to give it some "pizazz"!  The corner chippy is ScrapFx and is topped with a Websters cameo.  The bottlecap came in the Embellishment addon.


I painted the wings of this Dusty Attic chippy with Inklingz powder blue (in the main kit) and then embossed the body with Stampedous aged gold.   The metal flower also has aged gold embossing powder on it.

The flower is from the flower add on and I gave it a quick spritz with Lindy's to color it.  The bottlecap and quote inside it are from the embellishment add on.

Supplies:Patterned paper: Tailgate Marked - Airborne, Kaisercraft Key to My Heart - Flattered, Bo Bunny Somewhere in Time Chrononaut
Chipboard: Dusty Attic Divine Divas DA0657, ScrapFx Steampunk corner
Embossing powder: Stampendous aged gold, aged copper
Diecuts and punches: Memory Box Large Ringlets; Spellbinders Decorative Labels Eight
Flowers: Prima Jute Jovial
Metals - flowers, key - from eBay; Prima Finnabair Vintage Trinkets Plated Label
Mist: Lindy's Grab a Guy Gold
Masks: Prima Static
Masking paste: Viva Ferro Altgold
Paint: Shimmerz Inklingz - Powder Blue, Miner Miner 49er
Other: Bottlecap Inc Ball Chain Necklace, bottlecap, Webster's Cameo

***

We had a discussion on the forums the other day about the plastic boxes  in which produce is often packaged.  So that gave me the idea to make a gift box from a plastic lettuce box.  Here's one that I did using papers, Kaisercraft paper blooms and the resin butterfly from the kit.  The large flower is handmade using cardstock from the kit and the greenery and blow is from my stash.  Tomorrow on the Swirlydoos blog I will have a start to finish video on altering this box.  I hope you have time to check it out!


Tuesday, August 19, 2014

Swirlycamp projects!

Recently, 18 Swirlygals from the Swirlydoos Kit Club gathered at Memories Manor in St Clair, Michigan for a long weekend of scrappy fun and camraderie and did we ever have a good time!  I have to give a shout out to Jan and her team at Memories Manor because they sure know how to do up a retreat with style!  If you're ever looking for an incredible place to go for a scrappy retreat, be sure to check this place out!

If you've ever been away for a weekend crop you are probably familiar with that self addressed question:  "Why did I ever bring so much STUFF?"   Having asked myself that on numerous occasions I decided to pack nothing more than a Graphic 45's Come Away With Me paperpads in 12 x 12 and 8 x 8 along with coordinating embellishments with the purpose of creating a mini album.  Well I did get 6 pages done in the mini and I will share it with you when I finish it.

After working on the mini for a couple of days, I needed a break so I decided to make a couple of tags.  I did this one as an example for the group using papers from several  Fabscraps collections.  I made up the Swirlydoos graphic and passed them out to everyone.  There were lots of gorgeous camp tags made for sure!


And, one more tag to share with you, this one done with Graphic 45's Come Away With Me collection.  I used a cut-apart and a chipboard piece from the collection as well as some scraps behind the frame.  The frame is a Spellbinders diecut  and again, I've embossed it with Stampendous aged gold embossing enamel. (love that stuff!)


Thanks for visiting today, I really appreciate it!

Thursday, August 14, 2014

Swirlydoos Kit Club August Blog Hop and Reveal!

Welcome to:
August Scrapbook Kit Reveal & Blog Hop!

If you came here from Angelica's blog, then you are on the right track. If not, go back to Swirlydoos' blog and start from there. We have some amazing projects for you to see today!! Make sure to leave a comment on all of the blogs for a chance to win!!! Make sure you have LIKED & FOLLOWED Swirlydoos on Facebook!!!

Swirlydoos is proud to bring you our beautiful August collection:

Wistful Blues


And check out these coordinating add ons that perfectly compliment our August scrapbook kit!


Are you a subscriber? If so, your kit is on it's way! If not, check out the Swirlydoos store to see if there are any August kits or add ons in the store!

Has it sold out? - become a subscriber and not only will you never miss a kit again, but you'll also pay less for your monthly scrapbook kits!
*Mention this blog hop and save 10% on your first kit*


Right-click here to download pictures. To help protect your privacy, Outlook prevented automatic download of this picture from the Internet.
 Never miss one of our kits again!


We have some absolutely beautiful scrapbook projects for you to see today !!  
For my first layout, I used the August sketch provided with your kit.  I used a mask, included in the embellishment kit, behind the photos to masked the crackled effect.  Then overtop that, I used a Prima mask from my stash to stencil the white vines. I completed my layering behind the photo with a piece of Blue Fern's 12 x 12 Tangier panel chipboard included in the Embellishment add on. The panel has been inked with Prima pastel brown ink and then painted with glossy accents. The chipboard title comes in the main kit and I have heat embossed it with Stampendous aged gold from my stash.  I gave the background a few quick sprays of Lindy's Grab a Guy gold to make the page sparkle.


I gave the dark flowers and resin butterfly, both from the main kit, a quick spritz with Shimmerzing Goldie Lox.  I love the gold sparkle it adds.


This photo is from the Library of Congress and is of a child laborer looking out the window from a textile mill.  The chipboard is a Creative Embellishments chippie from my stash painted with Shimmerz Inklingz in pearl blue and accented with tiny metal circles from Embellishments add ons.


Here's my mixed media mania layout for the month!  I stenciled on the right with a mask included in the embellishments kit and then used Mixed Media Inx in wisteria to color the applied molding paste.  The rays on the left were done with Studio 490 gold embossing paste and a Tim Holtz mask from my stash.  I spritzed Lindy's Winter Jasmine Gold over the black base paper.  I used a dabber cap to apply Lindy's all around the cardstock base underneath the black base paper.


I sprayed one of the flowers lightly with Lindy's Winter Jasmine Gold.  There's a string of irridescent pink beads included in the main kit and I cut a few pieces of that to tuck into my floral cluster here and there.


I used Stampendous aged scarlett embossing enamel on the chipboard pieces from the embellishment add on.  Then I diecut some leafy branches (Sizzix) and dabbed on Gator Gumbo Olive to highlight the leaves and complete my floral cluster.


So, let's get started! Make sure to leave a comment on all of the blogs for a chance to win!!! 


You have until midnight, eastern time, on Thursday, 8/14 to complete the hop. Winners will be announced on the Swirlydoos Blog on 8/15. In order to qualify to win here is what you need to do:
1: Visit all of the blogs and leave a comment on each. This way we know you were there. Take your time. There are REALLY beautiful things to see along the way.
2: Before you leave each blog, look for the “special” words and write it down. 
Once you have visited all the blogs and collected all the special words, they will create a sentence. 
3: Finally, go back to the Swirlydoos blog and leave a comment letting us know how much fun you had, tell us the sentence that was created with all of the special words you collected. Can't wait to hear from you.

 My special word is : PUT
The party continues over at Kim's blog. Have fun!
****************

Blog Hop order:


LinkWithin

Related Posts Plugin for WordPress, Blogger...