
Tuesday, May 31, 2011
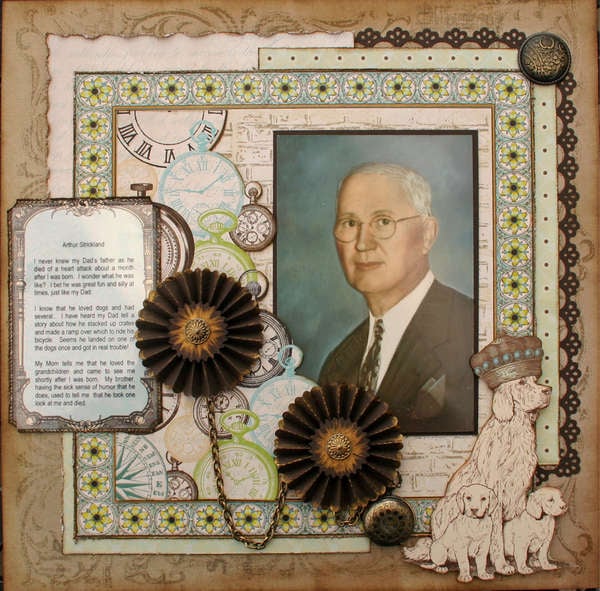
Arthur Strickland
Arthur Strickland, my grandfather that I never knew. I won a great paper prize pak from Flying Unicorn and this is the first LO I made with it, Webster's Pages, Ladies and Gents. These guy LOs are more difficult because I don't like to add a lot of flowers and bling to them. Let's face it, its relatively easy to make a LO look great when you put pretty flowers and sparkly bling - not so easy otherwise!

Saturday, May 28, 2011
Let's make a journal!
Journal - why do you need a journal? Well, I find that it helps keep me organized and it's a good way to keep up with challenges, to do lists, shopping list, whatever. I have a journal devoted to scrapbooking. I keep a shopping list in it so that as my supplies diminish I remember to replace BEFORE I run out. When I see a challenge or sketch that I want to do, I print it off the 'net and put in in my journal. I also have a page devoted to layout ideas, sometimes they pop in my head while I'm cruisin' the net and if I don't write them down right then and there, I totally forget about it.
Many journals that I have seen are made using composition books of some sort. For my journal, I chose a 3 ring binder. I like that I can add pages that I print off the web, can throw away a page when I no longer need it etc. Here's a journal that I made for a swap at Sisterhood of Scrap. I had just gotten my Umbrella Man die so I decided to do a Tim Holtz inspired journal.
Supplies:
3 ring binder - any size will do, I chose a 1" binder. Look for one that has a cover where you can slide your front and back covers into a clear sleeve. That way your covers are protected and you can change them when you want to redo your journal. I also like a binderthat has pockets in the front and back.Dividers - I used 5 tabbed
Tim Holtz Lost and Found paper collection
Tim Holtz Visual Artistry clear stamps
Alterations Umbrella Man die
Alterations Paper Rosette dieSpellbinders blossom 2 die
Bits and pieces from my stash
A tool that I find useful for using with my journal is a 3 hole punch. That way I can quickly punch pages that I print off the web and put into my journal.
Here's the front cover of the journal I made. Be sure that you cut your base paper small enough that it easily slides into plastic sleeve. Leave a little room so that those bulky embellies will work.
And here's the back cover.

I bought a set of 5 tabbed dividers and decorated the front of each. You can't see the tabs in these photos.


It was great fun making this journal. I hope you'll give it a try. If you make one, be sure to leave me a link to yours so I can see!!
Be sure that you are "signed up" for a chance to win my blog candy! See my side bar at the top.
Sketch from Sketches: Creatively Yours
Here's the great new sketch from Sketches: Creatively Yours hand drawn by Ali McDonald. I used groups of pictures for the horizontal photos in the sketch and placed my journaling underneath the photo rather than beside.

I used the G45 A Proper Gentleman collection for this LO. I don't really love the blue papers in this collection but thought they worked well for the older vintage photos and with the ocean in the color photos. That is a very skinny me in the top right photo at about 23 I'd guess. Sigh, I wouldn't mind being that size again!!

Friday, May 27, 2011
Family Tree - Glitz Laced with Grace
Glitz totally has my number with their Laced with Grace collection and our May Swirlydoos kit featured this fabulous line! I used our May sketch provided in our kit by Beggahuna for this layout. After I finished it, I had that bright orange circle cutout left from something and I just picked it up and laid in on the LO, well it was perfect to draw the eye to this wonderful heritage photo so added it to my LO.
The colors and the papers are just so vibrant and rich in this line. They are just perfect for the heritage LOs that I have been working on. These are my mother's father's parents, that makes them my great grandparents. Those awesome swirly vines on the right are a new Spellbinders die made for Heartfelt Creations. There is also a matching stamp that I must get. The gold key and leafy vines are Dusty Attic, oh how I love Dusty Attic!!
Thank you everyone who is following my blog!! I appreciate it more than you'll ever know. Only 35 more followers to go until I give away that wonderful Love Games blog candy! Tell your friends to come over, I need to give that away before I dive into it, LOL~!!

Tuesday, May 24, 2011
Artic Ocean - Chena and Escape Kitty
When we last saw Escape Kitty and Chena they were romping it up with their bear friends and look at them now! Chena!! What are you doing all the way up there in Tuktoyaktuk??? Please tell me you didn't charter a flight using my credit card!!! You can't drive there and I know you don't have wings...yet. You need to get your little poodle butt in that Rolling Doghouse and get yourself and Miss Kitty home!! Kitty doesn't like water, Jennifer will never forgive you if Kitty runs off.
Who is that weird looking lady standing beside you? I see you are carrying your tennis ball, are you playing fetch in the Arctic Ocean with her? Geez, Chena the water is about 40º, you're going to freeze to death!!
A note of historical significance - Tuktoyaktuk aka Tuk is in Canada's Northwest Territories on the Arctic Ocean. You can drive as far as Inuvik (scene of some Ice Road Truckers episodes several years ago) on a dirt/gravel highway that is oh, 400 miles or so, I can't remember. From Inuvik you take a 20 minute flight in a 4-6 passenger airplane to Tuk.
Back in the 90's Molsen Beer was running a Beach Party promotion and one of the beach parties was held in Tuk and Metallica played at the party. Now imagine a Native American village and Metallica. Doesn't quite compute does it?? LOL, well the village elders came out for the concert and apparently evryone enjoyed themselves! It was alcohol free as Tuk is dry as are many native villages. Our guide in Tuk told us all about it!
The crazy lady in the photo is me, note how bundled up I look. It ws the end of June, the water was really cold as and the air wasn't much warmer! This photo is from our 1999 vacation when we lived in Alaska and drove up the Dempster Highway. Chena and Kitty have been photoshoped into the picture of course!
Burlap for Escape Kitty and a touch of lace for Chena. Thanks to Jennifer, Jrabs, for inviting me to share in Escape Kitty's escapades. Be sure to visit Jrabs gallery at SB.com to get the "rest of the story" and see Jen's awesome fantastic creations!

Thanks for visiting and be sure to check out my giveaway at the top of my sidebar if you haven't already!
Saturday, May 21, 2011
Korea - 59
Oops, thank your for the correction, Jasmine. We have several holidays that seem to happen at about the same time, I was thinking this was another. Oh well, my mistake! Yeah, and in the US Memorial Day is the kick-off to summer also.
Anyway, I wanted to pay tribute to my favorite veteran who served in WW II, Korea, and Vietnam, 28 years in all, my Dad, my hero. I am so fortuante that my Dad came home from all the wars. So many did not. My husband hardly remembers his Dad as he was just 4 years old when his Dad was killed in Korea. His Dad was a pilot and his plane went down, not from enemy fire, most likely due to ice on the wings. My husband served 24 years in the Navy. so yeah, I am all about waving the flag and shouting for the red, white and blue. And that makes me think that I just have to say that I think it is deplorable what is being told about our Navy Seals and the operation that took Osama bin Laden. It is not information that needs to be devulged to the publice IMHO.
OK, this blog is not about politics etc, sorry for the little digression. I have so many WONDERFUL pps to work with right now. Bo Bunny Gabrielle and Time Piece, Glitz Lace and Grace and Love Games. WOW, all these papers are soooooooo gorgeous that when I sit down to scrap, I don't quite know which line to go to!!
But about this layout - the red circle layer in the back is a new paperpad from Tim Holtz that I love. It is a resist kraft paper. Here I have used fired brick Distress Stain to color the pp. The rest of the layers are all from Bo Bunny Time Piece. he gears and hinges are Timmy Grungeboard that I heat embossed with gold UTEE and walnut stain distress embossing powder. The wings are Dusty Attic and I have outlined them with a Pinpoint Roller Quickie Glue pen that I got at Archivers - it is way cool, just draw, outline etc, sprinkle with glitter and you're done. Makes a nice job of laying down glitter. It's mfg by Sakura. I added the cheesecloth around the photo to mimic the camoflage netting over the tent in the photo. I just look at this photo and think MASH, you know? LOL!!
The heart is sprayed with Moomshadow Mist Bucket of Blood Red, IRL it has a very cool shimmering effect.
Not much else to say about this LO, thanks for visiting. A VERY BIG thank you to everyone who has become a follower of my blog, I really appreciate it!! I am trying to visit your blogs and become a follower if I can. Blogger is not being nice right now and on some blogs I am not able to Follow, hope they get things straightened out SOON!!

Thursday, May 19, 2011
How DID I get that journaling on that little journaling ticket?
It's really easy, measure your journaling spot and set your magins appropriately in your word processor and type out your journal. Then print out your journaling on an overhead transparency, cut it out and adhere to your journal ticket. It looks great on a layout and the transparency is hardly noticable. Sometime I cut the transparency exactly the same size as the journal ticket so that the transparency is invisible. I use a glue that dries completely clear and just dot it on in the corners to attach my transparency to the journal ticket and it is almost not visible depending on how the light is shining on it. I see that in my photo the camera definitely picked up the vellum tape.
When printing on transparencies, I use the print "mirror image" function of my printer so that I can still put the shiny side of the transparency up. If you don't do this, you will have the rougher side of the transparency facing up and that 's not a big deal but the perfectionist in me likes that side to be down.
When printing on transparencies, I use the print "mirror image" function of my printer so that I can still put the shiny side of the transparency up. If you don't do this, you will have the rougher side of the transparency facing up and that 's not a big deal but the perfectionist in me likes that side to be down.
Wednesday, May 18, 2011
Canis Lupus
I used the Get Picky sketch #8 for this layout. Get Picky has two challenges each month, an inspiration challenge and a sketch challenge. Check it out, lots of great work going on there!
Wolves fascinate me and my top priority while we were at Denali was to observe this creature in his home. I had high hopes, so many of our campers were going out during the day and coming back with wonderful stories of their wolf sightings. I don't know how many times I got on that bus in Denali to ride through the park to see wolves but it was mostly a bust for us, everytime!
The photo at the bottom is the only one I took from the bus. That was fun, we were actually observing a lone bear and off in the distance we see this wolf. Well the bear had been lazing in the grass until he spied to wolf. Then the bear gets up like he's going to chase the wolf; the wolf sees the bear and starts running while looking back over his shoulder. It really was quite comical. The bus driver said that the bear was probably bored and just wanted to play with the wolf. I don't know about that!
The top right wolf pictures I took from the car through the front window of the car and the other two I shot from the motorhome on the day we were driving out of Denali to go home.
I used the BasicGrey Curio papers for this, they seem to work well with my nature photos. On the right behind the photos I've used a piece of Core'dinations black magic that I embossed using a Cuttlebug Victoria folder.
I love the Dusty Attic ferns and Tribal Design that I sprayed with Olive Vine Glimmer Mist.
 I see I need 1 more follower to make 100, yipee. Only 50 more to go to give away my blog candy. Check out my blog candy at the top of my sidebar. If you're not a follower, please become one. If you are, please tell your friends! I appreciate it!! Thanks for stopping by!
Tuesday, May 17, 2011
Youth - Bo Bunny TimePiece sketch challenge
The more I work with this collection, the more I love it!! I just love the brown with the touches of dark red and subtle ivories. It is perfect for scrapping the plethora of vintage photos that I have on hand! I did this layout from the beautiful Tara Orr sketch at the Bo Bunny blog.
The picture is of my Mother taken circa 1945. The little note say "Remember when you were young. Could you have imagined all the places you would live - France, Japan, Germany?"
The chipboard at the top is Dusty Attic that I painted with vintage white and then "gold leafed" with Perfect Pearls. After that dried I painted it with Crackle Accents to give it that aged look. Finally I rubbed distress ink, frayed burlap, into the cracks.
Swirlydoos had this collection as a spotlight kit recently and that's where the papers, trinkets, pearl spray, pearl flower centers, and tags came from. I add a lot of bits and pieces from my stash. That lacy bit behind the photo was actually a "hanky" that was tucked into the breast pocket of some outfit long gone! The paper flowers are Primas that I have layered and inked. The crocheted flower is from Petaloo-Chantilly. Oh that striped ribbon I have hoarded for years. I don't know why I like it so much, but I do. Finally it is time to use it. Seriously I've had it since probably Christmas 2005 or 2006. It came in a page kit that my SIL gave me for Christmas.

Thanks for stopping by! If you follow me on my blog, you will be entered to win some great blog candy. See the details at the top of my sidebar.
The picture is of my Mother taken circa 1945. The little note say "Remember when you were young. Could you have imagined all the places you would live - France, Japan, Germany?"
The chipboard at the top is Dusty Attic that I painted with vintage white and then "gold leafed" with Perfect Pearls. After that dried I painted it with Crackle Accents to give it that aged look. Finally I rubbed distress ink, frayed burlap, into the cracks.
Swirlydoos had this collection as a spotlight kit recently and that's where the papers, trinkets, pearl spray, pearl flower centers, and tags came from. I add a lot of bits and pieces from my stash. That lacy bit behind the photo was actually a "hanky" that was tucked into the breast pocket of some outfit long gone! The paper flowers are Primas that I have layered and inked. The crocheted flower is from Petaloo-Chantilly. Oh that striped ribbon I have hoarded for years. I don't know why I like it so much, but I do. Finally it is time to use it. Seriously I've had it since probably Christmas 2005 or 2006. It came in a page kit that my SIL gave me for Christmas.
Thanks for stopping by! If you follow me on my blog, you will be entered to win some great blog candy. See the details at the top of my sidebar.
Monday, May 16, 2011
Glitz Love Games - Love Birds
I REALLY love this line from Glitz, Love Games!!! Red is my favorite color anyway so this line just "speaks" to me! Its a red with a hint of orange to it, but oh so pretty!! Be sure to be a follower of my blog if you are not already, for a chance to win a RAK of Love Games. Details of my giveaway HERE.
This is a picture of my parents, they have always been so crazy about each other that Love Birds just seemed like a good title. The photo was taken on an Easter Sunday back in the 40's. I made the flowers and I have a tut posted (look on the sidebar) if you are interested. The birdcage was diecut with the Alterations die, painted with Distress Bronze crackle paint and then inked with distress black soot.
The vine on the right is Dusty Attic Vine Flourish DA0485 (there's one just like it in my Giveaway) painted with acrylic paints, then glimmer mist (Tattered Leather on the stems) and finally a coat of Diamond Glaze.
The title is also on a Dusty Attic piece, Vintage Nameplate DA0463 that I painted with vintage white acrylic paint and Diamond Glaze.
At the top I have stamped with a brick wall stamp. Thanks to Denise for turning us on to that awesome stamp!!

Thanks for stopping by! Be sure to become a follower for a chance to win my RAK!
Red Poppy Flower Tutorial
Oh this is my first flower tutorial and let me just say that I learned everything I know about making flowers at Swirlydoos.com and in particular, from LisaG, (starsailorscrapper). Lisa has a really pretty poppy tutorial at Swirlydoos using different punches than these so you might want to check that out here.
OK, I made this flower specifically to go with my Glitz Love Games papers. I used Bazzill Red Rock cardstock which goes really great with Love Games. The flower centers are punched from an olive colored cardstock scrap that I had. You will need:
Cardstock for your flower and for your centers
Alterations Tattered Floral die or something similar
McGill starburst punch
McGill sun punch
Glimmer mist - I used Vanilla Breeze on the red Cardstock and Olive vine on the olive cardstock
Distress ink - pumice stone
water spritzer (not pictured)
Glue - I use Diamond glaze and hot glue


Now take your tweezers and spread the suns out a little. Pick up the individual "stamens" from the starburst and lift so that the overall effect is "fluffed" And that's all there is to it!

OK, I made this flower specifically to go with my Glitz Love Games papers. I used Bazzill Red Rock cardstock which goes really great with Love Games. The flower centers are punched from an olive colored cardstock scrap that I had. You will need:
Cardstock for your flower and for your centers
Alterations Tattered Floral die or something similar
McGill starburst punch
McGill sun punch
Glimmer mist - I used Vanilla Breeze on the red Cardstock and Olive vine on the olive cardstock
Distress ink - pumice stone
water spritzer (not pictured)
Glue - I use Diamond glaze and hot glue

For the large flower cut 2 large flowers, 3 sunbursts and 4 suns.
For the small flower cut 2 small flowers and 4 sunbursts.
Spritz the flowers and the suns with a little water. Don't get them soaked, it isn't necessary and makes them harder to work with.

For the large flower:
Take the 3 sunbursts and glue them one on top of the other staggering thestarbursts so they don't exactly line up with each other. Spray with a little olive vine glimmer mist and set aside to dry.
Scrunch the petals of the two large flowers with your fingers. I place my fingers on either side of the petal and push towards the center.
Take something thin like the handle of a paint brush and place in the center of the sun and then wrap the sun around the paint brush handle. Do this to four of the suns.
Now dry the flowers, the suns and the starburst. I use my heat gun to dry them but you can leave them to airdry. After you have dried the flowers, ink the tips of the petals with distress ink.
TIP: I keep a box lid with 3" sides handy and I put my damp flowers in the box lid to dry. That way they don't blow all over the place.

Assembly: Take one of the suns and carefully spread it out enough so that you can glue another sun inside. Glue these two suns inside a third sun and then glue the three inside the 4th sun. I paint a little glimmer mist on the suns at this point and then dry them. If you have used hot glue to glue the suns together, be careful when heating as the glue will melt.
Glue the two flowers together staggering the petals and spray with glimmer mist for a nice shimmering effect. (You can also spritz your flowers with glimmer mist when you are scrunching the petals instead of water but since I am using red cardstock I don't really need to soak the cardstock with color so I just give a spray at this point.) Use a paintbrush handle to curl the petals inward. Now you are ready to assemble the flower. Be sure everything is dry before assembling! Glue the starbursts to the flower and then glue the 4 assembled suns to the starbursts.


The procedue for the small flower is exactly the same except that I omit the starbursts underneath the 4 suns. You can also cut between the petals so that you have more "petal" to scrunch.
Be sure to become a follower of my blog for a chance to win my blog candy of a Glitz Love Games kit that I put together! Check at the top of my sidebar for details!
Silence
This is my entry for the round robin that we have every month at Swirlydoos! The image came from a challenge posted at Sisterhood of Scrap.
This was a lot of fun as I used a new mist, Moonshadow, on the layered piece behind the photo. Moonshadow mists have a dark tone but iridescent color when the light hits it "just right". You can see the effect of the mist in the detail photo. I love the Moonshadows, not right for everything, but perfect for some things!
The metal frame is a piece of silver metal from Ten Second Studios that I embossed with the Damask Cuttlebug folder. Then I used Pitch Black alcohol ink to darken the metal. Its such a pretty effect I think.
The flowers are just layered Primas and the leaves were punched from black cardstock with a McGill leaf punch. Then I edged the leaves with silver ink to pull them into the layout by mimicing the color of the frame.


Thanks for stopping by! I'm working on a LO with the gorgeous Glitz Love Games collection and I'm goingto have a flower tut so be sure to visit again!!
Saturday, May 14, 2011
Rocky Mtn High - new sketch at Sketches: Creatively Yours

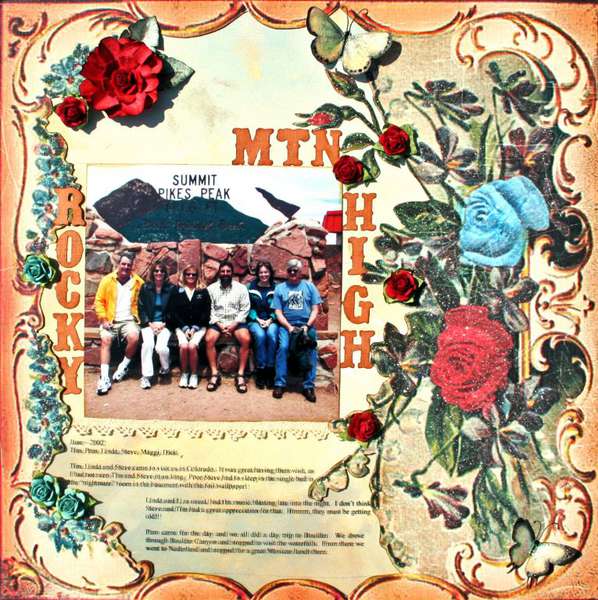
I diecut the letters using the Alterations die, Vintage Market. I struggle with titles, I'll find some letters I want to use from my stash and of course, there aren't enough vowels to make the title, nothing else "goes with" the chosen font...this drives me crazy. And I hate cranking up the Cricket in the middle of a project - I don't know why, that's just me. SO to solve this problem, one day I got out a pack of border cardstock I bot years ago and I diecut a lot of letters!! The precut borders are just the right width for the Alterations Vintage Market die. I also had puchased a plastic divided storage container that had 32 little compartments, just perfect for sorting my letters! Mostly I cut the letters in common colors like black, brown, beige, greens, white (easy to change the color of these!) etc. Now when I need letters, I just reach for my box and this works well for me. Cuts out a layer of frustration, KWIM?
Thanks for your visit!!
Friday, May 13, 2011
My Scrappy Giveaway!!
Hi friends!

I have two BFFs, going all the way back to college and the very first scrappy pages I ever did (2005) were for them. I decided to make them each a scrapbook with photos and stories of the many years that we have been friends. Oh my, that trip down memory lane ran through a couple husbands, college, work and now retirement. So both of these gals have had birthdays this week, one on the 7th and the other today! Now they are the same age as me and next year we'll be crossing over into what I think of as senior citizen land, LOL. So last year, we decided to stop sending gifts to each other as we don't need anything and it was just getting to be a hassle.
Since I'm not sending them gifts I'm going to give away this great Love Games paper collection from Glitz in their honor. There are 12 sheets of Love Games pp along with Paper Layers. Then I've added some flowers, Dusty Attic (who doesn't want Dusty Attic!), some trims. I diecut a couple Umbrella men just because he is so cute, LOL! I also added some diecut Alterations grungeboard gears and birdcages too. All you have to do for a chance to win my blog candy is be a follower of my blog and leave me a message anywhere on my blog! When I get to 150 followers, I will use Random.org to pick a winner from all 150 followers. You'll need to check back here to see if you are a winner. You will have 7 days from the winner announcement to claim your prize. If you are already a follower, thank you, you are already entered. Easy enough, right? I'd love you to leave me a link to your blog so I can check out your scrappy home too. (Sorry open to US and Canada scrappers only, can't afford the postage otherwise!)
I hope everyone has a super weekend, and now I must call my BFF and wish her a Happy Birthday!!

Monday, May 9, 2011
Fall at Denali National Park
Well I really loved the Swirlydoo's April kit that showcased Bo Bunny's Gabrielle but I think I love this May kit with Glitz Laced with Grace at least as much!! The oranges and olives so perfectly offset each other and the colors are so vibrant, I really love it!!
This is a picture I took in 1997 of a grizzly bear fattening up on berries for the coming winter. I took these pictures in September on a beautiful fall day. In September, winter is just around the corner and it can snow anyday. In fact, I have been at Denali in September when there was snow on the ground.
I really had fun making the flowers and leaves on this layout as I tried out my new Moonshadow mists on the leaves. It really does give them a beautiful patina look. AND something new I have discovered, I bought a set of 16 pearl watercolors at Michael's for a whopping $5 and used it to paint my flowers. Really gives an effect similar to Glimmer mist but it's easier and a lot cheaper!! I used the paints on the orange flowers. The green flowers were sprayed with olive glimmer mist. The Dusty Attic vine is painted with acrylics and then glazed with Diamond Glaze. I like Diamond Glaze better than Glossy Accents, its a little thinner and therefore brushes on nicer. It seems to have the same glue qualities as Glossy Accents too.
I used the May sketch at Dusty Attic for this layout and I'm entering it in their sketch challenge. Also made the layout for Glitz Challenge #2.

Thanks for stopping by my blog! I appreciate the time it takes and I'd love you to leave a comment so I'll know that you were here!
Friday, May 6, 2011
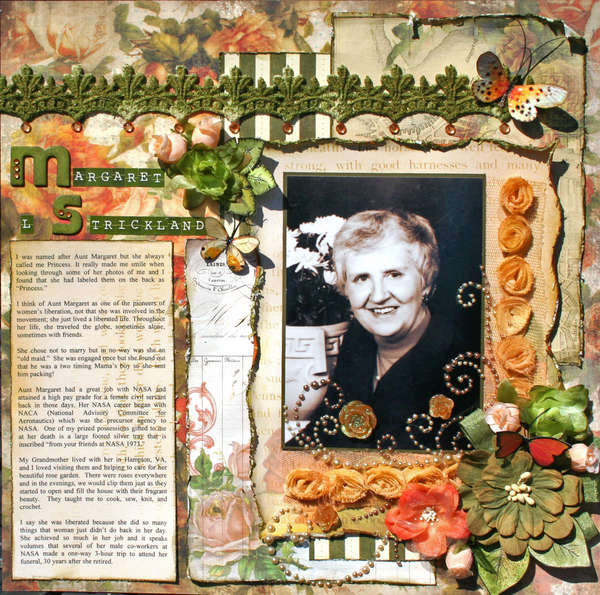
My Aunt
 Oh the May Swirlydoos kit is just fabulous!!! I love the rich colors!! This is my dear Aunt Margaret for whom I was named. She was the most amazing woman and I have so many wonderful memories of time spent with her. I remember as if it were yesterday shopping at a fabric store when she and my grandmother taught me to sew. We often played cribbage in the evenings when she came home from work and sometimes I would win. Wonder if she just let me win?
Journal: I was named after Aunt Margaret but she always called me Princess. It really made me smile when looking through some of her photos of me and I found that she had labeled them on the back as “Princess.”
I think of Aunt Margaret as one of the pioneers of women’s liberation, not that she was involved in the movement; she just lived a liberated life. Throughout her life, she traveled the globe, sometimes alone, sometimes with friends.
She chose not to marry but in no way was she an “old maid.” She was engaged once but she found out that he was a two timing Mama’s boy so she sent him packing!
Aunt Margaret had a great job with NASA and attained a high pay grade for a female civil servant back in those days. Her NASA career began with NACA (National Advisory Committee for Aeronautics) which was the precursor agency to NASA. One of my prized possessions gifted to me at her death is a large footed silver tray that is inscribed “from your friends at NASA 1973.”
My Grandmother lived with her in Hampton, VA, and I loved visiting them and helping to care for her beautiful rose garden. There were roses everywhere and in the evenings, we would clip them just as they started to open and fill the house with their fragrant beauty. They taught me to cook, sew, knit, and crochet.
I say she was liberated because she did so many things that woman just didn’t do back in her day. She achieved so much in her job and it speaks volumes that several of her male co-workers at NASA made a one-way 3-hour trip to attend her funeral, 30 years after she retired.
I used the beautiful May Swirlydoos kit for this layout that features Glitz Designs Laced with Grace collection. The venetian lace at the top is from my stash that I sprayed with Olive Vine Glimmer Mist and the tiny bloomers around the photo are Tim Holtz sprayed with Yellow Daisy and Sunkissed Peach Glimmer Mist. I also added the Prima SIIP. Aunt Margaret had a large and beautiful rose garden so I thought these papers were just a perfect match for her photo. TFL!! I really appreciate your visit!
Wednesday, May 4, 2011
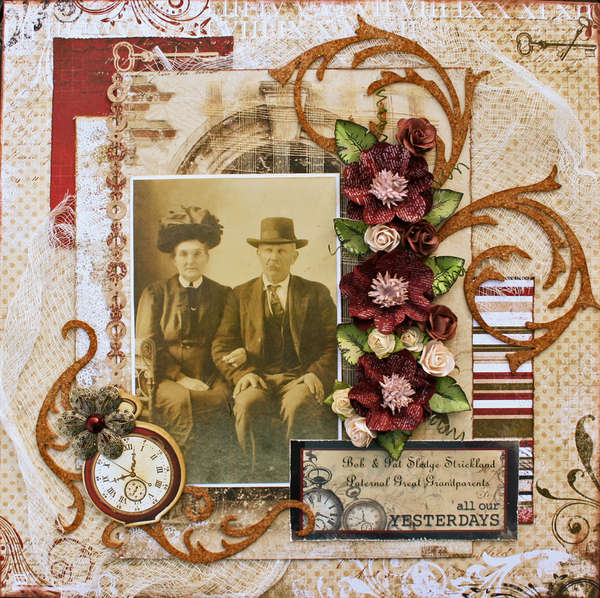
all our Yesterdays
This is a picture of my paternal great grand parents. It is an odd feeling to look at two strangers and realize that their genes contributed to the person that I am. I didn't even know my grandfather on my father's side as he died just a month after I was born.
I made this as an example LO for a challenge that I am hosting at Swirlydoos. I love love love this line of paper from Bo Bunny! I used fabric mess, cheesecloth and cork on this layout - love natural elements like this. The metal flower is Prima and the large wine ones are handmade. The leaves were done with a Heartfelt Creations stamp, the swirls with Alterations die, everything else is Bo Bunny Timepiece and from Swirlydoos Spotlight kit.

I made this as an example LO for a challenge that I am hosting at Swirlydoos. I love love love this line of paper from Bo Bunny! I used fabric mess, cheesecloth and cork on this layout - love natural elements like this. The metal flower is Prima and the large wine ones are handmade. The leaves were done with a Heartfelt Creations stamp, the swirls with Alterations die, everything else is Bo Bunny Timepiece and from Swirlydoos Spotlight kit.
The continuing saga of Escape Kitty and Chena
Got another photo from Chena the other day. Seems the girls are having a lot fun in Alaska playing with bear cubs. Jrabs at Scrapbook.com posted a great LO of EK and Chena frolicing in the water with a bear cub. Seems they had caught a BIG salmon. I'm betting that the cub caught the bear. Chena does not know how to fish and that fish was way bigger than EK!!
So now EK and Chena are playing with a pair of inland cubs at Denali National Park. Look at our FEARLESS kitty standing inbetween those cubs.
I am thinking that poodle coat is getting pretty long by now and a BIG matted mess. Oh dear, I'll have to shave her down when she gets home, IF she ever gets home. Chena, your Dad and I would really like our motorhome back, July 15th at the latest so you and EK need to turn that rig around and head for home. Ha-ha, I think they are having way too much fun!!

Here's a closeup of the birdcage:

Thanks to jrabs for letting me share in her Escape Kitty story and for the pictures of Escape Kitty. Do check out jrabs gallery for more stories of this crazy cat and dog!
Monday, May 2, 2011
My Father, my hero
I love this Swirlydoos spotlight kit Bo Bunny Timepiece collection just about better than any I've ever had!! I love the color combo, it just speaks to me! The passport and bicycle embellies are nods to some things that I know about my Dad. He was in the Army so the passport represents his travels around the world. The bicycle is a laughing memory that my Mom talks about. When Dad was a young teen he used to ride by my Mom's house on his bike showing off. LOL, I love it!!
My Dad reckoned the photo was taken 1947 or 1948. The building in the back was my grandfather's country store that had a bedroom in the back and that is where my parents lived for a while after Dad came home from the war. Dad knows this picture was taken after he came home from the war because the little room you see in the corner of the bldg is a bathroom that was added when he returned. Don't you love how we clue in on things to remember them? To have running water & indoor plumbing in rural NC in 1947 was pretty special. I remember when my Mother's parents got indoor plumbing and it was around 1960 give or take a year. I also remember when they got a telephone, and a party line at that. My grandmother's entertainment was to listen in on the party line sometimes, LOL!! Secretly of course....

Cardstock: photo mat Bazzill Bitter chocolate
Patterned paper: Bo Bunny TimePiece collection – bg page Timepiece; Timepiece Stripe; Timepiece moments
Stickers: Bo Bunny TimePiece collection
Chipboard: Bo Bunny TimePiece collection; Dusty Attic french flourish #2 DA0274; Tattered Angels Glimmer Chips Traveler (passport)
Ink: Distress black soot, frayed burlap, brushed corduroy, pumice stone, Colorbox chestnut roan, Glimmer Mist Tattered Leather, Ranger Archival ink jet black
Other: Bicycle Tattered Angels Glimmer chip; brads cameos, Bo Bunny TimePiece collection, cheesecloth
Subscribe to:
Posts (Atom)
LinkWithin
