Pages

Tuesday, October 27, 2020

Treat Bag for Creative Embellishments

 It's that haunting time of the year and a fun decorated gift bag quickly transforms into a spooktacular treat or gift bag!

I started with a simple kraft gift bag and added colorful panels to the front and back.

On one side I added this fabulous skeleton, definitely one of my fave Halloween themed chipboard pieces.  I used Picket Fence Distress Stain to color him.  I love the mottled look that it gives.


The other side of the bag is decorated with a large shaker cauldron with Buttons Galore shaker mix inside.

A ouple of tips for assembling your shaker:  Adhere the clear plastic piece to the top piece and set it aside to completely dry.  Assemble the bottom piece and two side wall layers and set aside to dry.  Allow plenty of time for drying and then add your shaker mix and glue the top on and again, set aside to dry.  Don't shake it until it is completely dry!


These chipboard pumpkin faces are so fun  Tim Holtz's Crackling Campfire is a great color for pumpkins.  I used the Distress Paint on these.


Happy Haunting!!


From Creative Embellishments


Other Supplies

Authentique Masquerade Collection
Distress Paint - Crackling Campfire
Black Paint
Beaded Trim - Hobby Lobby
Distress Stain - Picket Fence

 ENTER THE CREATIVE EMBELLISHMENTS BLOG CHALLENGE


The monthly challenge is always posted on the first of the month on the Creative Embellishments Blog.  Be sure to check it out, you could win a great gift certificate to the store!  Here are the rules:
  • Create a NEW project layout, mini album, tag, card, canvas, etc….as of  October 1st, 2020.
  • It is required that you mention in your blog post that you are playing along at Creative Embellishments together with a link back to our blog page. Please make sure to reference our challenge. Please, no old projects. (meaning projects from previous months that may fit the challenge) Please share only new projects.
  • Please add your entry to the inlinkz tool below to be eligible for the prize. You have until the last day of each month 11:55 pm eastern time to enter.
  • Simply add a link to your FB photo (if you do not have a blog) featuring your challenge entry. Let us know how you were inspired by the photo.
  • Combining with other challenges is permitted.
  • We would love to see you USE AT LEAST 1 OF CE products on your projects but it isn’t required to play along.
  • WINNERS will have 2 weeks to claim their prize. The winner will be announced on this post the day after the challenge ends. Keep an eye out to see if you are a winner.


Thanks for popping by!

Maggi xoxo


Monday, October 19, 2020

Halloween Decor with Creative Embellishments

I am loving all the large plywood home decor items available in the Creative Embellishments shop.  This witch's hat is 11.5"w x 11.9"h which makes it perfect for a Halloween door hanging!

You know I love paper, soooo, yep I covered the hat first with paper from Authentique's Masquerade collection.  The fun flags are stickers in the collection. 

Every self respecting witch needs a few bats flying around her hat right?   ðŸ˜ƒ  These are chipboard bats heat embossed with aged black embossing enamel.


 I used orange cardstock underneath the wood hat band that I embossed with aged gold embossing enamel.  The pumpkins are simply painted and glued.


I've had this raven die-cut hanging around for a while.  I think it's a Tim Holtz die.


This witch's hat was loads of fun to decorate, you are only limited by your imagination!


From Creative Embellishments


Other Supplies

Authentique Masquerade Collection
Stampendous Aged Black Embossing Enamel
Stampendous Aged Gold Embossing Enamel


 ENTER THE Creative embellishments blog CHALLENGE


The monthly challenge is always posted on the first of the month on the Creative Embellishments Blog.  Be sure to check it out, you could win a great gift certificate to the store!  Here are the rules:
  • Create a NEW project layout, mini album, tag, card, canvas, etc….as of  October 1st, 2020.
  • It is required that you mention in your blog post that you are playing along at Creative Embellishments together with a link back to our blog page. Please make sure to reference our challenge. Please, no old projects. (meaning projects from previous months that may fit the challenge) Please share only new projects.
  • Please add your entry to the inlinkz tool below to be eligible for the prize. You have until the last day of each month 11:55 pm eastern time to enter.
  • Simply add a link to your FB photo (if you do not have a blog) featuring your challenge entry. Let us know how you were inspired by the photo.
  • Combining with other challenges is permitted.
  • We would love to see you USE AT LEAST 1 OF CE products on your projects but it isn’t required to play along.
  • WINNERS will have 2 weeks to claim their prize. The winner will be announced on this post the day after the challenge ends. Keep an eye out to see if you are a winner.


Thanks for popping by!

Maggi xoxo


Monday, October 12, 2020

Post Box - Eileen Hull Designs by Sizzix New Die

Eileen Hull has two new XL dies available and you're going to love them!  Today I am sharing the Post Box XL Die with you.

The XL dies often are longer than 12" and that sometimes makes using our favorite design papers with these dies a challenge.  In today's tutorial I'll show you a couple of ways to make 12" paper work with this new die.

Sizzix ScoreBoards XL Die - Box, Post 


These are the two boxes I made with the Post Box die.  Yep, it's time to get those Christmas projects going!


Christmas Wish Box

The Post Box makes a great Christmas Wish Box.  Give each child their own box to fill with there Christmas wishes.  They'll have so much fun putting their Christmas wishes in the box.  They could cut things out that they see on advertisements, write a letter to Santa, lots of ways to fill the box!


Tutorial 
1.  Cut mat board and design paper 5 1/2" wide.  Apply adhesive to the back of the design paper and adhere to the mat board (6" x 13") lining it up at the bottom edge.  Eileen's Thermoweb adhesive sheets work really well for this application.


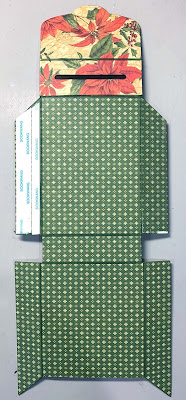
2.  Now cut a piece of design paper 5 1/2"W  x 3 1/4"L and adhere over the blank spot on the matboard.


3.  Now place the paper covered  mat board on the die with the small piece of patterned paper covering the scalloped top of the die.  Place the mat board face down so that the scalloped edge is just covered with the mat board and run it through your die cutting machine.  It should come out nicely cut with the edge of the different design paper at the back seam of the slotted top.  In the photo below you can see that I am peeling off a very thin strip of paper that  went over the back scoreline.


4.  Assemble the box using double sided tape.  Note that the bottom flaps in this photo fold over the upper flaps.


5.  I made the sentiment on the front  by printing onto clear transparency film.  I love doing this especially when I want to add journaling to a journaling card.  Use the "T-Shirt Transfer" function on your printer as this prints a mirror image of the text which you will need to do because you have to print on the backside of the transparency film.  Be sure you get the right film for an ink jet printer if that is what you use.

6.  Make a closure for the box, I used velcro.


I finished off the back of the box with a cut-apart.


7.  You could also make cards to write on that fit through the slot.


Christmas Ornament Gift Box


One Christmas my parents bought my brother a golf putter and instead of wrapping it, they hung it right next to the tree trunk where it was effectively hidden!  It was great fun as my brother was really hoping for that putter and was quite mystified that there was no golf club looking package under the tree!  Ever since then I've thought it was fun to hide things in the tree.  So here's an adorable box that holds a gift card or small gift that's also an ornament.


Tutorial 

1.  To utilize 12" paper for this design, cut design paper 5 1/2" x 12 and adhere to 6" x 13" mat board.  (I always trim off the extra 1/2" on the side).  Place the mat board on the die such that the scalloped edge is covered with design paper and the uncovered portion is at the bottom and die cut.  Keep the little piece that comes out of the "mail slot".  Then cut the two triangle pieces off at the top.  In this photo you can see that I've cut the left side off.


2.  Assemble the box in the same manner as above.


3.  Now use a piece of coordinating design paper to make a trim all around the box.  You could use a border trim or ribbon.


4.   Now place the little piece that was diecut out for the slot back in the slot and cover with decorative paper, a sticker, whatever works for you on the outside.  Then punch two holes in the top and thread ribbon, string, twine etc. to make a hanger. 

I used a magnet set on this box as a closure.  The magnet on the box itself is underneath the design paper while the magnet on the flap is visible.


I used a sticker on the top of mine.  


Embelish the box however you like and you're all set with a pretty gift box ornament.


Supplies 


Graphic 45 Winter  Wonderland Collection


Thanks for stopping by!  Be sure to take a look at Eileen's blog to see more projects with the Post Box die!


Thursday, October 1, 2020

Blog Hop Sharing Eileen Hull Designs Newest Release - Teacup and Spoon Die by Sizzix


Eileen Hull Designs Blog Hop Introducing the New Teacup and Spoon and Post Box Dies.


Hooray- two new ScoreBoards releases from Eileen Hull and Sizzix! Are you ready for a new 3D Bigz L Tea Cup die? Fill it with teabags and other assorted goodies or use the Tea Cup cutout on the front of a card- so many possibilities. Also new is the XL Post Box, a fun little box that goes together in 10 seconds and has a slit in the top to tuck a gift card. You will have fun embellishing in your style to create holiday treats for everyone on your list!

The hop starts at Eileen's blog, and then:

Halloween is my favorite holiday for crafting, there's just something so fun about playing with ghoulish papers and dark images!  Soo...every year I make Halloween Treat treat favors for friends and neighbors.  Eileen's new Teacup and Spoon Die  is just what I needed for this year's treat boxes! Aren't these just adorable?


This is what the assemble teacup looks like if you make up the "stock" version.  Isn't it just adorable?   


For my version, I cut the teacup handle off so that it would be more like a cauldron.  I glued the spoon inside and used it as a post to hold the Happy Halloween sentiment.  I used Carta Bella's Happy Halloween collection for this treat box.


I used an older Echo Park collection for this one, Halloween Town.


Thanks for stopping by today.  Nex on the hop is Lisa Hoel.


Products by Eileen Hull Designs 


Be sure to stop by my blog next week when I'll show you how to make these adorable treats!

Creative Embellishments Challenge for October

It's time for a new challenge on the Creative Embellishments Blog.  This month the challenge mood board is all about spooky!  The twist is to add something with wings to your project.  You can find the challenge entry rules at the bottom of this post. 


I made two Halloween cards for the challenge.


I used a tombstone shaker and walking skeleton from Creative Embellishments for this first card.  I love this skeleton!  I used Distress Stain to add some color to him.  The stain works great as it leaves a mottled effect (doesn't show to much in the photo, it's much better IRL) rather than the flat look you get with paint.

The tombstone shaker is heat embossed on the inside with Ranger Antiquities in Cement.  A tip:  Glue the shaker outlines to the base BEFORE heat embossing as some adhesives don't stick well to the embossing.  I filled the shaker with sequins from Buttons Galore & More -Black Tie Mix.


The twist is to add some thing with wings and I did, on the inside!


On the next card I used a tag in the center and some black fabric rosettes to complete my spooky look.

I stenciled some bats on the tag to meet the twist of adding something with wings.  While that dried I a heat embossed a Halloween ATC coin and backed it with design paper.  I adhered the coin and a sentiment to the tag and glued the whole business to the card base.


I added simple sentiments inside and it's ready to send to someone special!


Other Supplies

Buttons Galore & More Black Tie Sequin Mix
Ranger Antiquities Embossing Powder - Cement


How to Enter the Challenge


The monthly challenge is always the first post on the Creative Embellishments Blog.  Be sure to check it out, you could win a great gift certificate to the store!  Here are the rules:
  • Create a NEW project layout, mini album, tag, card, canvas, etc….as of  October 1st, 2020.
  • It is required that you mention in your blog post that you are playing along at Creative Embellishments together with a link back to our blog page. Please make sure to reference our challenge. Please, no old projects. (meaning projects from previous months that may fit the challenge) Please share only new projects.
  • Please add your entry to the inlinkz tool below to be eligible for the prize. You have until the last day of each month 11:55 pm eastern time to enter.
  • Simply add a link to your FB photo (if you do not have a blog) featuring your challenge entry. Let us know how you were inspired by the photo.
  • Combining with other challenges is permitted.
  • We would love to see you USE AT LEAST 1 OF CE products on your projects but it isn’t required to play along.
  • WINNERS will have 2 weeks to claim their prize. The winner will be announced on this post the day after the challenge ends. Keep an eye out to see if you are a winner.

xoxo


LinkWithin

Related Posts Plugin for WordPress, Blogger...