
Eileen Hull has two new XL dies available and you're going to love them! Today I am sharing the Post Box XL Die with you.
The XL dies often are longer than 12" and that sometimes makes using our favorite design papers with these dies a challenge. In today's tutorial I'll show you a couple of ways to make 12" paper work with this new die.
Sizzix ScoreBoards XL Die - Box, Post

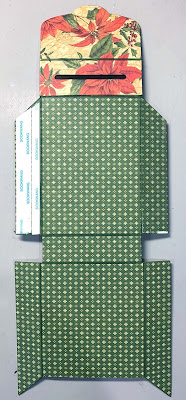
These are the two boxes I made with the Post Box die. Yep, it's time to get those Christmas projects going!

Christmas Wish Box
The Post Box makes a great Christmas Wish Box. Give each child their own box to fill with there Christmas wishes. They'll have so much fun putting their Christmas wishes in the box. They could cut things out that they see on advertisements, write a letter to Santa, lots of ways to fill the box!

Tutorial
1. Cut mat board and design paper 5 1/2" wide. Apply adhesive to the back of the design paper and adhere to the mat board (6" x 13") lining it up at the bottom edge. Eileen's Thermoweb adhesive sheets work really well for this application.

2. Now cut a piece of design paper 5 1/2"W x 3 1/4"L and adhere over the blank spot on the matboard.

3. Now place the paper covered mat board on the die with the small piece of patterned paper covering the scalloped top of the die. Place the mat board face down so that the scalloped edge is just covered with the mat board and run it through your die cutting machine. It should come out nicely cut with the edge of the different design paper at the back seam of the slotted top. In the photo below you can see that I am peeling off a very thin strip of paper that went over the back scoreline.

4. Assemble the box using double sided tape. Note that the bottom flaps in this photo fold over the upper flaps.
5. I made the sentiment on the front by printing onto clear transparency film. I love doing this especially when I want to add journaling to a journaling card. Use the "T-Shirt Transfer" function on your printer as this prints a mirror image of the text which you will need to do because you have to print on the backside of the transparency film. Be sure you get the right film for an ink jet printer if that is what you use.
6. Make a closure for the box, I used velcro.

I finished off the back of the box with a cut-apart.

7. You could also make cards to write on that fit through the slot.

Christmas Ornament Gift Box

One Christmas my parents bought my brother a golf putter and instead of wrapping it, they hung it right next to the tree trunk where it was effectively hidden! It was great fun as my brother was really hoping for that putter and was quite mystified that there was no golf club looking package under the tree! Ever since then I've thought it was fun to hide things in the tree. So here's an adorable box that holds a gift card or small gift that's also an ornament.
Tutorial
1. To utilize 12" paper for this design, cut design paper 5 1/2" x 12 and adhere to 6" x 13" mat board. (I always trim off the extra 1/2" on the side). Place the mat board on the die such that the scalloped edge is covered with design paper and the uncovered portion is at the bottom and die cut. Keep the little piece that comes out of the "mail slot". Then cut the two triangle pieces off at the top. In this photo you can see that I've cut the left side off.

2. Assemble the box in the same manner as above.

3. Now use a piece of coordinating design paper to make a trim all around the box. You could use a border trim or ribbon.

4. Now place the little piece that was diecut out for the slot back in the slot and cover with decorative paper, a sticker, whatever works for you on the outside. Then punch two holes in the top and thread ribbon, string, twine etc. to make a hanger.
I used a magnet set on this box as a closure. The magnet on the box itself is underneath the design paper while the magnet on the flap is visible.

I used a sticker on the top of mine.

Embelish the box however you like and you're all set with a pretty gift box ornament.


Supplies
Graphic 45 Winter Wonderland Collection
Thanks for stopping by! Be sure to take a look at Eileen's blog to see more projects with the Post Box die!

Your Holiday Christmas boxes are adorable! Good tip on how to fix papers so it gets covered. I love the papers too. Thanks for sharing.
ReplyDeleteso festive Maggi! I love those papers. =)
ReplyDeleteCool
ReplyDelete