Pages

Wednesday, November 21, 2018

Tis the Season for Gift Giving at the Frilly and Funkie Challenge Blog

The Challenge  
Are you ready for a new challenge on The Frillie and Funkie Blog?  I'm hosting this time around and I've got a good one for you, something fun and useful! I know we're all busy making gifts, cards and cooking this time of year.  So, for this challenge, you can do something you've probably got on your schedule anyway, and that is create a vintage or shabby chic gift for a special someone in your life. Your gift could be as simple as a handmade card or tag, or an elaborate piece of home decor. Maybe you like to place your gifts in handmade boxes? That works too, your imagination is the only limit on this challenge!

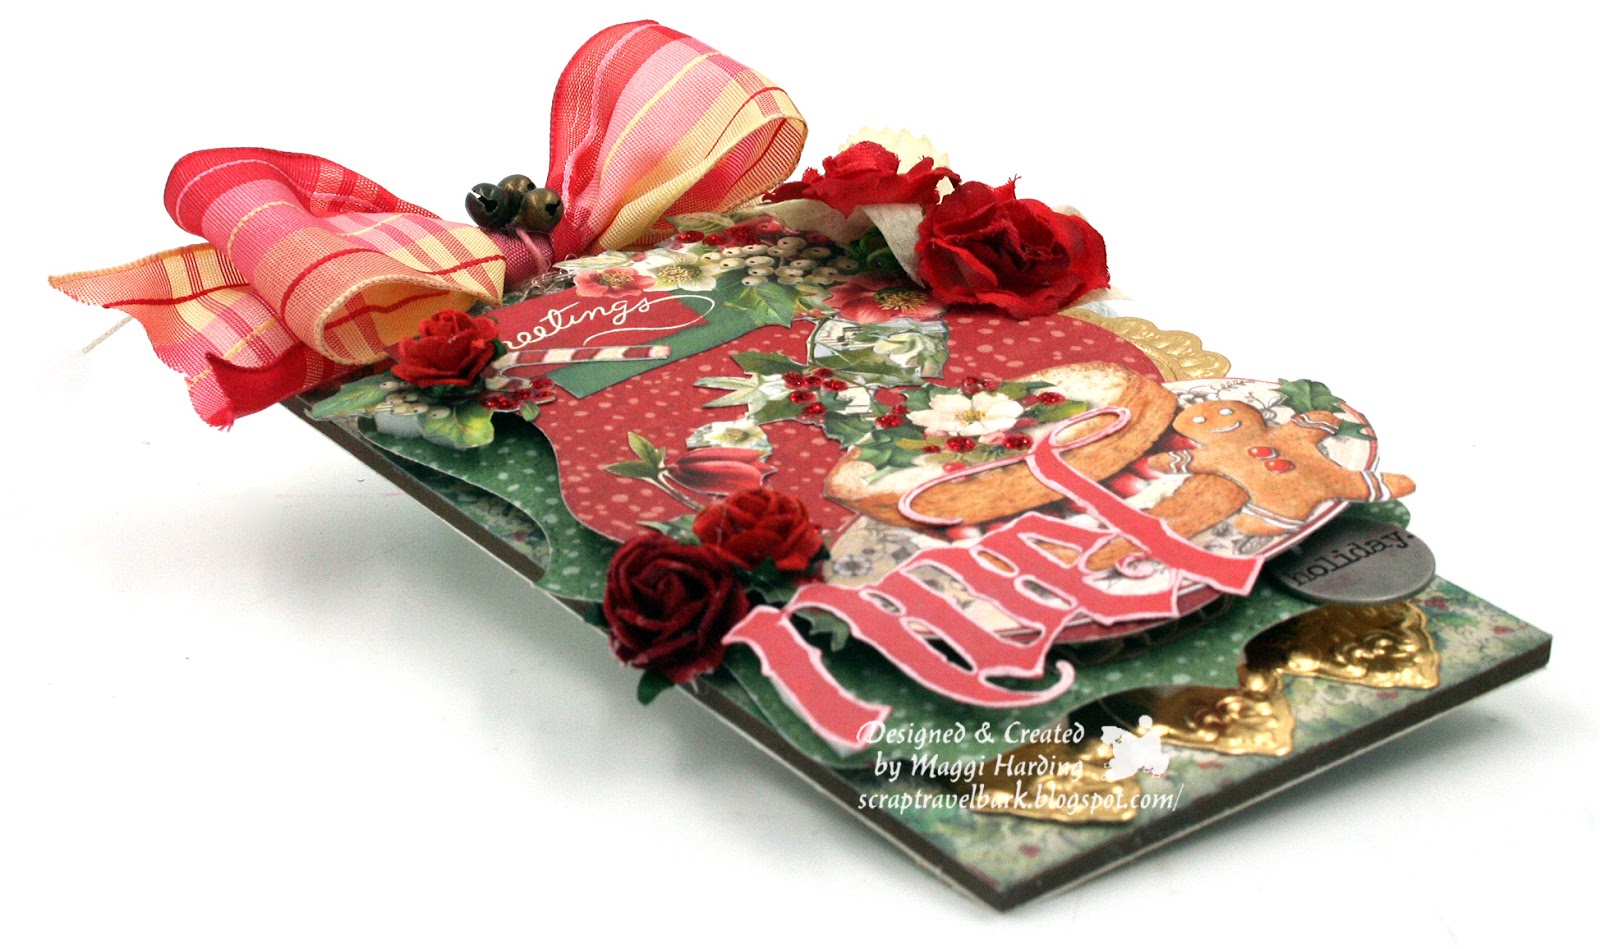
My Inspiration Piece
It's that time of the year where we're looking for the perfect gift for our families, friends and neighbors, right?  One of my favorite gifts to give is home baked goodies and of course, those goodies need to be placed in a festive box adorned with a special tag. 

I used a #8 Tim Holtz Etcetera Tag and Stamperia Christmas Vintage paper for my tag.  I'll bake some cookies and put them is a simple container and then dress it up with this pretty tag. I first covered the tag with design paper and then added two die-cut layers that I popped up with dimensional foam tape. 

Best of all, I can write the recipe on the back of the tag.  I must admit, I do bake some delicious cookies and people always ask for my recipe so this takes care of that!

Back to the front of the tag, in this photo you can see that I fussy cut that cake and gingerbread man d don't they look yummy?  I die-cut a border and medallion from Tim Holtz metallic paper using the new impresslits dies that cut and emboss all in one step and tucked those in at the top, bottom and side. I am loving those dies!

I am also loving the Thinlits word die that I used to cut Noel.  That font is so pretty!  I cut it from white cardstock because I wasn't sure what color I wanted and finally inked with a blend 
of Fired Brick and Candied Apple.  

I love to "hide" little things here and there on my tags and on this one I tucked in a Christmas Typed Token near the bottom.  I think little details like that add so much.
The pretty bow is not Christmas ribbon but I think it looks great with this tag.  I added 3 tiny jingle bells to the center of the bow.


Here you can see the dimension in this tag with the popped up layers and pretty red blooms!


How to enter the challenge

Create a vintage or shabby chic gift project and link it up to the Frilly and Funkie Challenge any time between now and 11:55 Eastern Time on Tuesday, December 3th, 2018.

The Design Team will choose their top four picks, with the winner being invited to be a guest designer in one of our Frillie and Funkie challenges. The other three winners will receive Top 3 badges to display on their blogs. Everyone who enters and follows the rules will be entered into a draw to have the chance to win a $25 spending spree at The Funkie Junkie Boutique.

Thanks so much for stopping by today. Be sure to take a look at the creations of my talented teammates, you can see their creations here, at the Frillie and Funkie Blog.


Wednesday, November 14, 2018

A Wish Book for the Kids with Eileen Hull Designs

A Project for the Kids!

When I was a child, I spent many many hours perusing the Christmas "Wish Book".  Perhaps you are a bit younger than me and never experienced the "Wish Book" and you're wondering, what is a wish book?  Well, the "wish book" was the Sears catalog and children throughout the nation spent hours flipping through the pages and pages of toys, hoping that Santa would fulfill their dreams.
Today's project is for the little ones in your house; it's my version of the wish book.  I've seen my niece and nephew go through the flyers that come in the mail and circle their favorite toys and I thought it would be fun for them to have their own wish book where they could write their list for Santa.

I used Eileen Hull Designs by Sizzix Book Binding die to create this fun little mini.  Scroll down near the bottom for a tutorial on how to use this fun little mover and shaper die.


The book has many blank pages so the kids can cut out pictures of their favorite things and glue them in the book.


There are also lots of pockets to tuck in pictures and tags.

We want our children to know that Christmas is not only about toys and Santa; we also want them to know that Christmas is about giving so I've included pages where they can record their ideas for gifts for other family members.
Pocket pages, on the left and right.


Tutorial

Eileen's book binding die is just so fun!  It gives you the flexibility to bind your albums without expensive binding machines.  I've used MAMBI Happy Planner Discs to bind my book, but you could also use rings.

Making the binding is so easy.  All you need is album cover and Eileen's  Book Binding die.  I like to tape the die onto the cover so that it stays where I want it and then run it through my die cut machine and that's it.  You will need a  Movers & Shapers Shuttle or Base Plate as the Book Binding die is a Mover and Shaper die.

Then, all you need to do is snip the opening and slip in a disc.


To make my Wish Book, I used Graphic 45's St Nicholas collection.  For the cover I just layered up a couple of pieces of design paper and added a large sticker at the top, a cut-apart at the bottom and a piece of chipboard on the right.  Then, to finish it off, I added a title and made a couple of flowers using Eileen's Journaling Cards, Flowers & Leaves die set.


These flowers are easy to make!  Just die-cut some blooms with the flower die and give them some shape with a stylus or tweezers and stack them up as I've done in the photo below.


Then to give them some Christmas magic and sparkle, dab with a clear drying glue and sprinkle with Diamond Dust or alternatively, add Icicle Stickles to the petals.


Next die-cut some leaves  with Eileen's Leaf Die and pinch to shape,  Nestle the leaves under the flowers and that's it.


To finish off your book, die-cut plenty of blank pages, use lined paper as well as design paper, so the kids have places to record their wish list.  Give the kids some adhesive, scissors and ads from the paper (you know there will be lots over Thanksgiving week) and see what they come up with.  This would also be a great project to do with the kids.  Let them decorate their covers.  I bet you'll have some very memorable "wish books"!


Sizzix Dies Used


Other Supplies
Graphic 45 St Nicholas Collection 12 x 12 papers and Stickers

Saturday, November 10, 2018

Saturday Showcase: Stamperia Garden Journal at The Frilly and Funkie Blog

Spotlight on Stamperia's Garden Collection

Join me over at The Frilly and Funkie Blog for the  Saturday Spotlight!  Today the spotlight is shining on Stamperia's Garden collection, AND I've got a great tutorial for you.  These papers are colorful and filled with delightful garden images that just might entice you to do a little fussy cutting.  I've created a garden journal that is simple to make, but oh so lovely, and, since it's the time of year for gift giving, this journal is perfect for the gardener's in your life!


Inside journal page:

The Stamperia Garden Collection can be purchased at The Funkie Junkie Boutique along with many other Stamperia collections.


Wednesday, November 7, 2018

Thankful Canvas for the Frilly and Funkie Challenge

Challenge Theme: 
Kathy is hosting our challenge this time and it's A Harvest of Gratitude.  Kathy asks that you
"create a vintage or shabby chic project that portrays something that fills your heart with thanksgiving. Use harvest colors and be sure to tell us how your project reflects your thankful heart."

My Project:
Sometimes life is hard, I mean really hard.  Right now, my family is having to deal with a lot of stressful issues.  We just lost our Mother and another family member is dealing with a difficult health problems.  Some days I find it difficult to think positively but this challenge has reminded me that I still have much to be thankful for and so I created this canvas as a constant reminder, life IS good, even in the face of adversity.


The Process:
Have I told you how much I LOVE everything Stamperia?  Oh my, they have the most gorgeous papers, totally drool worthy!!  The papers are so pretty, well, you could just frame the papers as they are with no modification!  For this project, I used the Patchwork collection and a rice paper sheet, also from the Patchwork collection.

Ok, I did add a few things to the papers.  I started with a 9" x 12" canvas and I first glued a 9" x 12" piece of design paper to that. I used a Tim Holtz circle mask and aged mahogany paint to stencil on some random circles.  Then I used a sponge stamp to add some smaller dots of Fossilized Amber and Aged Mahogany.

Then I took a 4" square canvas and painted it with Aged Mahogany paint.  After that dried, I decoupaged on a 4" square cut-apart and glued it to the canvas.  The raised canvas creates a picture with in a picture, giving the small canvas a position of importance. I am so grateful for my home, it is my refuge so I thought it was important to represent that on my canvas.


Though I'm not a coffee or tea drinker, I still love these cups and the messages they convey.  I fussy cut the teacups from the rice paper they were printed on and decoupaged them on the canvas.  I love their translucent look.

Beneath the cups I've added a  chipboard word that says it all, "family".  Family is everything to me.  The two words I've used on this canvas are Creative Embellishments chipboard and I like how they stand out.  I colored the words with Seth Apter's Oil Rubbed Bronze embossing enamel by Emerald Creek.  I like how the dark color gives the words a sense of importance.

I love the copper flecks in the embossed words.


Everyone faces challenges in life, I have to remember, that in spite of it all, life IS good.  I created a lot of texture on this tiny canvas that is just 3" square. I did some masking on the canvas with a burlap stencil and then painted it all with Aged Mahogany paint.


 Flowers
In my crafting world, it's all about the flowers.  Can't help myself, I have to put flowers on everything!  The flowers I've used on this canvas are mostly from Little Birdie's Vivid collection of blooms.  Love the vibrant color that works so well with this canvas!


How to Enter the Challenge

Create a vintage or shabby chic Harvest of Gratitude project and link it up to the Frilly and Funkie Challenge any time between now and 
11:55 Eastern Time on Tuesday, November 20th, 2018.

The Design Team will choose their top four picks, with the winner being invited to be a guest designer in one of our Frillie and Funkie challenges. The other three winners will receive Top 3 badges to display on their blogs. Everyone who enters and follows the rules will be entered into a draw to have the chance to win a $25 spending spree at The Funkie Junkie Boutique.

Thanks so much for stopping by today. Be sure to take a look at the creations of my talented teammates, you can see their creations here, at the Frillie and Funkie Blog.


LinkWithin

Related Posts Plugin for WordPress, Blogger...