Pages

Tuesday, August 31, 2021

Layout for Creative Embellishments, Same Place, Different Time.

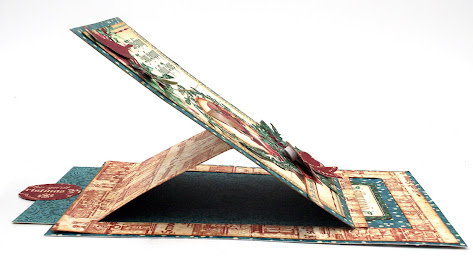
I love working with vintage colors and photos.  This layout for Creative Embellishments is special because it is a photo of my Uncle taken in France circa 1946.  The smaller photo is my cousin, my Uncle's son, taken in the very same place in 2013.

I've used Graphic 45's DCE, Communique papers that is such a great collection for vintage masculine pages.  On the left side of the page peeking out, is a hidden tag that I've used for journaling.


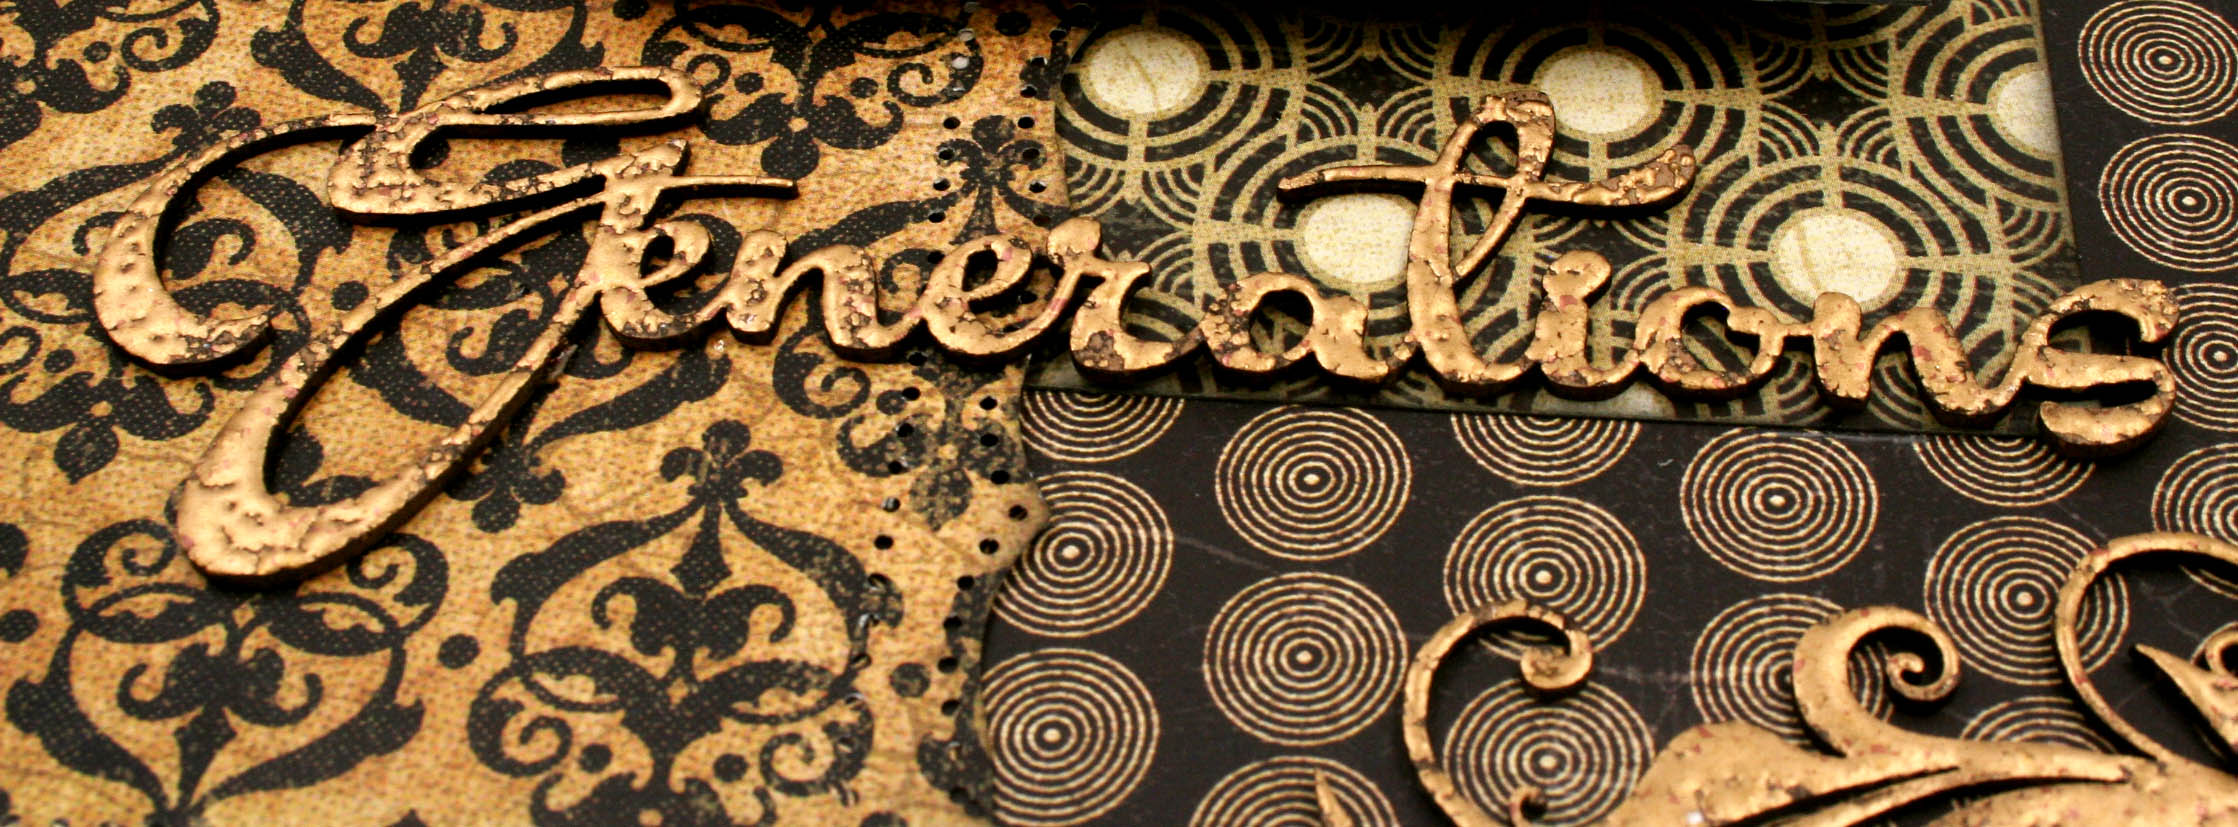
I used two Creative Embellishments page corner chippies that are heat embossed with gold powder.


Generations is from Creative Embellishments Heritage Word Set, also heat embossed.


Supplies from Creative Embellishments


Other Supplies

Graphic 45 Communique Collection
Stampendous Aged Gold Embossing Powder


Thanks for stopping by today.  Be sure to enter our monthly challenge, you could win a gift certificate!
xoxo Maggi


How to Enter the Challenge

*Create a NEW project layout, mini album, tag, card, canvas, etc….as of August 1st, 2021.
*It is required that you mention in your blog post that you are playing along at Creative Embellishments together with a link back to our blog page. Please make sure to reference our challenge. Please, no old projects. (meaning projects from previous months that may fit the challenge) Please share only new projects.
*Please add your entry to the inlinkz tool below to be eligible for the prize. You have until the last day of each month 11:55 pm eastern time to enter.
*Simply add a link to your FB photo (if you do not have a blog) featuring your challenge entry. Let us know how you were inspired by the photo.
*Combining with other challenges is permitted.
* We would love to see you USE AT LEAST 1 OF CE products on your projects but it isn’t required to play along.
*WINNERS will have 2 weeks to claim their prize. (Shipping not included) The winner will be announced on this post the day after the challenge ends. Keep an eye out to see if you are a winner.

Friday, August 27, 2021

New Stamps from Eileen Hull Designs!


Finally!!  I can now tell you about Eileen Hull's new stamp sets premiering today!  Join Eileen on her Facebook Live today, to get a close up look at these stamps. This first release features 2 great stamp sets and a background stamp.  Take a look!

 Buttons, Cards and More Set (6x8)                                Snail Mail Everyday Sentiments Set (6x8)

Vintage Damask (4x6)


There are so many ways to use these stamps.  I made a couple of vintage cards but there are so many other things you can do with these.  Be sure to keep an eye on Eileen's blog for ideas.


First let's take a look at a simple vintage thank you card. 


I love this sentiment from the Buttons, Cards and More Set.  Here's the great thing about this sentiment - It's exactly the same shape as the label diecut from Eileen's Gift Box XL Die!  I just stamped onto cardstock and then diecut with the label die. This is another way to use your Eileen products together.  The wreath surround and bow are diecuts from the recently released Wreath and Snowflake Thinlits Dies.  I love how I can use dies from different sets all together on one project.


Near the bottom on the striped strip I used the thanks sentiment from the Snail Mail Everyday Sentiments Set.


On this card I created a background with the Vintage Damask Stamp.  Then I stamped the Sunshine Buttons Stamp  from the Buttons, Cards and More Set onto cardstock.


Rather than showing the stamped button images, I glued real buttons onto the front.  


A little lace across the bottom completes the vintage look!


Aside from cards, think about the great ephemera you could make with these stamps, library cards, button cards, tickets, all distressed and ready to pop into a junk journal or onto a vintage tag.  I just got these stamps after returning from a 6 week vacation so I haven't had much time to play with them but my mind is churning with ideas!  Stay tuned!

Supplies


Eileen Hull Vintage Damask Stamp by Maker Forte 
Eileen Hull Buttons, Cards, and More Stamp Set by Maker Forte


Thanks so much for joining me today, I hope you're as excited as I am about Eileen's new stamps!


Tuesday, August 10, 2021

Eileen Hull Designs Thinlits - Time for Christmas Cards

Eileen has a great new Thinlets Die Set, Wreath & Snowflake.   It's perfect for card making and I bet you can think of other uses too.  Below I have a tutorial for you that you can adapt to make any size card.


I made a slider easel card with the set using an older Graphic 45 Christmas collection, A Christmas Carol.


The die set includes a wreath bow and a sweet little cardinal.


Slider Easel Card Tutorial

1.  Cut a base for your card.  Mine is 5 1/4" x 7 1/8".  The base is the blue dotted paper in the photo below.

2.  Cut a piece 5" x 6 7/8".  This is the red patterned paper and is the 2nd layer from the bottom.  Then cut out from the center of the red patterned paper 5/8" from the bottom and left and right sides forming a flap, i.e. do not cut at the top.  

(To adapt:  Make the bottom base any size you want.  The piece on top of the bottom can be the same size or you can cut to leave a 1/8" border all around as I have done.  Just be sure to cut out the center 5/8" - 3/4" from the sides and bottom of the top piece.)


3. Cut a piece   4 1/8" x 6 1/4".  This is the blue patterned piece (not the dotted blue) you see above.  If you are adjusting the sizes, this piece needs to be a little wider than the opening that forms the flap.  

4. Score the flap at 1/8" at the bottom and score at the top where the flap folds up.  Then fold the flap bottom to the top of the flap opening - see below photo.

5. Attach the bottom of the piece from step 3 (blue patterned) to the 1/8" scored section of the flap centering.  The flap should not be as wide as the blue patterned paper.  Glue only the 1/8" flap to the blue patterned paper. See next photo below.


6. Now put glue JUST around the edges of the left, right and bottom of the red patterned paper and glue to the blue dotted base.  YOu can only glue around the edges, otherwise the slider will not work. You should be able to pull the blue patterned paper up forming a "mountain" with the red patterned flap as below.


7.  Side view showing the flap mechanism.  Attach a pull of some sort to the top of the pull out slider mechanism.  I made a circle tab from red patterned paper.


8.  Now you can decorate the slider as you wish.   I added a cut apart from the Paper collection to a 4' x 6" rectangle and then glued to the bottom part of the easel only so that it stands up when the easel is pulled out.  I used the wreath around the cut-apart and topped it with the pretty little bow.  In the upper corner I added some greenery and the cardinal, all from this die set.

View of finished card laying flat.

Now you have a really pretty interactive card all ready to be mailed!


Here's a simple card made with the same Thinlits.  I used 3 cuts of the wreath to make it nice an lush.  


Eileen also has a new XL die out called the Box Ornament.  Isn't this so cute?


I cut the ornament and used it to make a cool card with a Steampunk twist.  This is Graphic 45's 2020 Christmas collection.  I used platinum paper with gold paper accents so that the dimension would show.

I love that the bow is 2 parts.  Cutting the outline from a different paper helps give the bow dimension.


Supplies


Graphic 45 A Christmas Carol Collection


Both the Wreath & Snowflake Thinlits Set and the Box Ornament are great dies for your holidays crafting.  The Wreath and Ornament Set is designed such that it is sized to work with the Box Ornament, so you can mix and match these sets.

Thanks for joining me today!

Maggi xoxo

Tuesday, August 3, 2021

Baby Layout for Creative Embellishments

 I made another page for what seems to be a never ending 8 x 8 scrapbook of my great niece.  I used Graphic 45's Princess collection along with a frame and title pieces from Creative Embellishments chipboard.


The title piece is heat embossed with Stampendous Shabby White Embossing Enamel.  I layered it over the frame so that it would stand out.


The frame is heat embossed with Ranger Antiquities - Rose Quartz Embossing Powder,  I think.😑  It is definitely embossing powder and looks like Antiquities but the Rose Quartz looks a little darker in the jar. I don't have anything else close to the frame color so this has to be it!


Layouts can be effective and still simple.  I want them to fit in a scrapbook so the pages need to be relatively flat.  I think chipboard helps emphasize the photo and really, that's what it's all about right?  Well that, and journaling which I'l leave to my niece's Mom and Dad.


Supplies from Creative Embellishments


Other Supplies

Graphic 45 Princess Collection
Stampendous Shabby White Embossing Enamel
Ranger Antiquities - Rose Quartz Embossing Powder


HOW TO ENTER THE CHALLENGE

Be sure to check out the monthly challenge on the Creative Embellishments Blog because you could win a great gift certificate to the store! To find the monthly challenges just click on the pink search icon on the upper right side of the page and enter “challenge” in the search box and the challenges will pop up.


 Here are the rules:

  • Create a NEW project layout, mini album, tag, card, canvas, etc….as of  August 1st, 2021.
  • It is required that you mention in your blog post that you are playing along at Creative Embellishments together with a link back to our blog page. Please make sure to reference our challenge. Please, no old projects. (meaning projects from previous months that may fit the challenge) Please share only new projects.
  • Please add your entry to the inlinkz tool below to be eligible for the prize. You have until the last day of each month 11:55 pm eastern time to enter.
  • Simply add a link to your FB photo (if you do not have a blog) featuring your challenge entry. Let us know how you were inspired by the photo.
  • Combining with other challenges is permitted.
  • We would love to see you USE AT LEAST 1 OF CE products on your projects but it isn’t required to play along.
  • One lucky randomly drawn entry will get a $25 gift voucher to our store. (Shipping not included)
  • WINNERS will have 2 weeks to claim their prize. The winner will be announced on this post the day after the challenge ends. Keep an eye out to see if you are a winner.


xoxo Maggi

Monday, August 2, 2021

Cherub Garden Tag for Creative Embellishments

 I like to use large tags as my creative "playground".  It's sort of an art journal for me.  I just can't do traditional art journals, I draw a blank every time I open one.  But, give me a tag, and the mojo sometimes flows. 

This is definitely one of those pieces that didn't have a plan.  I started by adhering a piece of 49 and Market design paper to a large tag and then though hmmm, those Little Birdie succulents would look good with this paper.  Then I grabbed a harlequin stencil and stenciled on a harlequin pattern. 


Well then I remembered those harlequin chipboard pieces and thought they'd look nice too.  I heat embossed them with Stamependous Shabby Chic embossing powder.


Then I added my succulent garden.  Love these from Little Birdie Crafts.  I've had these little Prima resin cherubs forever.  Dont ask me why, it just popped in my head to add cherubs and call it a cherub garden.


So I thought, if I'm going to have cherubs, I need an angel/cherub kinda word, hence peace.  Works for me.  😄


Well. that's how one thing leads to another!  Hope you've enjoyed this little trip through my creative process!  Thanks for joining me.

Supplies from Creative Embellishments

Large Tags


HOW TO ENTER THE CHALLENGE

Be sure to check out the monthly challenge on the Creative Embellishments Blog because you could win a great gift certificate to the store! To find the monthly challenges just click on the pink search icon on the upper right side of the page and enter “challenge” in the search box and the challenges will pop up.


 Here are the rules:

  • Create a NEW project layout, mini album, tag, card, canvas, etc….as of  August 1st, 2021.
  • It is required that you mention in your blog post that you are playing along at Creative Embellishments together with a link back to our blog page. Please make sure to reference our challenge. Please, no old projects. (meaning projects from previous months that may fit the challenge) Please share only new projects.
  • Please add your entry to the inlinkz tool below to be eligible for the prize. You have until the last day of each month 11:55 pm eastern time to enter.
  • Simply add a link to your FB photo (if you do not have a blog) featuring your challenge entry. Let us know how you were inspired by the photo.
  • Combining with other challenges is permitted.
  • We would love to see you USE AT LEAST 1 OF CE products on your projects but it isn’t required to play along.
  • One lucky randomly drawn entry will get a $25 gift voucher to our store. (Shipping not included)
  • WINNERS will have 2 weeks to claim their prize. The winner will be announced on this post the day after the challenge ends. Keep an eye out to see if you are a winner.


xoxo Maggi


LinkWithin

Related Posts Plugin for WordPress, Blogger...