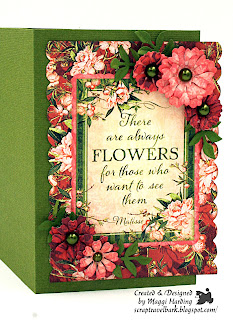
Tri-fold Gift Card
Hello friends! Today I'm sharing a tutorial with you for making a tri-fold card that is also a gift card holder. Everyone likes to receive a gift card right? I'll be using some dies from Eileen Hull Designs new Book Club 2 collection which includes the Wrapped Journal that is such a BIG hit, but it also includes 6 other die sets.
Step by Step Tutorial
Complete supplies list at the end. I'm using Graphic 45's Floral Shoppe collection, but you could use any papers you like. Ink the edges of all the papers if desired. I used Eileen Hull's Blends by ColorBox. These are great inks that include an inker, applicator, and reinker all in one.
Step 1:
Cut a piece of card stock 12" x 6" and score at 3 3/4" and 8 1/4" that coordinates with your chosen papers.
Cut 2 pieces from Scarlet Serenity 3 1/2" x 5 5/8" and adhere on the sides as shown. For the center, cut a piece of Midnight Medley 4 1/4" x 5 5/8" and adhere in the center.
Step 3:
Fold the right side in and then the left side in forming a tri-fold card.
For the front cover - Cut a piece of Burgundy Blossoms 4 1/4" x 5 1/2". Use the Scallop Border Mover & Shaper on the edges to create a scalloped edge. I tape my paper to the die to hold it in place before running through my die-cut machine.
Step 4:
Use the Journaling Cards, Flowers & Leaves to die-cut some flowers. Ink the flowers to give them more character. Curl the petals and then stack the smaller blooms onto the larger creating dimensional flowers. Add a pearl center. Die-cut some leaves too.
Step 5:
Cut a piece of Verdant Blossoms (pink) using the large scalloped die from the Journaling Cards, Hearts set. Then trim out an ephemera card so that it is 2 3/4" x 3 3/4".
Now it's time to assemble the front of the card. First adhere the scalloped edge piece onto the front of the card stock base 1/4" from the left side, centering top to bottom. The right side will extend beyond the card stock. Next, center the pink scalloped piece and then adhere the ephemera card as shown. Add flowers and leaves at the top right and bottom left.
Step 6:
Attach a magnet on the right side flap, about 3/4' from the edge. Then, cut a piece of Burgundy Blossoms (green side) 3 1/2" x 5 3/8" and adhere centering top to bottom over the magnet. Take a 2nd magnet and place over the one underneath the paper. Peel off the paper covering the sticky dot and close the left flap over top. Your magnets will be perfectly aligned.
Step 7:
Place a die-cut flower over the magnet on the left side to cover it.
Step 8:
Adhere a small ephemera card over the magnet on the right side.
Step 9:
Cut a piece of Scarlet Serenity (burgundy print) 3 1/4" x 4 1/4", round the corners if you wish.
For the inside center panel, die-cut a scalloped piece from green card-stock with the Journaling Cards, Hearts die set. Then die-cut a credit card sleeve from Verdant Blossoms (green/pink print) with the Credit Card Sleeve & Tags. Use the small scalloped die to make the slit in the credit card sleeve. Adhere the credit card sleeve just around the edges to the green card-stock piece and then adhere to the burgundy print piece. I cut a small piece of Golden Serenity (Burgundy side) with the small rectangle die in the Credit Card Sleeve & Tags to use as a place to write a hidden message.
Step 10:
Glue the above assembly inside on the center panel as shown below. You can insert a gift card where I have inserted the burgundy piece. Die-cut the word "love" with the Journaling Words die and adhere over a die-cut from the Bookplate, Hinges & Label set.
Step 11:
That's it! Isn't it great how all of the Book Club 2 and Book Club 1 dies work together? There are so many combinations and layers you can put together with these dies. Of course, they are work wonderfully with the star of the Book Club 2 dies, the Wrapped Journal, BUT, they work great for other things like this card.
Eileen Hull Designs Dies by Sizzix
Other Supplies
2 small magnets
Thanks for stopping by today. Be sure to stop by Eileen's blog and see what the rest of the design team is up too!


Great tutorial Maggi! I needed some inspiration for cards and you reminded me of tri-fold cards, so thanks very much. I always admire your design and this is a great one on layering and techniques, and using one of my favourite papers. Many thanks
ReplyDeleteThanks so much Julie, glad I could inspire you!
DeleteThanks for more uses for the credit card sleeve die—i DO love the way the collections work together. BTW, the floral paper is gorgeous.
ReplyDeleteI am loving that little die. Everyone in my family might get gifts cards this year, LOL!!
DeleteMaggi this is genius! The way you put the elements together is so inspiring ❤️
ReplyDeleteThank you Eileen!
DeleteWhat a beautiful creation, Maggi. The G45 paper is exquisite as a starting point and with your additions it just keeps getting better. Who wouldn't get excited about a gift card that is truly 2 gifts in one? tfs
ReplyDeleteYou are so kind Helen, thank you!
DeleteBeautiful Maggi! Thanks for all the great step out photos - I am definitely a visual learner!
ReplyDelete