Pages

Tuesday, January 9, 2024

Tutorial for Eileen Hull's Cantilevered Sewing Box by Sizzix

I was really excited when the cantilevered sewing box die came out as it brought back fond memories of my Mother's sewing box.  It is just like hers in a miniature version!  It has 6 little drawers that are great for storing small items like buttons, bobbins, charms, etc.


It opens up so effortlessly making it such a useful box!


This may look intimidating but it really isn't.  Follow my tutorial and you'll have a finished box in no time.

 You can easily make this box, here's what you'll need:


Glue
36 small brads
Ink
Paper 


Tutorial


The key to making a box covered with paper inside and out, is to adhere your paper to the matboard BEFORE die-cuting.  This simplifies it all so much!

Step 1: To begin, cut 2 sheets of paper for the outside and 2 sheets of paper for the inside of the box, and 2 sheets of mat/chip board, all  to 6" x 12".  You will need additional mat board and design paper but  you can use smaller pieces and scraps for this part.


Step 2: Adhere paper for the outside of the box on one side of the matboard and adhere  paper for the inside of the box on the other side.  Be sure to burnish the adhesive down.  Using adhesive sheets ensures a strong bond and I find it much easier than using glue, but its a personal preference thing!  Also I like putting the adhesive on the paper rather than the matboard, again works better for me, personal preference. 

Place the outside design paper down over the die and run through your machine.  (In this tutorial, it is the blue side that goes down over the die) Die-cut both sheets of covered 6" x 12" matboard.

Step 3: Then use smaller pieces of matboard and paper to die-cut 4 more drawers and 2 more sets of hinges (the long narrow pieces on the die.)


Step 4:  You should have 6 drawers, 2 lids, 2 leg sets, 4 long hinges and 8 short hinges as shown in the photo.


Step 5: Ink around all the pieces if so desired. I like to use a Faber-Castell Big Brush pen to get in the scored grooves, a Sharpie also works. DO be careful not to let the pen slip! (I inked the blue chest but not the green one.)


Step 6:  Next, form the boxes by gluing the sides together using a fast drying glue.   You can use a rubber band to hold the sides together until the glue sets up.   Assemble all 6 drawers.


Step 7:  Cut a piece of chip or mat board and a piece of design paper  2 1/8" x 6" to use as a base for the drawers.  Adhere the design paper to the matboard.


Step 8:  Apply Scor-tape or other adhesive to the narrow side of a box (side without the holes) and apply Scor-tape to the underside of the base from Step 7.


Step 9:  Adhere two of the boxes together as shown below.  Make sure the boxes sit flat, if they don't,  don't force the bond between them, just adhere the two boxes to the base.


Step 10:  Fold the leg assembly on the score lines.  Adhere to the bottom of the base as shown. I used Scor-tape because it instantly bonds.


Step 11:  Use small brads to attach the 4 long hinges on the outer corners as  shown.  Attach 4 short hinges to the middle as shown.


Step 12:  Stack two boxes on top and attach the hinges as shown.


Step 13:  Stack the remaining two boxes and attach the remaining 4 hinges as shown as well as attaching the other hinges.  Attach a brad through the 4 empty holes on each side.


Step 14:  The two remaining pieces are the lids. (Sorry I forgot to photo this step.)    Apply Scor-tape to the small tab and insert into the top box so that it forms a cover as shown below.  You could also attach to the outside of the box. Then embellish as you desire.


And that's all there is to it!  If you have questions, post in the comments and I'll respond.  Thanks for joining me.

xoxo
Maggi


Tuesday, January 2, 2024

Eileen Hull It's All About Stitching Dies!

2024 – EILEEN HULL’S JANUARY SIZZIX CLASSICS RELEASE

Welcome to the 2024 January Sizzix Release Party of Eileen Hull’s newest die collection! We are celebrating with a Live party and this Blog Hop! Eileen’s Teams have been hard at work creating with Eileen’s new products and have quite a lineup of inspiration for you.

If you've longed for some of Eileen's older dies, The Classic Cantilever Sewing Box, Embroidery Hoop and Needle Book dies have been brought back because you asked! These dies all relate to stitching but you can use them is so many different ways! They are all Bigz dies which are so versatile because of the number of materials that may be cut with them.


THE NEW DIES:


I was so excited to see the Cantilever Sewing Box XL Die, as my Mom had a wooden sewing box just like it and I now own it. It’s great for storing sewing supplies like needles, thread, buttons, floss and pins- but it also works for hair bands and clips, small storage items, jewelry, desk organization and small treats. Use the drawers separately to organize your desk drawers or create a shadowbox- so many ways to use! The finished size is 3 1/2” x 6 1/4” x 2 1/4”.  I will have a step by step tutorial on this blog January 9 to make this sewing box so be sure to come by.


The Embroidery Hoop measures 4” and is designed to be cut from thick material such as matboard or chipboard. You can actually tuck thin fabrics in the hoop and stitch on them. Or you can die cut from paper and use the hoop on card fronts. Use the pieces separately or all together.


I'll be the first to tell you that sewing is not my thing. My Mom was a seamstress extraordinaire. She tailored suits, made every stitch of clothing I ever wore until I got out of high school. She did teach me to sew and I became proficient but I hate it! So here are other ways to use this adorable embroidery hoop.

I collect all things "chicken". This image came from a napkin so I framed it with the embroidery hoop.


I used a bit of linen to make a memory hoop to display some of my Dad's military service pins. Its not pretty but it honors my Father. Those are his actual dog tags.


The Needle Book is also a ScoreBoard die and features a pretty scalloped edge to the book. It measures 3 1/2” x 2 1/4" x 1/2" and is perfect for storing your stitching needles and pins- works great when made from felt! But it can also be made from matboard, chipboard, leather or fabric- one of the benefits of the Bigz dies.

I made the needle book from felt and inside it's magnetic!  Just toss your needle on it and it sticks.  There's no need to poke it thru the felt to keep in the book.  (and your finger as I would do 😏)


This cute little book also makes a sweet notebook that you can easily tuck into your purse or pocket.  I put blank pages inside where I can write myself a note.


Please join us for the It’s All about Stitching Release Party that will be held on Tuesday, January 2nd at noon Eastern time on Eileen's  YouTube, Facebook and Instagram pages. Eileen and her team will be sharing creative ways to use these dies and we can’t wait to share them with you! There will be giveaways so make sure to tune in and see how to enter to win!

Tuesday, December 12, 2023

2023 Eileen Hull Designs Roundup

 Eileen's DT takes a little break in December and posts their favorite projects from the year.  We really aren't goofing off, 😄 we're busy designing for the release coming in January!

My "other" hobby is cooking so of course, this cookbook was one on my favorite projects.   This was made with Eileen Hull's Frame Pocket Journal die.  The die is plus size, meaning that you need a large format die cut machine that has a 9" opening..  The die is approximately 8 3/4" wide and 12 1/2" long. The paper I used is Graphic 45 Farmhouse.  You can see the original post here.


This was a really fun journal to make.   I used the Card Case die and the Journaling Card, Envelope & Window Thinlits Set.  It has 5 pages that are also envelopes so each page has a pocket to tuck in photos and ephemera as well as a place to mount photos.  See the tutorial for this here.


AND my very favorite project is this Halloween house that is really a candy box.  There's a tutorial on my blog here.  YOu could easily turn this into a Christmas house or an Easter Bunny house.  Lots of possibilities with this!  The roof opens up so that you can fill it with treats.


Thanks for stopping by!  I wish you a very happy holiday season, whatever your faith may be.  See you next year!


Tuesday, November 7, 2023

Comfort & Joy! With Eileen Hull Dies

 The holidays are just around the corner and it's time for our annual event, Comfort & Joy! This is the 4th year we've had Comfort & Joy, though this year we are not having a day of dedicated classes. No matter, the Inspiration Team is here to offer you lots "recipes" of Comfort & Joy!

A recipe is simply a list of ingredients and instructions, right?  So for today's comfort, we're making a recipe card that you can include with a delicious tin of cookies.


The "Recipe", you'll need:

  • Eileen Hull Journaling Card, Envelope, and Window by Sizzix
  • Plain cardstock, even large scraps will work, that is what I used
  • A sheet of decorative cardstock
  • Small element for decoration, fussy cut image, sticker etc
  • Adhesive
  • Food recipe printed so that it fits on 4" x 3" card 

Fold a piece of cardstock in half and place the Journaling Card die from the set over the crease such that the die will only cut on 3 sides, thereby making a card that is 4'w x 6" L. 


Then cut another Journaling Card, this time cutting on all 4 sides.


You should end up with two pieces like this:


Now glue your recipe to the Journaling Card.  Most likely your entire recipe will not fit on the Journaling card, so I adhered the ingredients to the journaling card and the instructions inside the card.
Fold the top of the card back half way as shown.


Now glue the top of the journaling card (ingredients) to the folded part of the card, creating an easel like below.  We've just created a recipe card that you can easily see while baking.


Then make an Envelope using decorative paper and the envelope die.  Now you have a nice card and gift for a lucky someone.  If you use my recipe, you'll have enough cookies to fill a tin and plenty for you too!


You really should try these cookies, they are my most most favorite in the world!!


Maggi's Brickle Drop Cookies

1    cup  butter softened
1    cup  granulated sugar
1    cup  light brown sugar  
1    tsp vanilla
½    tsp  salt
3     eggs
3 ½ cups all-purpose flour      
2    tsp  baking soda
2    tsp  cream of tartar    
8    oz   Heath Bits ‘O Brickle toffee bits (1 pkg)
1    cup peanut butter chips
1    cup  chopped pecans

·       Heat oven to 350º, lightly grease cookie sheets or use parchment paper.  They have a tendency to stick so I like using parchment paper best.

·       Beat butter, sugars, vanilla and salt in large bowl until blended.  Add eggs; beat well.  Stir together flour, baking soda and cream of tartar; gradually add to butter mixture, beating until blended. 

·       Stir in toffee bits, peanut butter chips, and pecans. I actually beat this in 'cause the batter is rather stiff and I just can't stir it in very well.  I have a Kitchenaid mixer that handles this well.

·       Drop by heaping teaspoons onto cookie sheet.  Bake 8 to 10 minutes or until lightly browned.  Cool slightly; remove to wire rack to cool completely.  About 6 doz cookies.


And here's another favorite, Texas Tornado Cake. This is so easy to make, I don't even get out my mixer. I just whip it up with a wooden spoon. The icing is divine, very similar to icing on a German Chocolate Cake, but not quite as rich.


Texas Tornado Cake


For the cake:
  • 1 ½ cups sugar
  • 2 eggs
  • 2 cups Gold Medal UNBLEACHED all-purpose flour (bleached flour toughens baked goods)
  • 2 cups fruit cocktail with syrup (16-oz. can) can use 2 cups of any kind of chopped canned fruit
  • 2 tsp. baking soda
  • 1 cup chopped nuts
  • ¼ cup brown sugar
For the icing:
  • 1 stick butter
  • 1 cup coconut
  • ¾ cup brown sugar
  • ½ cup evaporated milk or half-and-half
Instructions

1. Mix regular sugar, eggs, fruit cocktail, baking soda and flour.

2. Pour into greased and floured 9×13” pan.

3. Combine brown sugar and nuts; sprinkle over batter.

4. Bake at 325° for 40 minutes.

5. Prepare the Coconut Icing by combining the butter, coconut, brown sugar and evaporated milk in a medium saucepan. Bring to a boil over medium high heat and allow to boil for 2 minutes. Turn heat to low and keep the icing warm, stirring occasionally, until the cake is done baking.

6. Once the cake is done, remove from the oven and pour the icing over the top of the hot cake.

Note, seems fruit comes in 15 oz cans these days, so I just add enough water to make 16 oz fruit and liquid.  I have used light syrup and it is fine.


Thanks for stopping by, happy baking!
xoxo
Maggi

Saturday, November 4, 2023

Comfort & Joy with Eileen Hull Designs

This is our fourth annual Comfort & Joy event which started during the pandemic as a way to stay connected throughout the holidays even though we were separated from family and friends. Now it's a Eileen Hull Fan Club tradition!


Eileen's team will be creating with holidays recipes. Keep in mind "recipes" can include anything- actual baked goods, journals, banners, tags, cards, home décor, gift wrap and gifts to give and sell and should include an EH die or product!. Please make sure to share YOUR "recipes" in the Comfort & Joy 23 photo album- there will be prizes! We hope that you enjoy this event and look forward to seeing what we all create this holiday season!


Tuesday, October 10, 2023

Halloween Decor with Eileen Hull's Shadow Box Frames

 I love crafting Halloween projects, they are just so fun!  I think it takes me back to my childhood, and of course usually involves eating chocolate while I'm crafting!  😁 So here's a fun home décor project you can make with your kids using Eileen Hull Designs by Sizzix Shadow Box Frames. 


There are two sets of Shadow Box Frame dies and I used the #2 set but either would work.  It just depends on what size frames you want to make.  These are 4 3/4' x 6 1/4".  I constructed the frames from black cardstock and then added 5/8" strips around the frame to add lots of color.  I had some foam alphabet letters which were just the right size to stamp the letters with orange paint onto black cardstock that I cut to fit the frames. 

I used an old Tim Holtz product, Picket Fence Distress Stain, to color Mr. Bones.  I like the uneven coverage that it gives the chipboard.


The frames tended to be a little heavy on the front causing them to tip over so I added a simple chipboard stand to the back.  You can use any scrap chipboard; just cut a length 6" - 7", then score with a craft knife around 3" from the bottom.  Take care not to cut all the way through the chipboard, you just want to scored it enough so that it fold nicely.  Glue to the back and you're all set.


Iff you dig around in your stash I bet you'll find lots of left over Halloween bits and pieces.  I have a lot of great chipboard from Creative Embellishments so I pulled out the skeleton, pumpkins, and the ghost shaker.


I dyed some cheesecloth black.  Its easy to do, just put some cheesecloth in a plastic sandwich bag.  You can spray a little mist or ink up the cheesecloth in the bag, then mist with water and moosh it up!  Of course you can skip the bag if you don't mind inky fingers!


Again, I used Picket Fence Distress Stain to get the transparent look on the ghost  It covers just enough of the chipboard color to make it look sort of cloudy and translucent like I imagine a ghost would look.


Supplies


Cheese cloth - available at Walmart and supermarkets

Orange Paint
Black Cardstock

Thanks for visiting!

xoxo
Maggi


Friday, September 22, 2023

Gnomes for the Seasons with Spellbinders Gnome Hugs Die Set

I had a blast creating with the Gnome Hugs Die Set; gnomes are so cute!  The die set is really for Christmas gnomes but I decided to use the die set to creat gnomes for all seasons.   Here are 4 seasonal cards created with the same die set, Gnome Hugs from Spellbinders. (S6-213)


Since this is a Christmas die set, let's start with the Christmas Card.  I used Stamperia Christmas paper scraps and a journaling card to create this card.  


The sentiment is printed on a transparency and glued to a small tag.  


Halloween is coming soon so I thought some "spooky gnomes" were in order.  I don't think gnomes are very spooky, they're too cute to be scary!  This card is made with left over bits of Haloween paper.  In addition to using the Gnome Hugs die set, I used Autumn Wonder for the pumpkins, and Notched Corner Frames for the inner black print layer.


The gnome on the left is wearing a witch's hat that I fussy cut instead of the die-cut hat.  The two larger pumpkins are cut with Autumn Wonder and the smaller is from an older 2018 die set, the pickup truck bed.


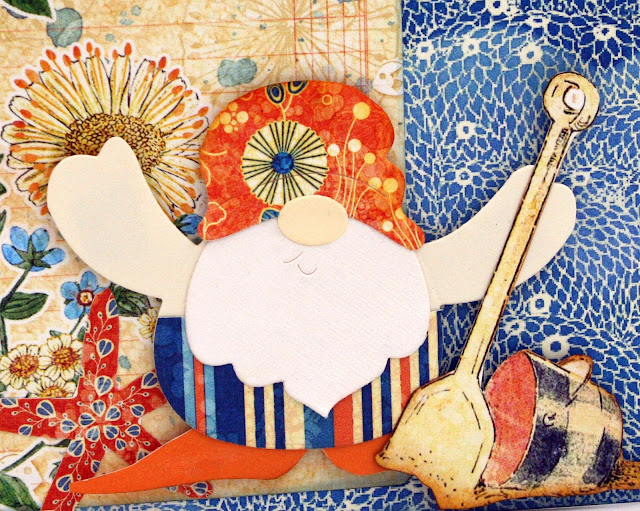
Of course, I needed a beach gnome for the summer!  I used Graphic 45's Sun Kissed collection for this card.  Our gnome is playing in the sand with a fussy cut shovel and bucket.


I rounded off the hat die cut from the Gnome Hugs set to make what I hope resembles a swim cap.  And his feet, well they're  supposed to be swim flippers that I just cut freehand.  Ha!  Whatever... they look a bit like feet or flippers. 😄


And finally, the spring gnomes in their garden of flowers, die cut using the Envelope of Wonder flower dies and papers from Graphic 45's Once UPon a Springtime collection. 


...And that's a wrap for Gnomes for the Seasons!  Thanks for joining me and my gnomes today!

xoxo Maggi


Supplies


ENVELOPE OF WONDER ETCHED

LinkWithin

Related Posts Plugin for WordPress, Blogger...