Pages

Showing posts with label Graphic45. Show all posts

Tuesday, August 13, 2024

How to make a Card Box Using Eileen Hull's Treasure Box Die

Let's make a card box using Eileen's ScoreBoards XL Die - Treasure Box.  It's always great when you can use a die in more than one way!


TUTORIAL

Let's get this party started!  You'll need 3 sheets of mat board and some scraps, design paper, glue and/or double sided tape, and scissors of course.

Step 1:  Cut your mat board.  Run the treasure box die through your die-cut machine making 4 sets of die cuts.  Take two of the die cut box bodies and cut the top tabs off.  Below are the pieces you will need.

Picture below, L to R:  2 box bodies, 2 lid bodies, top of lid, bottom of box, 2 box bodies with top tabs removed.


Step 2:  Cut 2 pieces of mat board 5 1/8" x 1" and 2 pieces 3 1/8" x 1" from scrap matboard.


Step 3:  Join the box body with the box body that has the tabs cut off by adhering the pieces cut in Step 2 over the seam where the two pieces come together.  Be sure to leave a tiny space when you add the smaller piece to the end so that the box folds properly.  If they are tight against each other, the box won't fold properly.


Step 4:  Apply adhesive to the tabs and form the box.   I like to use red liner tape as it has a strong hold.
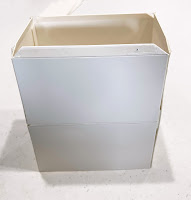
Fold the tabs on the bottom and add the bottom of the box. (Box on the right is upside down with the tabs folded.)


Step 5: Now let's cover the box with design paper.   You could have adhered design paper to the matboard before cutting it but I didn't do that as I did not want a seam to show where the two box bodies were joined.

Cut a pieces of design paper 12" x 7 1/8".  Score the top and bottom at 1/2".  Score at at 1/2", 5 3/4", and 9". 

Cut another piece 6 1/4" x 7 1/8" and score the top and bottom at 1/2". Score left side at 3".


Step 6:  Cover the box beginning with the larger piece wrapping the 1/2" score around a corner as shown  below. You should have 1/2" at the top and bottom to wrap around the edge.  Then add the smaller piece of paper so that the box is completely covered.


Step 7:  Clip the corners and wrap the paper over the top and bottom of the box.


Step 8:  Cut a piece of design paper 5" x 3" and cover the bottom of the box.


Step 9: Cut 2 pieces of design paper 2" x 4". Score all four sides at 1/2".  Clip the corners and adhere to the ends of the box lid.

Paper scored with corners clipped.


Adhere to the ends of the lid.


Step 10:  Cut a piece of design paper 5 1/8" x 6 1/2".  Score at 1/2", 1 5/8", 4 3/4", and 5 7/8".  Adhere to the box top beginning by adhering at the 1/2' scoreline inside the box and then wrapping around the top of the box.


Step 11:  Attach the lid to the box body.  I used metal hinges and brads.  You can use the hinges that are cut with the Treasure Chest score board or make a hinge like I did in this post. (See Step 5.)  


All finished, now you can embellish.  Here you can see how the box bodies are joined together and how the paper is wrapped over the edges.


I wanted a label holder on the front to accent the word "Cards".


The only label holder I had was silver and I wanted it to match the copper colored hinge I used.  Not a problem!  I got out my rose gold Sizzix Luster Wax and covered up the silver.  Works like a charm!

This box is a little bigger than 5" x 7" and will hold A7 cards.  Fill it with cards and make a gift of it or keep it for your own cards.  


Supplies by Eileen Hull for Sizzix


Graphic 45 Midnight Masquerade


Thanks for joining me!
xoxo Maggi

Friday, September 22, 2023

Gnomes for the Seasons with Spellbinders Gnome Hugs Die Set

I had a blast creating with the Gnome Hugs Die Set; gnomes are so cute!  The die set is really for Christmas gnomes but I decided to use the die set to creat gnomes for all seasons.   Here are 4 seasonal cards created with the same die set, Gnome Hugs from Spellbinders. (S6-213)


Since this is a Christmas die set, let's start with the Christmas Card.  I used Stamperia Christmas paper scraps and a journaling card to create this card.  


The sentiment is printed on a transparency and glued to a small tag.  


Halloween is coming soon so I thought some "spooky gnomes" were in order.  I don't think gnomes are very spooky, they're too cute to be scary!  This card is made with left over bits of Haloween paper.  In addition to using the Gnome Hugs die set, I used Autumn Wonder for the pumpkins, and Notched Corner Frames for the inner black print layer.


The gnome on the left is wearing a witch's hat that I fussy cut instead of the die-cut hat.  The two larger pumpkins are cut with Autumn Wonder and the smaller is from an older 2018 die set, the pickup truck bed.


Of course, I needed a beach gnome for the summer!  I used Graphic 45's Sun Kissed collection for this card.  Our gnome is playing in the sand with a fussy cut shovel and bucket.


I rounded off the hat die cut from the Gnome Hugs set to make what I hope resembles a swim cap.  And his feet, well they're  supposed to be swim flippers that I just cut freehand.  Ha!  Whatever... they look a bit like feet or flippers. 😄


And finally, the spring gnomes in their garden of flowers, die cut using the Envelope of Wonder flower dies and papers from Graphic 45's Once UPon a Springtime collection. 


...And that's a wrap for Gnomes for the Seasons!  Thanks for joining me and my gnomes today!

xoxo Maggi


Supplies


ENVELOPE OF WONDER ETCHED

Wednesday, September 25, 2019

Treats not Tricks at The Funkie Junkie Challenge Blog


The Challenge

I"m happy to be leading the challenge this time around, especially since it is time for Halloween crafting.  Funny thing is, I don't really decorate for Halloween, but I love the dark Halloween colors.  So, my challenge to you is to make Treats not Tricks!  Chose a theme for your project and make a vintage or shabby chic something that holds a treat.  It could be a Halloween treat bag, a Vaentine's candy box, a birthday card for a special person that holds a treat (could be a gift card "treat" or a bit of chocolate), anything that can hold a treat.

My Treat not Trick

Of course, I went with a Halloween theme and created a fun little card tag to hang on a bottle of wine.  It's a perfect treat for adult friends.  I used Graphic 45's DCE, The Magic of Oz for my creation.


The Card

This fun little treat card was made with Eileen Hull Designs by Sizzix's Notebook (#663635).  On the inside, there's a pocket that very nicely holds two pieces of chocolate.


I looped a string through the bow to make a loop to secure the card to the wine bottle.


How to Make the Card

Making this was fun and easy!  First I covered a piece of mat board (at least 5.5" x 8.5") on both sides with black cardstock.  Then I used Eileen Hull's Notebook die to die-cut the covered mat board.  Presto, you have a black card blank.    

Next I covered a piece mat board (6" x 6") again with black cardstock on both sides and die-cut it with Eileen Hull Designs Gift Card Folder and Label #2 die by Sizzix.  Fold up the 3 flaps and adhere to each other to make the Gift Card Folder.


Punch a hole in the top of the Gift Card Folder.


Now the fun part begins!  Adhere the Gift Card Folder inside the card base. Use design paper and stickers to decorate inside and out.  I adhered a small magnet set under the circle embellishment and the design paper on the left to hold the card closed.


Put  a treat in the pocket, loop over a nice bottle of wine and give a treat to a special person in your life!


How to Enter the Challenge

Create a vintage or shabby chic valentine and link it to the The Funkie Junkie Boutique Blog any time between now and 11:55 Eastern Time on Tuesday, October 8th, 2019.  The Design Team will choose their top four picks, with the winner being invited to join us as a Guest Designer at The Funkie Junkie Boutique Blog.   and the next three will receive Top 3 badges to display on their blogs. Everyone who enters and follows the rules will be entered into the draw to have the chance to win a $25 spending spree at The Funkie Junkie Boutique.

Thanks so much for stopping by today. Be sure to take a look at the creations of my talented teammates, you can see their creations here, at The Funkie Junkie Boutique Blog.


Eileen Hull Designs by Sizzix ScoreBoards L Die - Notebook (#663635)
Black Jute (I used some string I had on hand, but this jute from Tim Holtz would work great)

Thanks for stopping by today!!

LinkWithin

Related Posts Plugin for WordPress, Blogger...