Pages

Saturday, June 27, 2020

The Funkie Junkie Saturday Showcase - Stamperia's House of Roses


Sadly, this is my last post for The Funkie Junkie Boutique Blog.  I find that life is demanding more of me and  I don't have the crafting time that I used to have.  It has been a real pleasure to serve with this design team and Linda, the owner.

For this Saturday Showcase, all the designers have designed a tag to share so be sure to visit the blog to see all the designers' creations.  I've used Stamperia's House of Roses paper collection on my tag.  This is such a gorgeous collection of pinks.


I decided to go simple with this as the cut apart I used really doesn't need anything else other than the simple white woodgrain background,


To create the background, I first painted a Graphic 45 large tag with white gesso.  Then I stenciled on a woodgrain pattern using a Tim Holtz stencil and texture paste.


After the texture paste was really dry, I inked with Hickory Smoke Distress Ink to give the appearance of aged bleached out wood. 


Next I put a thick layer of Ranger Crackle Accents all over the cut apart and let that dry.  Then I rubbed Hickory Smoke ink over the surface so that the crack in the surface would show. 


Then it was a simple matter of assembly.  I diecut  couple of corner vines to place underneath the pretty Little Birdie flowers.   I also used Lindy's Ponderosa Pines Olive and Frosty Forest Green to color the leaves to give them a more natural appearance.


At the bottom I added die-cut paper lace.


A pretty bow and butterfly complete this simple but effective tag.  I can see this on a white wrapped package. It would be the perfect thing to turn an ordinary package into a masterpiece.


Friday, June 26, 2020

A Floral Canvas with Little Birdie Flowers and Papers


Sharing a Little Birdie Crafts floral canvas with you today featuring their gorgeous roses. I've used an 8" x 8" art panel from the Little Birdie store as my base.


I first covered the panel with paper from the Shabby Chic Bouquet collection.  I applied an adhesive backing sheet to the paper so that the paper could not bubble when mixed media was applied.   After inking the paper edges I painted it with clear gesso.  I allowed that to dry and then used a floral stencil to mask the flowers in the left corner.  Then I used a sea sponge to sponge on some watered down white gesso.  This is the result.


Next I prepared these two chipboard pieces by heat embossing them with Stampendous White Shabby Chic embossing enamel.  Then I glued the frame around a cut-apart from the Shabby Chic Bouquet collection.  Don't worry about the bottom of the tag hanging outside the frame.  It'll be covered with flowers.


After fussy cutting the clock and the birds that you see in the photos, I started putting the piece together.  I used several layers of dimensional foam tape to pop up the cut-apart and clock.  


Now just tuck the flowers in and around the focal point cut-apart.  Be sure and put some behind the cut-apart for a natural appearance.


Tuck the floral chippie beneath the cut-apart and place some smaller flowers across the top and add a jute bow.


Here you can see how I tucked flowers under the edges of the cut-apart.
Jute Braided Flat Twine 7Ply Natural

Thanks so much for joining me today.  Remember that you can now order from Little Birdie's US based warehouse.  Shipping is fast and economical and there is no minimum purchase requirement.


Wednesday, June 24, 2020

Cattywampus Challenge at The Funkie Junkie Boutique Blog

The Challenge
Sara Emily is hosting this fun challenge called Cattywampus.  As a fellow southerner I know all about cattywampus.  In case you don't know what cattywampus means Sara Emily tells you all about it in desribing her challenge. "Cattywampus is a funny sounding southern slag term I hear a lot around the house. According to the On Line Slang Dictionary it has several meanings including "appearing off center, diagonal from, crooked or not level, appearing askew, tilted or lopsided". Taking inspiration from any one of these definitions, include something cattywampus in your vintage or shabby chic project. Be sure to tell us what that cattywampus thing is; we might miss it!'"

My Take on the Challenge

I think I am a bit cattywampus myself, 😅!  If I don't use a ruler most things I do are apt to be just a wee bit cattywampus so I love to make things that are purposely tilted, or cattywampus! 

This card has two cattywampus layers, and don't they look just so pretty?


I used the beautiful Ciao Bella Sicilia Collection to make this card.  I love the yellows and blues.  I die-cut a blue payer to put under the top layer and focal point.  When I select my layers, I like to used contrasting colors so that each layer stands out on its own.


I used a "Thanks" stamp from the new Graphic 45 Sentiment Stamps collection along with a new Graphic 45 die.  Here I've nestled 3-D flowers in with the flowers printed on the papers to create a colorful garden.


Of course, no project is complete for me until I've added lots of pretty blooms!


Supplies from The Funkie Junkie Boutique


Ranger Texture Paste Opaque Matte

How to Enter The Funkie Junkie Blog Challenge

Create a vintage or shabby chic project and link it up to The Funkie Junkie Challenge Blog Challenge, Cattywampus, by 11:55 PM EDST June  9th.  The Design Team will choose their top four picks, with the winner being invited to be a guest designer in one of our Funkie Junkie Challenges. The other three winners will receive Top 3 badges to display on their blogs. Everyone who enters and follows the rules will be entered into a draw to have the chance to win a $25 spending spree at The Funkie Junkie Boutique.

The guidelines for entering are simple; create a new vintage or shabby chic project following the challenge theme, link to your post (not just your blog) and also include a link back to this challenge in your post. You can combine our challenge with up to 10 challenges (including this one) to be in with a chance of winning. If you are entering through a public forum (such as Instagram) you'll need to include the words 'Funkie Junkie Boutique Challenge'. Also, please be sure to turn off your Word Verification so our Design Team can leave comments on your blogs. Make sure you follow these rules as unfortunately, we have had to eliminate entrants from the prize draws in the past.


Thanks so much for stopping by today!

Tag for the Guys for Creative Embellishments

I made this fun tag for my husband using a large tag from Creative Embellishments. At 5 1/2" x 10", they are the perfect size for most any project. He's a real grease monkey and loves nothing better than to play with old broken down cars and trucks. He really is quite talented as he is able to take a pile of "junk" and turn it into a street legal, street rod.

Ciao Bella's Start Your Engines paper collection is so perfect for doing projects for my hubby!  The background of the tag is a paper that looks like metal plating.  Then I added some black stenciling using CE's metal plate stencil.


I used two distressed checker pieces to go along with the racetrack checkered flags.  How did I get them so nicely black and white?  Easy, just paint the checker pieces with white paint and then glue to black paper.  Then trim off the excess black paper and you've got a black and white checkered piece.


Of course I had to include some rusty gears.  I used rust colored embossing powders to get the effect.


Had to add the old jalopy of course!  I used some gray and brown ink to dull the "black" of the paper.  After all, it's an old jalopy and the paint has long since faded!


You know I put flowers on everything so I added this rosette, I figured the hubby would not "see" it as a flower.


Other Products

Ciao Bella Start Your Engine paper collection
Mix'd Media Truffle Embossing Powder
Emeral Creek Baked Texture Chunky Rust
Tim Holtz Rosette Die
Tim Holtz Old Jalopy Die
Wendy Vecchi Studio 490 Black Embossing Paste

Creative Embellishments Challenge

I hope you'll enter our monthly challenge; it's always the first post on the Creative Embellishments Blog.  You could win a great gift certificate to the store!  Here are the rules:
  • Create a NEW project layout, mini album, tag, card, canvas, etc. of  the 1st of each month, 2020.
  • It is required that you mention in your blog post that you are playing along at Creative Embellishments together with a link back to our blog page. Please make sure to reference our challenge. Please, no old projects. (meaning projects from previous months that may fit the challenge) Please share only new projects.
  • Please add your entry to the inlinkz tool below to be eligible for the prize. You have until the last day of each month 11:55 pm eastern time to enter.
  • Simply add a link to your FB photo (if you do not have a blog) featuring your challenge entry. Let us know how you were inspired by the photo.
  • Combining with other challenges is permitted.
  • We would love to see you USE AT LEAST 1 OF CE products on your projects but it isn’t required to play along.
  • WINNERS will have 2 weeks to claim their prize. The winner will be announced on this post the day after the challenge ends. Keep an eye out to see if you are a winner.


Friday, June 19, 2020

Layout for Creative Embellishments

The summer flowers in Alaska are amazing!  All that sunlight makes the flowers grow to super sizes.  I took these photos at the Visitor's Center in Anchorage.  The Visitor's Center is the prettiest little log cabin in the middle of downtown, amongst all the tall buildings. The cabin has a sod roof and is surrounded by cascades of hanging baskets lush flower beds. 


 I used Wisteria chippies to mimic the hanging baskets.  They are painted and then I dabbed on a bit of Lindy's mist for that something extra.  Then I topped the chippies with Little Birdie flowers.


I love word chippies and Creative Embellishments has a huge selection.  I heat embossed the words with Emerald Creek's Taos Sunset Baked Textureembossing powder.


One the left side I layered burlap and two chippies.  The lace chipboard is heat embossed with Dirty Sand and the cross stitch piece is heat embossed with Taos Sunset.


Products from Creative Embellishments Store


Other Products

Emerald Creek Embossing Powders
Emerald Creek Embossing Powders: Dirty Sand, Taos Sunset
Mix'd Media Embossing Powder - Truffle
Little Birdie Flowers Marika Boho Vibes 2pc
Little Birdie Flowers Eva Boho Vibes 3pc
Little Birdie Flowers Kimberley Boho Vibes 14pc


Creative Embellishments Challenge

I hope you'll enter our monthly challenge; it's always the first post on the Creative Embellishments Blog.  You could win a great gift certificate to the store!  Here are the rules:
  • Create a NEW project layout, mini album, tag, card, canvas, etc. of  the 1st of each month, 2020.
  • It is required that you mention in your blog post that you are playing along at Creative Embellishments together with a link back to our blog page. Please make sure to reference our challenge. Please, no old projects. (meaning projects from previous months that may fit the challenge) Please share only new projects.
  • Please add your entry to the inlinkz tool below to be eligible for the prize. You have until the last day of each month 11:55 pm eastern time to enter.
  • Simply add a link to your FB photo (if you do not have a blog) featuring your challenge entry. Let us know how you were inspired by the photo.
  • Combining with other challenges is permitted.
  • We would love to see you USE AT LEAST 1 OF CE products on your projects but it isn’t required to play along.
  • WINNERS will have 2 weeks to claim their prize. The winner will be announced on this post the day after the challenge ends. Keep an eye out to see if you are a winner.


Thanks for joining me today!


Wednesday, June 10, 2020

Eileen Hull Designs Pocket Notebook & Belagio Cork Fabric


The Eileen Hull Designs DT has teamed up with Belagio Fabrics this month to show you lots of pretty journals covered with their gorgeous cork fabrics.  You won't believe how pretty these fabrics are!  Best news is that the fabrics are durable,easy to adhere and layer with each other or different materials.  Be sure to take a look at the video at the bottom of the post to see the inside.

I usually embellish my projects until there's not any vacant space but I thought these cork fabrics so gorgeous that I wanted the fabric to be the focal point.  I call this my elegant journal.  Its just two different cork fabrics with a layer of gold paper between them.  Then a simple piece of chipboard from some long gone Prima collection topped with a bronze flower enhanced with Eileen Hull's Molten Dimensions Golden Rod Embossing Powder.

The closure is a simple wide band with two magnets sandwiched inside to hold the covers securely closed.

Inside, I've styled this as a Prima junk journal because I made the signatures from left over older Prima collections.  I also had some "junk" from when I cleaned out my Mom's house.  Would you believe Green stamps and some yellow stamps that another store gave out?  Then I found a bunch of old paper pads with numbers and letters on them.  I wonder what they were for?

Easel Card for Little Birdie Crafts

Hello Little Birdie fans, I'm sharing another easel card today.  These are so pretty to display and, a bonus, they are easy to make!


I used 2 paper collections to make this card, Shabby Chic Bouquet and Poppies and Roses.  The two collections blend together very nicely and are great compliments for each other.

The only part of making this card that is a little bit tricky, is the easel and it's quite simple.  I used a 12 x 12 sheet of paper from the Shabby Chic Bouquet collection.  Cut the paper into two pieces, each 6″ x 12″. Then cut one of the pieces in half so that it is 6″ x 6″. Take the long piece and score on the long side at 3″ and 6″.  Fold at the 6" score line creating a "mountain" and then fold at the 3" score line to create a "valley". It should look like this.


To create the easel, glue the top 3" of the card (above the score line) to the 6" square.  It will look like this when displayed.


Creat some layers for the front of the card.  I have used diecut layers on my card.  The pink piece is the first layer on my card.  


The next layer is the pale green circle.  Pop this layer up to give your card some pretty dimension.  You can use dimensional foam or use cardboard (it's free!).  Adhere the circle over the pink layer, centering.


Next adhere the intricate die-cut doily.  You don't have to use the same dies, just select similar shapes to achieve the same effect.

Choose one of the journaling cards from the Shabby Chic Bouquet and give it some shape like in my photo below.  Use a double layer of dimensional foam in the center so that when adhered to the card, it looks like a scroll.


Next add a chipboard heart over the journal card.  Then add lots of pretty Little Birdie flowers, tucking some under the heart and around the edges of the journal card.


View of the card laying flat.  Fussy cut a floral bouquet from Poppies and Roses and lace from Shabby Chic Bouquet.  Adhere the lace inside towards the bottom and then adhere the fussy cut bouquet over top.

That's all there is to it!  This would be a special keepsake card for a dear friend!

Supplies from Little Birdie Crafts


Chipboard Heart (Not in the shop, but there are many other 
great shapes to choose from)


Thank you for visiting the Little Birdie Blog, I hope I have inspired you to create something beautiful today!

Maggi Harding - Scrap, Travel & Bark!


Positively Pensive Challenge at The Funkie Junkie Boutique Blog

   Today is Ballpoint Pen day and that is the inspiration for the new challenge at The Funkie Junkie Boutique Blog hosted by Suzz.   The challenge, Positively Pensive, is to thoughtfully use a ballpoint pen on your project. You can doodle, journal, sketch or trace an outline using any color ballpoint pen on your art. Create a vintage or shabby chic project with some form of ink from a ballpoint pen and if it isn't obvious how it was used make sure to tell us in your post!

My Take on the Challenge

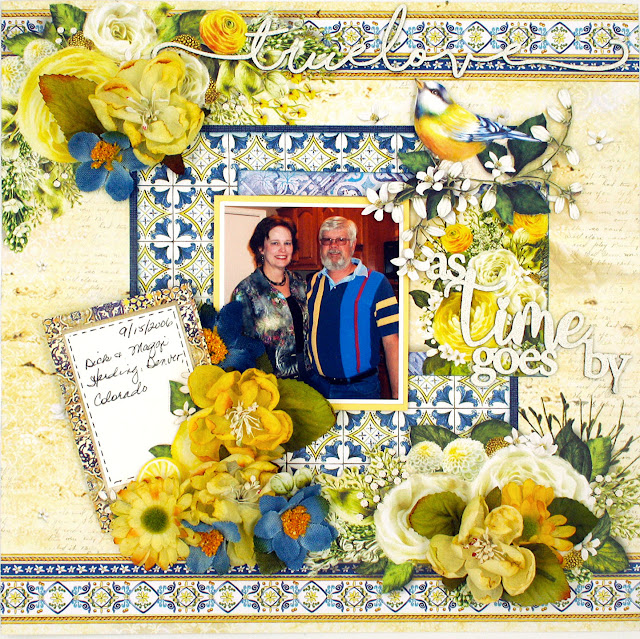
I used Ciao Bella's Sicilia papers to make this bright and cheerful layout.  Blue and yellow is such a pretty color combination, and, well, I just had to go wild with all the flowers! 


The challenge was to use ballpoint pen and I did on the journaling card.  The "stitches" were drawn on with a pen.


I added Creative Memories chipboard titles to my layout.  The are heat embossed with Ranger Antiquities embossing powder.  I love the texture this powder creates.


A fussy cut bird and branch add to the florals so dominant in these papers and on my layoutl.

Lots of textures and dimension on this layout,  I think I'll have to frame this one, it sure won't fit in an album!


Supplies from The Funkie Junkie Boutique

Ciao Bella - Sicilia 12x12 Paper Pad

Ranger Embossing Powder - Weathered White Antiquities

Ranger Tim Holtz Distress Ink Pad - Faded Jeans

Ranger Tim Holtz Distress Embossing Ink Reinker

Ranger ADHESIVE - WHITE FOAM ROLL 1/2" X 1/16"x 2 YDS.


How to Enter The Funkie Junkie Blog Challenge

Create a vintage or shabby chic project and link it up to The Funkie Junkie Challenge Blog Challenge, Positively Pensive by 11:55 PM EDST June  9th.  The Design Team will choose their top four picks, with the winner being invited to be a guest designer in one of our Funkie Junkie Challenges. The other three winners will receive Top 3 badges to display on their blogs. Everyone who enters and follows the rules will be entered into a draw to have the chance to win a $25 spending spree at The Funkie Junkie Boutique.

The guidelines for entering are simple; create a new vintage or shabby chic project following the challenge theme, link to your post (not just your blog) and also include a link back to this challenge in your post. You can combine our challenge with up to 10 challenges (including this one) to be in with a chance of winning. If you are entering through a public forum (such as Instagram) you'll need to include the words 'Funkie Junkie Boutique Challenge'. Also, please be sure to turn off your Word Verification so our Design Team can leave comments on your blogs. Make sure you follow these rules as unfortunately, we have had to eliminate entrants from the prize draws in the past.


Thanks so much for stopping by today!


LinkWithin

Related Posts Plugin for WordPress, Blogger...