Pages

Friday, August 31, 2018

Mixed Media rice paper canvas with Stamperia

Stamperia Rice Paper Canvas

Hello friends, I'm back with another Stamperia rice paper canvas.  Mixed media applications are the perfect treatment for the rice papers.  I've used crackle paste, embossing enamels, gold modeling paste, inks and waxes on this one.

The Process

I began the process by gluing the rice paper to a 9 x 12 canvas with Stamperia Mixed Media Glue.  This is a product that I really like, it is thin and just applies so nicely. Matte medium or clear gesso also works just fine.

After the glue dried I used black gesso to stencil on the mustached man at the bottom and then I used gold masking paste to stencil on a clock face, crown and harlequin pattern.


Next, I applied crackle paste all around the edges and after that dried, I misted with gold and brown mists.  Then I added some gold embossing powder and heated in random places around the edge.

Chipboard
I chose some great Steampunk gears from Creative Embellishments and heat embossed them with Stampendous Aged Bronze and Emerald Creek Oil Rubbed Bronze and Charred Gold.  I rubbed on some Rich Copper Prima Metallique wax in a few places to add a rusty look.


Some of the chippies are simply misted with gold mist such as the large gear in this photo behind the clock face.  The flower I used is metal and I enhanced its look by dabbing on embossing ink and Stampendous Aged Gold embossing enamel and heat setting.  If you try this, be careful as the metal does get hot!

To finish up the canvas I used Prima Metallique Waxes to highlight and bring out the details. 

If these techniques interest you, here are some other canvases I've made using similar techniques, Roses Canvas,  Clockwise Mannequin and Red Poppies.

Supplies

Stamperia Rice Paper - Clockwise Clock & Keys
Stamperia Mixed Media Glue
TCW Black Gesso
TCW Gold Gesso
Ranger Texture Paste - Opaque Crackle
Prima Colorbloom - Worn Leather, Tea Stain
Stampendous Aged Bronze
Emerald Creek Oil Rubbed Bronze and Charred Gold
Prima Metallique Wax - Bronze Age,Aged Brass
Prima Antique Brilliance - Red Amber

Thanks for stopping by today!

Wednesday, August 29, 2018

Little Birdie step card tutorial

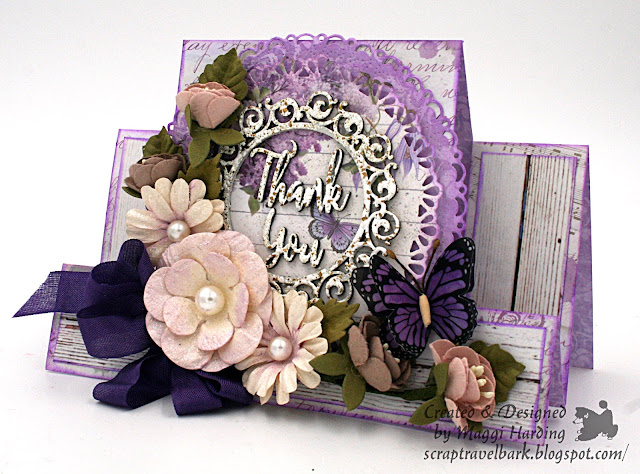
A thank you card
I am excited to be guest designing for Little Birdie Crafts today. I am saying thank you to Little Birdie for inviting me to guest design with a thank you step card!  I am a mad fan of their  exquisite flowers.  In addition to their drop dead gorgeous flowers, Little Birdie Crafts has an extensive range of crafting products.  I bet you can shop their store and find many things you need!


Elements of the card

In the center of the card I used 2 pieces of Little Birdie Chipboard.  It comes already primed (I love that!) and ready for whatever medium you decide to use.  I chose my favorite go to product, embossing enamel.


Of course, we must take a look at these gorgeous flowers!!  The 3 center flowers are Symphony Orchid Sparkle flowers, they are divine!  They have a subtle orchid color and  pretty sparkle.  I've flanked them with Pauline Swiss Coffee.  I love these, they are like little vines with 2 blooms and leaves on a floral stem.  You know what I love most about Little Birdie flowers?  It's that they come with beautiful greenery that is so realistic in appearance.


To finish it off I added this gorgeous vellum butterfly that came from a package of Florita flowers.


Now that we've taken a close look at my card, let's see how you can make this card.


Tutorial

Step 1:
Carefully cut out the card base following the template below.  You can download the template here.  I suggest you make a practice card base first so that you understand the cuts and folds before cutting your good design paper.  It is not hard, it can just be a little confusing the first time around.  Once you are comfortable with the design, cut the card base from your choice of papers or card stock.  It does need to be a heavy weight paper so that the card will stand up appropriately.


Fold where indicated on the dotted lines so that it looks like this:


Here is a side view of the card base with the proper folds.


Step 2:
Cut 2 strips of white wood grain paper from Little Birdie's Texture Brew paper collection,
1 1/4" x 3".  Then, cut another strip 1 1/4" x 6 3/4" from the same paper.

Next cut two circles, one with a 4" diameter and one with a 4 3/4" diameter.

Ink the edges of the strips and circles if desired.


Step 3:
Now adhere the two 3" strips to the sides of the card and adhere the long strip at the bottom as shown in the photo below.


Step 4:
Now adhere the larger circle in the center of the card as shown.  Next use dimensional foam tape to pop up the smaller circle and adhere it to the larger circle.


Step 5:
Next we'll use a Little Birdie 3" chipboard circle and the chipboard words Thank you.  Dab the circle and words with embossing ink and sprinkle with your choice of embossing powder.  I've use white as it goes nicely with the wood grain paper.  heat set the embossing powder and then adhere to the front of the card as shown in the photo below.


Step 6:
Time for my favorite part, adding the flowers!  Arrange the flowers in a manner that is pleasing to you and adhere to the card.  Take care to adhere the flowers only to the center panel or bottom of the card.  If you glue to the folded step part, your card won't fold out properly.

Tie a pretty bow and tuck in underneath the largest flower.


That's all there is to it, add a message inside and you have a beautiful one of a kind card to gift to a special person.

Supplies Used from Little Birdie Crafts

Primed Circle Chipboard
Primed Thank you chipboard words
Texture Brew Paper Collection
Symphony Orchid Sparkle Flowers
Valerie Orchid Sparkle Flowers
Pauline Swiss Coffee Flowers
Butterfly from Florita Flowers 

Other Supplies

Stamperia Lilac Flowers paper collection
Stampendous Shabby White Embossing Enamel
Cheery Lynn circle dies
Distress Oxide Ink Wilted Violet

Thanks so much for joining me today for this very special post!

Interactive Card Tutorial for the Haberdashery Challenge at the Frillie and Funkie Blog

The Challenge

We have a fun new challenge up today at the Frillie and Funkie Blog hosted by Zoe.  The challenge is to create a a vintage or shabby chic project including items found at a Haberdashery.  A haberdasher is a person who sells small articles for sewing, such as buttons, ribbons and zippers.  So dig into your notions and find something fun for this challenge.


My Take on the Challenge


I was ready for this challenge as The Funkie Junkie Boutique has the perfect paper, Stamperia's Atelier, and I couldn't wait to use it!  Atelier is a beautiful vintage paper collection that shows images that a seamstress or haberdasher might have on hand.  So or is that sew, 😃 I made a card folio that is full of flip pages and pockets.  I made on pocket large enough that small gifts like sewing notions could be tucked inside.  It's the perfect card for the seamstress.

On the left side I used some pretty Venise lace from The Funkie Junkie.    I used a silver tone filigree piece over the lace to serve as a backdrop fro my flower cluster. I changed the appearance of the filigree piece by first brushing it with vintage ivory Artisan Powder and then rubbed it with Mettalique wax in vintage gold.

Those scissors, I love those scissors! They are little bronze charms from the shop that are so cute!


Video Tutorial

Join me in this video where I'll show you how to make this pretty cards with all its flips and pockets.


Photos

Each side of the card has a pocket that holds a ribboned tag.  You can tie the ribbons together to create a closure for the card.  Before you open the card, you can flip the front up.  This is a great place to write a message and tuck in a photo.  I used Graphic 45's square tags and their square tag dies to cut papers to cover the tags.  The tag dies cut a perfect tag to fit over the tag and leaves a tiny border.


Then, open up the card and you'll see that the left side folds out.  On the right, you'll find a deep pocket that will hold little gifts and a tag pocket and again, that adorable scissors charm!  Ialso added a pretty carved coconut shell button.  


View of left side flipped out which reveals a fun little ATC tag tucked into a pocket.  The center panel has a gift or credit card pocket.  I used white seam binding to tie all my bows.


Let's take a closer look at that gift card pocket!  It's diecut with a Sizzix die from Eileen Hull Designs.  I love that little die!


This photo shows the front of the card flipped up from the card inside.


The butterfly tag on the left also flips over and has a magnet closure.


All the flaps opened up.  I know, it's a little confusing, best to take a look at the video.

 There are 3 nice sized pockets that hold  Graphic 45 square tags.  I used the square die to cut the design paper.  I love how the die cuts the paper such that a tiny border is left all around the tag.

How to Enter the Challenge
Now it's time for you to have some fun with this challenge!! Create your Haberdashery project and link it up to the Frilly and Funkie Challenge Blog. If you win, you'll have an opportunity to be a
Guest Designer here at Frilly and Funkie! We also award Top 3 Badges for three further outstanding entries, chosen by the Design Team, because we can’t pick just one favorite!

AND, everyone who enters and follows the rules for the challenge is entered into a draw to win a $25 spending spree at The Funkie Junkie Boutique. Woo-hoo!

You have until 11:59PM EDT on Tuesday, September 11th to link your project.

Monday, August 27, 2018

Wrapped Journal for Eileen Hull Designs, Seth Apter, Emerald Creek Craft Supplies and Paper Artsy

Blog Hop!


Join Seth Apter, Paper Artsy, Emerald Creek and Eileen Hull and their teams for the "Get Wrapped Blog Hop"- a creative collaboration using products from the artists. Be inspired, learn new techniques and celebrate the collective talent in this group! Make sure to check out each post - you will not want to miss a single one...  


If you arrived here from Peg Robinson's blog, then you're on the right track.  If not head back to the beginning at Eileen Hull's blog, so that you don't miss any of the fabulous projects along the way.  


Let's start with the Wrapped Journal Sizzix Scoreboard Die by Eileen Hull Designs.   The die cuts the greatest little journal with a cover that wraps all the way around.

For this blog hop, I made the cutest little doggie journal ever!  Folded up, it's about 3 3/4" x 5" and it hold 4 signature booklets.  

Take a look at this quick video flip through to see all the inside details.


The cover wraps around and makes a neat little package that you can secure in many ways.  I chose to use a ribbon and bow closure on mine.  You could use elastic bands, a button closure, the possibilities are endless as you'll see along the way in the blog hop.


In this photo, you can see how the journal opens up and has a great cover that wraps all the way around.


Here's the outside of the cover "unwrapped".  I used Seth's Paper Artsy Autumn Paint Set for the background of the journal which I simply brayered on using mahogany as my predominant color.  After that dried, I used the midnight color paint to stencil on some muddy little pawprints. 


 Next I adhered a fussy cut border of sweet little doggies!


Emerald Creek Baked Texture Embossing Powders

Emerald Creek and Seth Apter teamed up to make the amazing Baked Texture embossing powders.   These powders were made for artists with their amazing textures and designs.


Take a look at the coat of the chipboard poodle on this signature booklet.  First I painted the chippie with Seth's Buff paint from the Autumn Set 1.  Then I applied Dirty Sand Baked Texture Embossing Powder to the areas where the poodle is curly coated.  I love how the embossing powder created the curly texture of a poodle coat, it's so realistic looking! Her bow is painted with mahogany from the Autumn Set.
Now take a look at the paw print, its embossed with Chunky Rust Baked Texture Embossing Powder.  I love the rough texture, it mimics the feel of a puppy paw!  If you used this color on gears, you would have really cool looking rusty gears.  But I wanted to show you that this color is great even for things that aren't rusty!

Here's a look at all four of the signatures.  They are filled with flip pages, pockets and tuck spots where you can add your photos and memories!


Supplies


Let's Get Wrapped Blog Contest!


There will be a prize pack valued over $150 USD from PaperArtsy, Seth Apter, Eileen Hull & Emerald Creek!

To be entered you must pop by and comment on each of the blog posts. (We don't want you to miss any of the tips and tricks.)

Contest closes August 29th at midnight and a winner will be announced Aug 30th, 2018.


Thanks for hopping by today, next stop on the blog hop is Stephanie Eaton's blog, so hop on over and see what she has designed for the hop!

Blog hop order:

Livia Yellowbird


LinkWithin

Related Posts Plugin for WordPress, Blogger...