Pages

Saturday, December 14, 2019

Die-cuts, fussy cutting, and paper scraps = Beautiful Tag!

The Funkie Junkie Design Team has a special post for our regular Showcase Saturday series.  Sll og us have created a special tag and tutorial for you showcasing some of our favorite Funkie Junkie items.  Stop by The Funkie Junkie Boutique Blog to see all the DT tags.


How to Make a Tag with Less Than Perfect Papers!

It's not that the papers aren't perfect, it's that I can't bear to throw a scrap away and this is how I use them.
  1. Use a Graphic 45 large ivory tag or recycle a large packaging tag as I did.  Sometimes the edging on the recycled tags looks fine but in this instance, I didn't like the look, so I just painted around the edge.
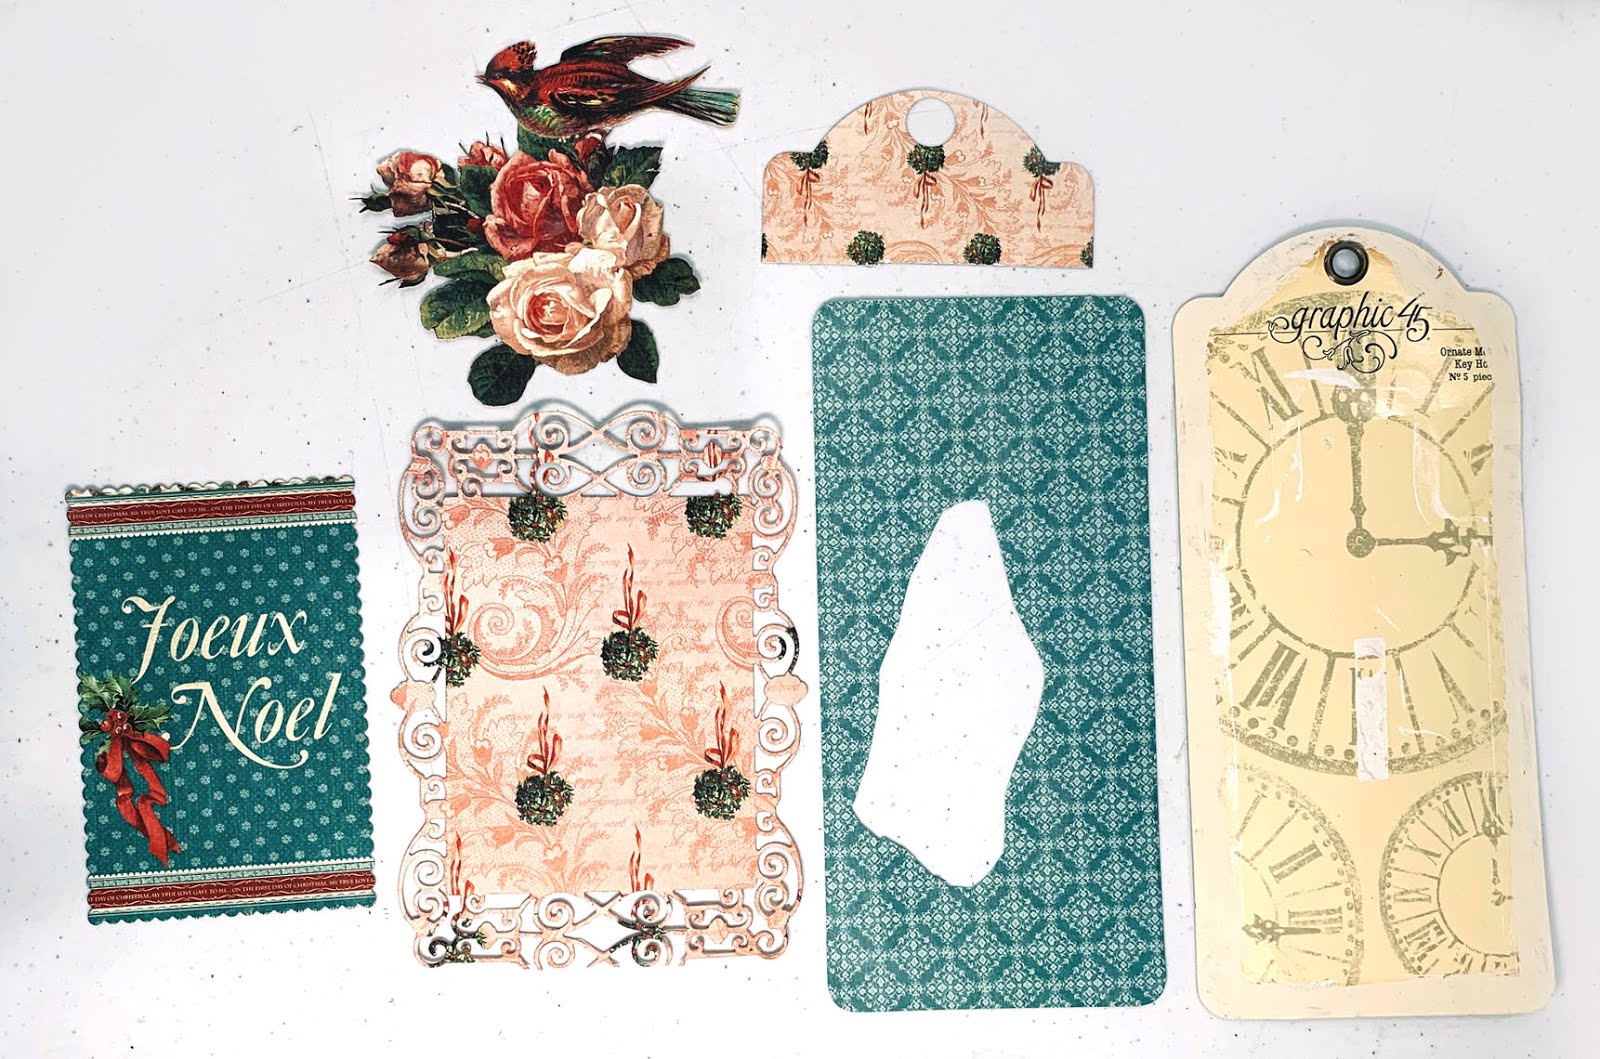
Assemble the pieces shown in the photo below:
  • Trim a cut-apart to about 3 1/8" x 4 3/4". (I used a scalloped die to cut mine).
  • Die-cut a frame that is approximately 4 1/2" x 6".
  • Fussy cut a bird and roses cluster as shown.
  • Use the Graphic 45 large tag die to cut a base for the tag.  Notice that my blue base has a hole in it and the top is missing.  Yep, I utilize EVERY scrap of paper.  The center is going to be covered so who cares if there's a hole in the middle.  And, my paper scrap wasn't long enough to cut the entire tag.  Soooo, no problem, I used the tag die to just cut the top portion and covered my tag with the two pieces.  (see the 2nd photo.)


  2.  Assemble the tag -
  • Glue a strip of beads at the bottom of the tag.
  • Then cover the base with the blue patterned paper and the separate pink top.
  • Pop up the die-cut frame and adhere about 1 1/2" from the bottom. Yes, I know the paper is upside down, but the die-cut at the bottom is a little messed up and that's not a problem because the bottom will be covered.  No one will notice that the paper is upside down after its all finished.


  • Pop up the Joeux Noel cut-apart and adhere over the center of the frame.
  • Pop up the fussy cut bird and place over the right side of the tag as shown in the photo.  Add some pretty flowers and a bow at the top.  
  • Tie a pretty Christmas tree charm to the bow.


Graphic 45 - 12 Days of Christmas Deluxe Collector's Edition
Silver Tone Christmas Tree Charms - Set of 5Graphic 45 - Large Tag Album - Ivory
Burlap String - 12 Colors
Spellbinders Romantic Rose Spellbinders Romantic Rose (very similar to the frame die I used)


Wednesday, December 4, 2019

It's the Holidays at The Funkie Junkie Boutique Blog

I'm hosting the current challenge at The Funkie Junkie Challenge Blog, come play along!  Read on for all the details and a tutorial for a flip up tri-fold card.

Not only is it the "most wonderful time of the year" , it's also the busiest time of the year, for me anyway!  It's hard to find anytime to pursue our paper passion so I decided on a practical challenge.  Hopefully, this will give you some needed crafting time, while making something that is useful for the holiday season that is upon us! For the challenge, create a vintage or shabby chic card, tag, gift box or bag that you can use over the holidays.  Easy peasy and something you'll probably need this season!

I created a tri-fold card with a flip up panel inside.  This card is flat enough to mail in a regular envelope.  Wow, imagine that, LOL, not something I do with any regularity!


Tutorial 

1. Cut a 12" x 6 1/8" cardbase from cream cardstock.  Score at 3 3/4" and 7 7/8" on the long side.  Be sure to orient your card such that the wider (4 1/8") flap is on the right side.

2. Cut a rectangle piece 4" x 6 1/2".  Score at 1/2" on one short side.

3. Take the small rectangle and fold the flap down.  Put adhesive just on the flap (Scor-Tape works really well for this application) and adhere to the center of the tri-fold just at the top such that the flap opens up as in the photo below.


4. Punch a border strip about 5 1/2" and adhere to the outside of the inside flap on the right side.  Place a small magnet closure on the outside of the inside flap as shown.  Be sure that you have it far enough to the left so that when you fold the left flap over, the magnet is completely covered by the left flap.


5. Place the magnet that is going on the left flap on top of the magnet on the right, remove the adhesive from the magnet and then fold the left flap over and press down where the magnets are located.  Then, when you open the card flap, the magnet will be perfectly placed.


6. Now, time to select your design papers.  I've used Graphic 45's 12 Days of Christmas.  Cut two pieces 3 1/2" x 5 7/8" for the front panel and adhere to the outside and the inside of the first panel. (We'll finish the front as our last step.)

I used two narrower scraps to cover my inner panel .  Then place a cut-apart in the center of the inner front panel.  Place adhesive on just 3 sides and adhere, creating a pocket as shown in the photo below.

7. Then use a Graphic 45 ATC tag, cover with design paper and tie a pretty bow at the top to insert in the pocket.  You could use this pocket for a gift card!

8. For the outside of the right side, I trimmed a cut-apart to 3 7/8" x 5 7/8 and adhered, coving the edge of the border strip and the magnet closure.


9. Cut two pieces 3 3/4" x 5 3/4" for the fold up center flap and adhere to each side.  Decorate the flap however you wish.  I used a die-cut tree and die-cut word as well as some stickers from the 12 Days of Christmas collection.

10. Cut a piece of design paper4" x 5 7/8" for the center panel underneath the flap and adhere.  Adhere a journaling die-cut in the center.  (YOu can see the center underneath the flap in the photo at step 3.

11. Cut a piece 3 7/8" x 5 7/8" for the inside right and adhere.  Add other layers as you wish.


12. Now let's finish the front.  Use a die-cut frame that will fit on your card.  I've used an old Sizzix frame.  Randomly dab embossing ink on the frame but don't cover completely.   Then sprinkle with white embossing powder and heat set.   (Note, this looks really good on dark paper as it creates a snowy effect.)  I either paint the ink on or use bottled with a dabber top ink.
13. Adhere the frame to the front of the card.
14. Trim a cut-apart to fit your frame and pop up with dimensional foam.


15.  The bow on the tag that you've slid inside the card gives a really festive look.


How to Enter the Challenge

Create a vintage or shabby chic project and link it up to The Funkie Junkie Blog Challenge, It's the Holidays.  The Design Team will choose their top four picks, with the winner being invited to be a guest designer in one of our Funkie Junkie Challenges. The other three winners will receive Top 3 badges to display on their blogs. Everyone who enters and follows the rules will be entered into a draw to have the chance to win a $25 spending spree at The Funkie Junkie Boutique.

Thanks so much for stopping by today. Be sure to take a look at the creations of my talented teammates, you can see their creations here, at The Funkie Junkie Blog.


Other Supplies
Graphic 45 ATC die
Cardstock - cream or ivory
Red Seam Binding
Tim Holtz by Sizzix Vintage Tidings


Wednesday, November 27, 2019

Eileen Hull Designs Trinket Box with a Shaker Top


Eileen Hull Designs Trinket Box with a Twist

Eileen trinket box is surely a favorite design of many and today I want to show you how to turn the box into a shaker trinket box.  Shakers are so popular right now, this is a fun way to present a special gift to a special person!


I've recorded a video to show you how to make the shaker and assemble the trinket box.  Best to watch it through before assembling your shaker trinket box as I give you tips and methods that I learned along the way while making this shaker trinket box.


When I die-cut the face for the trinket box, I did not use a crease pad so the inner oval that is normally just scored, cut all the way through and I liked that as it enabled me to turn the oval over and use a contrasting oval inset.


To make the ribbon closure, I simple adhered ribbon to the inside of the front cover, and glued a decorative strip of paper as shown below.  Then I adhered another piece of ribbon to the back cover and covered the back with a die-cut cover.


View of the outside


A little bonus for you

I love to add handmade tags to my gifts.  These are super simple and you can whip up a bunch in no time.  I simply die-cut a bunch of tags using Eileen Hull's Bookplate die from scraps all at one time.  Next I used my Crop-a-dile to punch holes at the top. Then I cut some of the tags into pieces and mixed and matched papers while assembling my tags.  I rummaged through my trims bin and added decorative trims and stamped "to-from" son cream paper, cut those out and adhered.  Tie a string at the top and that's all there is to it.


Eileen Hull Designs Dies Used


Thanks for joining me today!

Maggi

Wednesday, November 20, 2019

Lovely Leaves Challenge on The Funkie Junkie Blog

The Challenge - Lovely Leaves

Welcome to another fabulous challenge at The Funkie Junkie Boutique Blog.  Jenny is our host this time and she says, "At this time of year leaves take over from flowers as the stars of Nature's display - the deciduous ones take on beautiful Autumnal hues before falling to the ground, whilst the evergreen ones keep our gardens from looking bare as we wait for new flowers to appear in the Spring. For this challenge make sure to add leaves (or even Pine Needles if you like)your vintage or shabby chic projects."

My Project

This the season and all that!  I decided to make a piece for my front door.  This is a small Etcetera tag measuring 5.5" x 10"; really not all that small!  These tags come in several sized and they are perfect for home decor projects that are just a little bit different!


I started by painting the tag white and then I added a base layer of paper from the Christmas Worn Wallpaper collection.  Next I stenciled on some snowflakes and over than I stenciled gold checks with Tim Hotlz gingham layering mask.

The Merry Christmas words are from Creative Embellishments and I heat embossed them with Eileen Hull Designs Molten Dimensions Golden Rod.  The words were adhered to a piece of die-cut Worn Wallpaper that I popped up to make it stand out.  This I mounted onto red cardstock to further emphasize the words.


I love tradition Christmas red and green so I went with red as my accent color adding red trim and flowers to complete the festive look!  

To meet Jenny's challenge, I used Tim Holtz's Holiday Greens Sizzix die to die-cut pine boughs to tuck around my flowers and bow.


  Then I tucked in a couple of pine cones die-cut with the Pine Branch Thinlits set.     I think they are the perfect finishing touch!


I also love to add sparkle to my Christmas projects and I added a lot of sparkle to this one.  I stenciled the snowflakes with white paste and after that dried I painted over them with sparkle gel so they would twinkle!  The flowers are misted with Lindy's Blazing Sun Glitz Spritz which just adds a nice gold sparkle to the petals.  I dabbed Ponderosa Pines Olive onto the pine boughs to give them a hint of sparkle.  It's really too bad that the camera doesn't pick up all the sparkle of this festive piece!


A side view so you can see the dimension created by popping up the title


How to Enter the Challenge

Create a vintage or shabby chic project and link it up to The Funkie Junkie Blog Challenge, Lovely Leaves. The Design Team will choose their top four picks, with the winner being invited to be a guest designer in one of our Funkie Junkie Challenges. The other three winners will receive Top 3 badges to display on their blogs. Everyone who enters and follows the rules will be entered into a draw to have the chance to win a $25 spending spree at The Funkie Junkie Boutique.


Thanks so much for stopping by today. Be sure to take a look at the creations of my talented teammates, you can see their creations here, at The Funkie Junkie Blog.


Supplies from The Funkie Junkie Boutique


Other Supplies

Red cardstock

Wild Orchid Crafts Christmas flowers 
Petaloo Poinsettia
Red trim - Hobby Lobby

Wednesday, November 13, 2019

Tags and Shakers!

Now this is just plain FUN!  If you know me, you know that I love my furbabies.  I've combined Graphic 45's Raining Cats and Dogs with a really old paper from BasicGrey (I think) to make this fun large sized shaker tag.  Note that there are 3 poodles showing on the tag, 😄


The Tag
The tag is a great size at 5.5" x 10" and is made of sturdy chipboard by Creative Embellishments.  Tags are my art journal of sorts, I love to make tags for fun and just to try out new things.  This one is really simple but I think it has a great impact!


The Shaker Top
The bone shaker is so awesome and the minute I saw it, I had to have it!  I was scrapping with my scrappy girls that come once a year and there I sat with this tag and this shaker.  I kept placing the shaker here and there on the tag but nothing would work.  Then you know, it's like lightening, boom!  It made a great "bow" for my tag.  The shaker is also chipboard from Creative Embellishments and comes complete with everything you need to make a shaker except the filling.  I used Black Magic embossing powder from Eileen Hull Designs to coat the shaker.  My shaker material is a great collection of buttons, beads, charms etc from 28 Lilac Lane by Buttons Galore.  They make great shaker materials in so many colors and mixes.  Stop by and check them out here.


My Furbabies

Aren't they sweet?  There's 3 years difference in their ages and they adore each other but they do have sibling rivalry just like all kids!


Many thanks to my scrappy bff Jen for bringing the Buttons Galore & More "stuff" to my house for all of us to enjoy!  And thanks to all of you that read and follow my blog, much appreciated!

Wednesday, November 6, 2019

Fabulous Fall Challenge at The Funkie Junkie Blog.


The Challenge - Fabulous Fall!

Ginny is hosting our latest challenge and it's a colorful fall challenge.  She says fall is a "wonderful season where the leaves are changing and the air is crisp and our thoughts turn to pumpkin spice everything. For this challenge create a Fall inspired" vintage or shabby chic project.

My Project

As you probably know, I love dimension and bulk and most of my cards don't fit in conventional envelopes.  I just can't seem to stop piling on the layers and flowers!  This card is no exception, it's slider card mounted on a patchwork of beautiful fall colors.  It's lovely as a card or even a piece of fall decor.


The Method

What you're looking at above is a 4.25" x 5.5" slider card that I made with the Spellbinder's die pictured below.  (Sorry the card is upside down)  After assembling the card, I mounted it onto another layer of design paper to give it a frame.


The Frame

Stamperia's Patchwork Collection has so many pretty papers that work with all the seasons.  I selected this patchwork paper for it's fall colors.  The paper is 12 x 12 and has a border all the way around it.  Well I wanted that border all around so I cut a large piece 6" x 7.5".  Then I cut the border off the other corner and glued it in place to create a nice frame.  The size of the frame was determined by measuring carefully so that a 1/8" border of the green would peek out around the card.

By the way, did you know that The Funkie Junkie Boutique carries a great selection of Stamperia products at great prices, do check it out!


After assembling the frame I adhered the slider card to the frame, centering.  Then I adhered a smaller die-cut frame to the card being careful to ONLY glue to the bottom half of the pop up mechanism.  You can see the slider and pop up mechanism in the 2nd photo below.


I glued a die-cut medallion made with gold kraft paper and the Impresslits embossing folder.  It's a lot easier to grasp the pull on the slider with the medallion on it.

View from the back.


To finish the card, just add embellishments of your choice being careful not to adhere anything to the slider itself, thereby preventing it from sliding!

Be sure to join me on November 30th for the Saturday Showcase on The Funkie Junkie Boutique Blog as I will show you how to make  Christmas slider cards of different sizes.  Here's a sneaky peek!


How to Enter the Challenge

Create a vintage or shabby chic project and link it up to The Funkie Junkie Blog Challenge, Fabulous Fall.  The Design Team will choose their top four picks, with the winner being invited to be a guest designer in one of our Funkie Junkie Challenges. The other three winners will receive Top 3 badges to display on their blogs. Everyone who enters and follows the rules will be entered into a draw to have the chance to win a $25 spending spree at The Funkie Junkie Boutique.

Thanks so much for stopping by today. Be sure to take a look at the creations of my talented teammates, you can see their creations here, at The Funkie Junkie Blog.


Supplies from The Funkie Junkie Boutique

Stamperia Patchwork Paper Collection
Distress Oxide Ink - Vintage Photo, Wild Honey, Antique Linen
Bronze Pumpkin Charm
Tim Holtz Idea-ology Metallic Kraft Stock 8 x 8 Pad
Sizzix 3-D Impresslits Embossing Folder - Medallion


Other Supplies
Spellbinders Festive Wreaths Slider Card die set
Spellbinders Netabilities Iron Romance Etched Dies
Bakers Twine

Tuesday, October 29, 2019

Lost in Paradise Mini Using the Pocket Notebook by Eileen Hull Designs

The New Pocket Notebook Die by Eileen Hull Designs for Sizzix

Have you seen Eileen Hull's newest die, The Pocket Notebook?  I love it and it works so well for making mini albums and/or journals.  It measures 4.25" x 6.75" and can be as much as 2" thick.


I used Graphic 45's Lost in Paradise collection to make a mini using the Pocket Notebook XL die. I'm going to Hawaii next spring and I'll fill this book with photos and memories!

Another great thing about this die is that it not only cuts the cover for you, but it will also cut a folded page and a pen holder for you.  I love that!!

I recorded a flip through video so you can see each of the pages inside and I'll also tell you about my closure.


Notes on how I make my covers

To make my covers, I always apply paper to my mat or chipboard first.  I apply an adhesive sheet first to the paper and then adhere the paper to the board and I apply paper to both sides.  THEN I run it through my die-cut machine.  Be sure to pay attention to the designs on your paper.  I have been known to put the paper on upside down!

I used double sided tape to adhere the covers together.  I used to always use scor-tape but I am finding that Thermo-Web's red liner tape holds better.  I love how easy scor-tape is to use since you can tear it, so I save my red liner tape for this application.


SUPPLIES LIST


Wednesday, October 23, 2019

It Looks Real Challenge at The Funkie Junkie Boutique Blog

The Challenge

Cec is hosting a great challenge this time around!  She says, "There are so many ways to make something look real when it isn't. For this challenge, make a vintage or shabby chic project with one or more faux elements. Those elements could be faux rust, leather, stitching - to name a few. Make sure you tell us what the faux element is and how you made it because it will look real."

I can't wait to see all the faux elements everyone comes up with!

My Tag

Funny thing, I don't decorate for Halloween and we don't have trick or treaters.  BUT, I love making Halloween tags, cards and 3D stuff!  Again I chose a Tim Holtz Etcetera tag, (they are my go to) to create a fun spooky tag.

As usual, I thought I was going in one direction and ended up going another way!  I first used Wendy Vecchi embossing paste to stencil a pattern onto the tag.  Then I painted that over with Dyan Reavley's Dylusions paint.  Well then, I decided that the Worn Wallpaper looked good on the tag and so you don't see much of my masking.

Faux Elements
I started off with one of the easiest techniques, imitation stitching.  It's so simple, just take a pen a draw stitches on your project.  I "stitched" all around my design paper and I even added some cross stitches. (You can see them in the photo above.)

I used alcohol ink to make it look like there are potions in the glass bottles.  Then I shredded some cheese cloth, attempting to give it that spider web look.  Hmm, it looks pretty good from a distance.  😊  That didn't work out quite as well as I hoped but it's ok....


Flowers - I have to have flowers!

These are faux metal flowers.  I simply punched and shaped some flowers, inked all over with embossing ink, sprinkled with gold embossing powder and heat set.  Voila, metal flowers!

I think you should drink your potions from a silver chalice so I used silver embossing powder to make my shaker silver (Shaker from Creative Embellishments). Then I filled it with a mix of beads and sequins from Buttons Galore & More.  I also have bubbles rising from my potion, I just glued on some champagne color beads for the bubbles.


Side shot to show you the dimension on this tag. 


How to Enter the Challenge


Create a vintage or shabby chic project and link it up to The Funkie Junkie Challenge Blog Challenge, It Looks Real.  The Design Team will choose their top four picks, with the winner being invited to be a guest designer in one of our Funkie Junkie Challenges. The other three winners will receive Top 3 badges to display on their blogs. Everyone who enters and follows the rules will be entered into a draw to have the chance to win a $25 spending spree at The Funkie Junkie Boutique.


Thanks so much for stopping by today. Be sure to take a look at the creations of my talented teammates, you can see their creations here, at The Funkie Junkie Blog.

Wednesday, October 9, 2019

"It's Halloween" Challenge at The Funkie Junkie Boutique

The Challenge

Sara Emily is hosting the latest challenge at The Funkie Junkie Blog and it's all about Halloween.  She says, "I love Halloween! With Halloween just a few weeks away, I challenge you to create a vintage or shabby chic project with a Halloween theme. Your project can be as silly or creepy as you like, but just have fun!"

A Spooky but Frilly Tombstone

 I love the Etcetera tags and the Tombstone line of Etcetera tags are just so so fun for Halloween!  I used the mini size tombstone tag but they come in several sizes from large to small. 

First I applied a coat of off-white paint to all the pieces of the tag.  Next I stenciled bricks onto the top piece of the tombstone.  


 I finished the rest of the panels with crackle paste.  I inked over the cracks with Distress Ink in Vintage Photo to bring out the detail in the cracks.
After all the paint and mixed media dried, I added a panel of Worn Wallpaper to the center and then assembled  the tombstone.  Then the fun part began, adding the embellishments. I used some cheesecloth that I colored with a little black mist and stretched that out to resemble spider webbing.  The skeleton is chipboard from Creative Embellishments and it is heat embossed with Weathered White embossing powder.   The metal accents are Tim Holtz pieces from his Halloween Adornments.  I misted the roses (from I Am Roses)  with silver mist to bring out the petal detail.  The spiders are die-cut and heat embossed with black embossing powder.


Products from The Funkie Junkie Boutique

Stampers Anonymous Etcetera Tombstone
Tim Holtz Idea-ology Worn Wallpaper, Halloween
Ranger Embossing Powder - Weathered White Antiquities
Tim Holtz Idea-ology Adornments, Halloween Accents
Tim Holtz Idea-ology Adornments, Halloween Words
Stampers Anonymous Tim Holtz Layering Stencils
Ranger Opaque Crackle Texture Paste
Ranger Tim Holtz Distress Ink Pad - Vintage Photo 
Emerald Creek Eileen Hull Molten Dimension Embossing Powder


How to Enter the Challenge

Create a vintage or shabby chic project and link it up to The Funkie Junkie Challenge Blog Challenge, It's Halloween. The Design Team will choose their top four picks, with the winner being invited to be a guest designer in one of our Funkie Junkie Challenges. The other three winners will receive Top 3 badges to display on their blogs. Everyone who enters and follows the rules will be entered into a draw to have the chance to win a $25 spending spree at The Funkie Junkie Boutique.

Thanks so much for stopping by today. Be sure to take a look at the creations of my talented teammates, you can see their creations here, at The Funkie Junkie Blog.

LinkWithin

Related Posts Plugin for WordPress, Blogger...