Pages

Friday, June 30, 2017

A Farewell to Petaloo with Graphic 45's Master Detective

Handmade Tri-fold Birthday Card with Graphic 45 Master Dectective
I'm sharing my last official project for Petaloo with you today.  As you may know, Floracraft purchased Petaloo a year or so ago.  Now Floracraft has made the decision to integrate the Petaloo website with the Floracraft website and they've also decided to disband the Petaloo design team and that makes me sad.  I've had a wonderful year and a half  working with Cheryl, the former owner of Petaloo,  and representing Petaloo flowers.  I had the good fortune to work at the Phoenix  show this winter and at the Collins show last September teaching and demoing for Petaloo.  A very big thanks to Cheryl for giving me that opportunity.  
Handmade Tri-fold Birthday Card with Graphic 45 Master Dectective
I made this birthday card with the recently released Graphic 45 Master Detective collection.  Really this is more than a birthday card, it's a folio that makes a little gift statement on its own.  I'm sure the recipient will be so intrigued as they wander through the card/folio and find all the fun places where you could hide notes and gifts.  Beginning with the cover,  there's a fun little file folder that slides out from behind the cut-apart on the cover.

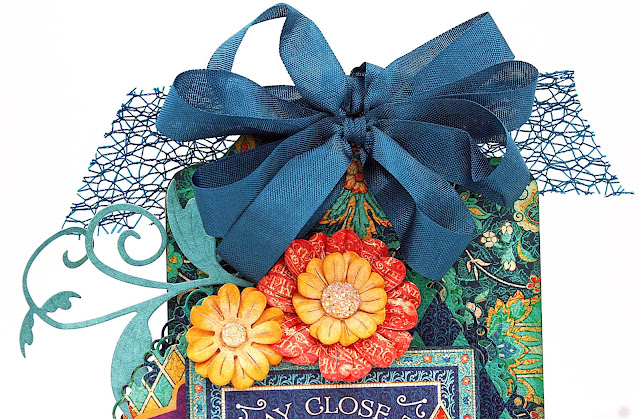
I've made the cover ever so pretty by using Petaloo's  Botanica blooms and gerber daisies.  They just brighten things up so much!
Handmade Tri-fold Birthday Card with Graphic 45 Master Dectective
When you open the cover you see birthday wishes.  I made a couple of ATC tags on the left and made a Julie Nutting doll on one of the tags.  On the right I stamped birthday greeting sentiments on the back side of an ephemera card from the Master Detective collection.  Two more pretty Petaloo gerber daisies add some pretty dimension.
Handmade Tri-fold Birthday Card with Graphic 45 Master Dectective
The folio is a trifold with pockets and places to tuck notes, gift cards, movie tickets, air tickets, how about cruise tickets?  Wouldn't that make a grand birthday present?  Int the center is a library pocket holding a small mini with 3 flip pages.

Handmade Tri-fold Birthday  Card Folio with Graphic 45 Master Dectective

The little mini is bound at the top with staples.  The design paper strip serves to hide the staples.  This is a really quick way to make a tiny mini, just cut your paper to whatever size you wish, then score at 1/2" and staple.  Then decorate the cover and  you have a quick little flip book.  
Handmade Tri-fold Birthday Card Folio with Graphic 45 Master Dectective

On the right side there's a Graphic 45 policy envelope attached with felt hinges that flips over so that something can be hidden inside the envelope, yes it's a mystery what lurks inside!  On the right, underneath the policy envelope is a spot with a belly band, perfect for securing photos.

The back is simply decorated with design paper and an ephemera card.Handmade Tri-fold Birthday Card Folio with Graphic 45 Master Dectective

Many thanks to all the Petaloo flower lovers that have followed the blog and design team over the years.  There will still be Petaloo flowers so keep an eye out on the Floracraft website to see what is new for Petaloo. 

One thing is for sure,  I'll still be making Petaloo's blooms part of my everyday craft life!   You can find me on my blog, Scrap, Travel & BarkPinterest,  Facebook,  and Instagram.


Cheery Lynn Thank You Card

Nothing says thank you better than a handmade card!  This is a large 7.5" x 6" card.  The base is simple cream cardstock and then I added several layers.  First a simple rectangle layer, then a layer cut with the Coved Rectangle Stitch Nesting Set.  Next two different sized cuts with the Rectangle Scalloped LG Purple Stackers Nesting Dies.

In the left corner I added the Victorian Romance Flourish Die.  This is such a pretty cut, it really adds a little pizazz to my card I think.  The thank you sentiment is the Thank You 2 Piece Die Set .

On the right I used the Inkwell & Quill 2 Piece Die Set.  I really love this die, its so fun and so vintage!  And of course I had to add some flowers.  I used the medium and large rose die sets to created these gorgeous roses.  These are the best rose dies I have used.  It's so easy to make a really pretty rose with these dies because the die cuts 7 pieces at once.  With one cut you have all the layers you need to assemble these gorgeous roses.  No more repetitive cutting! 

Cheery Lynn Designs Dies Used:


Thanks for joining me today!


Saturday, June 24, 2017

Mon Amour Travel journal and a tutorial!


I love making these fun journals!!  I think I'm addicted.  For this one, I used Sizzix's Eileen Hull Scoreboard XL Travel Journal die to cut the covers.  The thing I love most about these journals is that they are really quick to make as the inner pages are bound in with elastic bands, QUICK EASY!  My idea of a good time!
The Frilly and Funkie Challenge Blog hosts bi-weekly challenges and I made this for their With this Ring challenge.  The challenge is to create a vintage or shabby chic project that celebrates the big day.
I think this journal fits the bill as it could be used for so many things, organizing before the wedding, a honeymoon journal, a place for photos and memories from the big day, there are so many possibilities.

 I found my die at The Funkie Junkie Boutique last week and alas, I think they're already sold out, again.   But, if you're looking for one, you can asked the store to email you when they are back in stock.

I've put together a photo tutorial of how I made this; just scroll down for the tutorial.  But, first a few photos inside.

Now remember I said I loved this because it was quick and easy?  Yep, for the insides, I just purchased 3 notebooks that I inserted under the elastic bands.  There are 3 notebooks, 64 pages each I believe.  The notebooks are all different, one is ruled, one is plain, and the last one is graph paper.  These notebooks are so popular that you can find them most anywhere.  The covers are craft and I just covered them with design paper from Graphic 45's Mon Amour collection.

I added a chipboard Love piece from Creative Embellishments on the inside cover and colored it with Prima Metallique Wax.


TUTORIAL

This tutorial covers the techniques and products I used to make the journal. You can find the instructions for assembling the journal here.

Supplies used for this tutorial:
Chipboard
Sizzix ScoreBoards XL Die - Journal
Black gesso
TCW416 Stencil Grunge Hearts
Prima Texture Paste - White Sand
Ranger Tim Holtz Distress Oxide inks:  Iced Spruce, Fired Brick, Fossilized Amber
Prima Color Bloom mist - Empress Gold
Prima Metallique Wax - Vintage Gold
Petaloo Gypsy Rose Branch - Rose 5014-161
Petaloo Magnolia Mix - Blush 5015-311
Graphic 45 Mon Amour collection paper, chipboard, and stickers
Creative Embellishments word "love"

Step 1:
Cut a front and back cover from chipboard with the Sizzix journal die.  paint both outside covers with black gesso.  The inside covers will be covered with design paper, so no need to paint those.  The book edges will be waxed with Prima wax.


Step 2:
After the gesso dries, randomly mask on some hearts with modeling paste and let that dry completely.


Step 3:
Then dab with Distress Oxide inks randomly on the cover.  You can dabble one color at the time or several colors.  There's no right way or wrong way to do this.  Just dab away.
Step 4:
After dabbling on the inks, lightly mist with water and dry.  If you don't like the result, you can use a moist paper towel to remove some of the color.  Repeat this process until you are pleased with the result.
Step 5:
Now mist with Prima Color Bloom mist in Empress Gold.  I misted mine quite heavily as I wanted that gold to shine through.  After the mist dried, I added a bit more Oxide ink.

Step 6:
Do the outside of both the front and back covers. 

Step 7:
Rather than using an elastic band to hold the journal closed, I used a diecut clasp. (Part of the Journal die)  I used vintage gold Prima Metallique Wax to color the clasp which is attached with a gold brad.  Then I used velcro on the inside of the clasp and back cover to hold it closed.

Step 8:
Diecut paper for the inside covers and glue securely.  I misted the inside of the cover with gold mist so it is important to have a good bond between the paper and journal surface.  The paper will pucker very little if you adhere with glue stick or liquid adhesive applied to the entirety of the paper.

After you are satisfied with both the inside and outside covers, bind the covers together following the instructions provided by Sizzix.  In the center of the photo, I've applied 1/4" scor-tape for adhering the front cover to the back.


Inside cover after misting and binding.
Step 9:
Now go around the edges of the journal and rub on some vintage gold  Metallique Wax.  It only takes a little bit and you can apply with your finger or a stiff brush.
Step 10:
That's it, ready to embellish.  I added chipboard and a sticker from the G45 Mon Amour collection.  Then I used Petaloo's Petaloo Gypsy Rose Branch and Magnolia Mix flowers to embellish the cover.


I love it!  It's vintage, grungy, and shabby all at the same time.  

Thanks for joining me today!


Tuesday, June 20, 2017

An inspiration tag for Cheery Lynn Designs


Sometimes I like to spread a little cheer with an inspirational card or tag.  I usually chose a tag for my inspirational gifts and I like to attach them to a nice bottle of wine or other fun little gifts, like chocolate.  ðŸ˜Š  I used lots of pretty Cheery Lynn Designs diecuts from Graphic 45's  Midnight Masquerade collection to make this tag.  I started by cutting  two different size layers with the Horizon Oval Boutique Stacker Frames Die  set as a base for my sentiment card.


You have to have flowers right?  I used the flower dies from the  Floral Bouquet Kit 8 Piece Die Set to make these colorful pretty blooms.  They're easy to make, just stack several layers of blooms.  Give the petals a twist with your tweezers to give the flower some dimension and body.


Be sure to tuck in some leaves to finish off your floral clusters.  I've used our Tropical Flourish Die to create leafy vines around my flowers.  I love how that looks!  Then top your tag with a pretty bow and you're all set with a delightful tag that's sure to bring a smile to the recipient of your kindness!

Cheery Lynn Designs dies used:


Vintage layout for Creative Embellishments


Beautiful flourishes from Creative Embellishments, papers from Maja Design and flowers from Petaloo all come together to make this heritage layout a real beauty!  I love this vintage photo of my aunt that was probably taken in the 1930's.  She was a beautiful woman so I wanted this layout to reflect her beauty.

To start the layout, I did some masking and inking on the background.  Then I added a couple torn layers under the photo.


Creative Embellishments has recently added some gorgeous frilly feminine corner flourishes to their product line and I love them so much!  This one is Flourish Corner 4 and it looks so pretty layered with these Petaloo magnolias.  I heat embossed the flourishes with Stampendous shabby pink embossing enamel.  To bad you can't see the sparkle on them, it is magical with the glitter enhanced flowers.


I chose the word family from the  Small Family Border Word Set.  These small word borders are just the right size to fit under a photo.  Again, I heat embossed with  Stampendous shabby pink embossing enamel.
I love how the tail of the flourish cascades down the page.  It's just the perfect place for a stray flower!

Creative Embellishments Chipboard:

Thanks for joining me today, I appreciate it so much!

Thursday, June 15, 2017

Daddy's Girl layout for Petaloo


It's crazy that this is the only photo I can find of my Dad and me, so I scrap it often!  I was 4 years old and we had just returned from 3 years in France aboard the US aboard the USS United States.  I do wish I remembered all that!

Maja Design of Sweden so generously gave the Petaloo Design Team some of their gorgeous vintage papers and they go so beautifully with Petaloo's flowers.  I used royal blue ranunculus and sugared minis on this layout.  Then to add to the shabby vintage looked, I dry brushed white paint over the flowers and leaves.


My title is chipboard from Creative Embellishments that I misted with Lindy's and then glued on some 13 Arts blue grit.  Underneath the photo I used a Circle Doodle Frame .

Petaloo Flowers:
Ranunculus x 14 Royal Blue 5017-122
Sugared Minis x 11 Royal Blue 1131-122

Thanks for visiting today!

Saturday, June 10, 2017

Romance with Cheery Lynn Designs

Wouldn't you love it if your sweet heart gave you this romantic piece telling you about the rose in his heart?  Sometimes I am a hopeless romantic, but alas, my sweetheart is not!  Oh well....I can dream!  I designed this tag for Cheery Lynn Designs, their flowers and flourishes are so perfect for this romantic piece.  I'm also entering this in the Frilly and Funkie challenge, more about that at the end of this post.
I used a 5.5" x 10" large tag from Creative Embellishments for this. These large tags are a great alternative to using a canvas. Often I am asked, what do you do with tags? Well in the case of these large ones, they are like canvases, if I don't give them away, I hang them in my craft room. Small tags I gift or use the same way one uses a card.

First I covered the chipboard tag with design paper from my much hoarded Graphic 45  Le Romantique collection.  Then I built  diecut layers.  Behind the gentleman (image from The Proper Gentleman G45 collection) I used a diecut from the Horizon French Flair Boutique Stacker Frames set.


The verse is layered over a A2 Frames Rectangular Scalloped  diecut and that is layered over a doily cut with the Priscilla Doily die.


 I do love flowers and flourishes so much!  These are roses made with the Large Rose 7 Piece Die Set.  Then I tucked in greenery made with the Flourish Leaf Strip 5 Piece Die Set .  I like to add a little glimmer to my leaves so they are colored with Lindy's mist.  At the top I've used the Tropical Flourish Die and nested a metal butterfly that's had a bit of embossing powder heat embossed on its wings.

These flowers were made with Judy's Blooms Die and the Black Eyed Susan Strip 5 Piece Die Set.  Aren't they lovely?

Cheery Lynn Designs Dies Used:
Horizon French Flair Boutique Stacker Frames 3 Piece Die Set - DL271

The Frilly and Funkie Challenge Blog's challenge is titled "you're My Inspiration" and the challenge is to use an image or photo that inspired a vintage or shabby chic project.  Well, you know what inspires me, always, Graphic 45.  So I chose this handsome gentleman from the a Proper  Gentleman collection and fussy cut him out and paired him with his story, The Lover Tells of the Rose in His Heart, also from the collection.


That's it from the Romance department today!  ðŸ˜Š  Thanks so much for stopping by!

Wednesday, June 7, 2017

Petaloo's Spotlight on Maja Design

Maja Design was so kind to share a great selection of their beautiful vintage papers with the Petaloo design team.  Be sure to join us for the next 12 days as we showcase our projects made with Maja and Petaloo flowers.

I used papers from several Maja collections to design this fun vintage journal that can be used for photos and stories.  I love that Maja's papers coordinate from collection to collection.  Petaloo's Penny Lane flowers blend so nicely with Maja's paper so and the flowers come in a great selection of 10 different vintage colors.  I used Antique Mauve flowers on the cover and throughout the journal.

I masked on the journal cover and then inked with Lindy's mists and Distress Oxide Inks.  I was having trouble deciding on a color palette so I just went with various!  For the closure, I diecut a hinge with an Alterations die from grunge board and felt.  I glued the felt to the grunge board to give it strength and then used a magnetic closure on the front.

Here are the papers inside.  I kept them all simple to showcase the beautiful vintage papers.


Maja Products Used
Use this store finder link to shop for Maja Design papers.   

Vintage Spring Basics collection:
6th of March
10th of March
7th of April
5th of May
Days to Remember
Vintage Summer Basics collection -
1905
Memories
Vintage Romance Basics collection - 
Walk with Me
Words of Love
Vintage Autumn Basics collection - 
No. X

Thanks for joining me.  Be sure to visit the Petaloo blog, Instagram ,  Pinterest and Facebook and enter our prize drawing for Petaloo flowers and Maja Design paper! 

LinkWithin

Related Posts Plugin for WordPress, Blogger...