Pages

Friday, September 28, 2012

Photo transfers

We're gonna make some magic here with gesso and a magazine page!

Here's what you need:

First and foremost, YOUR IMAGINATION!

Canvas, the kind that is NOT stretched and stapled is easier to work with, the ones that were in our recent kit work great.
You'll need a paint brush, wide is better than narrow, but any will  do.
An acrylic medium such as Gesso, Heavy Gel, anything as long as it is an Acrylic Polymer Emulsion.
Bone folder or something similar, have heard that a spoon works well.
Brayer is handy but not necessary

Optional:
Acrylic paints

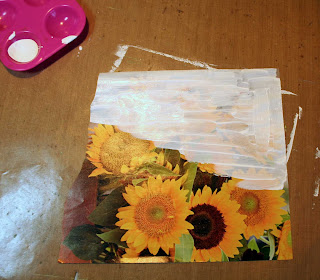
OK below you can see my image of sunflowers that I cut from a magazine.  I am going to transfer this image onto a canvas.  However, before transferring the image, I first painted the canvas with acrylic paint, I used Ranger Claudia Helmuth acrylic paints.

 
So I mixed a tiny bit of blue into the yellow to get the green below.  I wanted  a varied color so I did not mix the colors very well and that allowed me to get streaks of color.

 
I also streaked in some orange at the bottom.  After this dried, I was ready to do the photo transfer.

 
I started out using gesso but that was drying too quickly on this large image so I switched to heavy gel for my transfer medium.  Gesso does work but you have to work quickly.  Paint your medium on your image going one direction and then paint on going the other direction.  Place the image on your canvas and begin smoothing out the image working from the center to the edges.  I first used my brayer to sort of lay the image down and then used a rub on applicator to slowly rub the image into the canvas and transfer medium.  It is important to rub the image completely into the transfer medium being very careful not to tear or pucker the paper.  Some of the medium will run out from under the image, I just wiped that up with a damp paper towel.


After completely rubbing the image in, set it aside to dry overnight.  It might dry in less time, but don't push it, leave it alone!!

Ok its the next day now right?  Lightly spritz the image and dampen your fingertips and start rubbing the dried paper off the canvas.  You should start to see your image as you rub off the paper.  Below you can see the sunflower starting to peek through as I rub.

 
I am sorry, but I missed a couple photos in this process but I think you can still follow what I've done.  See the streaks below in my image where the image did not transfer?  Most likely that is where I either didn't rub it in enough or where my medium was to dry when I put the image on the canvas.  So I decided that that just added to the old vintage charm that I am creating and decided to live with it. 
 
I wanted to soften the edges of the image that I transferred so I used some rub on buff in gold around the edges.  I also applied a bit of white gesso here and there.

 
I just kept working with the buffing and gesso until I was happy with the results below.

 
Then, to dress up the canvas I made some sunflowers using a Spellbinders die.  I used micro beads for the center.  I also added some burlap underneath the flower cluster and a little straw matting at the top right corner.


And here is the finished canvas. 


Here is another canvas that I did using a laser printed image.  Note:  inkjet printed images do not work well as the color does not transfer true.  On the inkjet image I tried, black transfers looked reddish brown and the image overall looked muddy.
 
For this canvas I first glued on bits of printed paper, then for the transfer I used Claudia Helmuth matte medium, again you can use gesso, or any acrylic polmer emulsion, just look at the ingredients to see if it is an acrylic polymer emulsion.  I prefer using something other than gesso as that seems to dry a little quickly for me.  
 
 
Here is the image that I'm going to transfer.

 
Canvas covered with matte medium.

 
Rubbing the photo into the matte medium.


After drying overnight, I lightly dampened the back of the image and rubbed off the paper with my fingers.  I really love how the printed paper shows through the image on the edges.  Next time I will put printed paper under the entire image.  That is the cool thing about photo transfers.  They are somewhat transparent.
 

(Note after I rubbed the paper off my image transfer I had a really great crisp image of the bicycle - it really looked great. AND THEN- I had this bright idea to paint over the image with crackle paint. BAD IDEA, don't do it, because the crackle started chipping off and pulled off the image with it soooo, I was left with a very distressed image. Oh well, so it goes......  Now I was working with a very distressed looking image.)
 
I thought the canvas looked sort of lonely so I decided to incorporate it into a layout collage.  I took a sheet of Love Games from Glitz and stamped a brickwall and added some  strips of newsprint on the left.  I  decided to try a photo transfer from paper to paper.  That's the white strip you see below.


It didn't work very well as when I tried to rub the photo image paper off, some of the cardstock beneath the photo also rubbed off, but no matter, I was aiming for a rough aged look and you can see that is what I got.

 
I drew a rectangle in the center of my cardstock so that I would know where my canvas was located.  Then I just dug thru my stash and added a lot of different elements.  At the top center I used a Tim Holtz stamp that I embossed using Stampendous aged black embossing powder (great stuff !!  Check it out in the store).  I also added a diamond shaped stamp, Tim Holtz film strip, Tattered Angels bicycle, G45 metal flowers and a Tim Holtz Eiffel Tower stamp.

 
I sure hope you'll give this a try and  I'd love to see your project, leave me a link so I can see what you've done!

Thursday, September 27, 2012

October KOM sneak peeks!!

My favorite day every month is kit reveal day and my second favorite day is sneak peek day!  Here are some sneaks of what I did with the October kit.  This kit is just a tad different and I love everything that's different about it!  It's filled with great papers and fabulous embellies, you are seriously going to want this kit!

You might recognize those G45 butterflies that I embossed used a Sizzix Vintaj metal embossing folder, love how they look!
 
 One of the new products we have in the store is Stampedous aged embossing powders and do I ever love them!!!  On the far right you can see a chippy that I embossed with Stampendous aged aqua (the embossing powder is not in the kit) - isn't that just the greatest look!  Be sure to come back on reveal day, Oct 3rd, so you can see the whole thing.
 
I used some crackle paste here, I really love the texture of it.

 
Thanks for stopping by and see you on Reveal Day!!

Friday, September 21, 2012

20% off on 7 Gypsies


I love this 7 Gypsies collection, Trousseau, its so pretty, so vintage!!!  I cut apart one sheet of paper to get the stripes and Grace title.  Then I used a WRMK Lucky 8 punch to cut the circle from another sheet and layered that behind the striped piece. I cut a frame using MS punch around the page Deco flower to layer under the photo and also layered another  clipping from the Trousseau papers.  Then I tore bits of gray paper and put under the large circle.  I finished the LO off with some Dusty Attic flowers that I colored with a bit of pink water color.  The dressform is a Fabscraps piece that I covered first with white gesso and then misted with Glimmer mist.  The pretty white bird is a clay piece that Alda made, thank you!!  And that wonderful white swirl is from another dear friend, Kathi.  Its embossed with Stampendous aged cream.  I added a white swirly rubon on the right to complete this simple LO.  I just wanted to accent the beautiful painting of the bride working on her wedding dress.


Wednesday, September 12, 2012

Off the Page - Sept Flying Unicorn kit, Vintage Harmony

I love that in our main kit, you always get an off the page project!  Every month I look forward to this surprise as Alda never tells the CT what's coming in our kits.  Its kind of like Christmas every month!

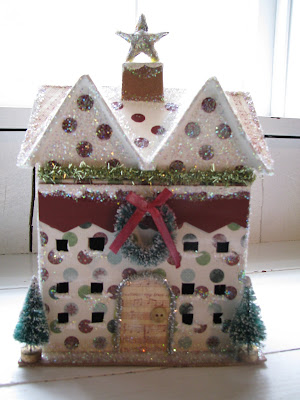
I decided that I wanted to make a French dress shop decorated for Christmas so I used papers from G45 Ladies Diary and made Christmas boughs of poinsettias and roses to decorate the windows and door.  I used Dusty Attic chippies to make my windows and a tiny Dusty Attic dressform to put in the window.  Gold braid and green bead trim from Hobby Lobby decorate the seam where the roof meets the body of the house.  Then I added sparkling pale pink beads around the roof line to imitate Christmas lights.  This was a really fun project to do and I'll love using it as a Christmas decoration!  You can purchase this great kit here.


Wednesday, September 5, 2012

More Flying Unicorn September KOM creations.

The September KOM, Vintage Harmony and the paper add-on includes papers from the Kaisercraft Miss Match collection which I loved because the papers are so diverse.  I did both of the below layouts using that kit.  One is so feminine and the other so grungy. It's hard to believe they come from the smae kit!
 
For this first page I used the Miss Match diecut and mounted it on an Anna Griffin paper that came in the kit.  The gates are new from Petaloo, I love them!  Miss Match has a great set of diecut tags and images.  The girl on the swing is part of that embellishment set, isn't that just so cute?  I love the romantic country look of these papers and thought they were perfect for this photo taken in the mid 40's of my Mother, her parents and 3 of her siblings.  My uncle is there in his uniform, her served in WW II.


Now let's get grungy with Miss Match!  Dick, his brother and a friend spent some time rehabilitating a house that his Mom owns that was built in the 40's by his father and grandfather.  When I saw this photo all I could think, was, what a motley looking crew!  I diecut some gears and heat embossed using Stampendous aged silver.  If you haven't tried that embossing powder, it is really neat stuff if you want to achieve and aged old look.  One of the guys owns a bicycle shop so I thought it appropriate to added the Kaisercraft bicycle diecut. 
 
The title is mounted on a chippy strip that came in the kit.  I painted it with Distress Vintage Photo crackle paint that came in the kit.  The letters are from my stash as are the chain and small metal gears.


Thanks for stopping by!!

Tuesday, September 4, 2012

Flying Unicorn September KOM - Vintage Harmony

The September KOM, Vintage Harmony, kit has such a wonderful eclectic collection of papers and embellishments that it certainly has something for everyone and every style!  Here's a link to the store where you can find this lovely kit and te coordinatng add ons.

 
Now you know that when I spied this lovely sheet of Carta Bella red and white paper, I immediately snatched it up and started scrapping! The chipboard border running behind the photo is painted with Picket Fence Crackle Paint (from the embellishment add on) and adorned with black beads (from my stash) and a Kaisercraft Miss Match diecut. Those big white flowers were so fun to make! They're from the flower add on kit and are the LYB paper flower kit, I added the flower centers from my stash.

I really loved the Kaisercraft Miss Match diecuts, the butterfly, buttons and journal card all came from the diecuts. I think I used them on all my layouts! The stickpin is from my stash, it was sitting on my desk just begging to be used!

Closeups


I did this page using mostly papers from the Kaisercraft Miss Match collection. I used a WRMK Lucky 8 punch to make the square diecut using Coredinations white wicker chair. I also cut a circle from the Anna Griffin paper, it is just peaking out from huder the photo on the left. The small circles, umbrella, journal ticket, Treasure ticket, are Kaisercraft Miss Match diecuts. The two multi color flowers on the right are some really old ones from my stash and the other green one is from an earlier kit this year. I also added the fabric leaves from my stash.

The photo is of my Mother's parents. I think it was taken in Washington DC when my grandparents were visiting. I don't ever remember seeing my grandmother dressed up like that!

The journal says:

Since my Dad was in the Army we lived all over the place. Whenever he was stationed stateside we would find ourselves making long road trips to NC to visit family. I particularly remember driving from Kentucky to NC numerous times.

We always stayed at my Mom’s parent’s home. Papa Greene, my grandfather, had a country store and I loved to go in there and explore the penny candy cases. I can close my eyes and see it as if I was standing there. I can smell its musty old smell and hear the clinking of bottles in the drink box. Uncle Bernis, Papa Greene’s brother, tended the store most of the time even though he had polio and was confined to a wheelchair.

When it was time for the long drive home, Papa Greene, with his smiling twinkling blue eyes, would give us each a small paper sack full of penny candy. Mama Greene always made country ham and cheese biscuits for us to munch on during our trip.

These memories are so precious to me. Grandparents are very special people!

Monday, September 3, 2012

Flying Unicorn September KOM - Vintage Harmony!

The Flying Unicorn is pleased to showcase this month's KOM - Vintage Harmony - on sale now, hurry and get yours!  The kit is full of an eclectic blend of papers and embellishments that you can use in so many different ways.  You can purchase the kit here.


PAPERS :
PAPER LOFT
Easy Peasy Lemon Squeezy
Made in the Shade
Our Song
Something Old
Lifetime
KAISERCRAFT MISS MATCH
Trash
Bric Brac
Knick Knacks
Junk
ANNA GRIFFIN
AG1675
AG1708
LITTLE YELLOW BICYCLE
Blue Riverie
Pattern Play
CARTA BELLA
Damask
Remember
EMBELISHMENTS :
Technique Tuesday 12” Borders x 8
Prima Tiny Alpha Stickers
Kaiser Rub Ins Miss Match
Faber Castell Accents Sampler
Kaiser—Photo Frames x 2
Bingo Cards x3
Cards x 10
Shimmer Smritz—Copper
R anger Crackle Paint—Vintage Photo
Making Memories Charms x 2
Vintage Ribbon 12” and 18”
Perfect Pearls—Heirllom Gold
FLOWERS :
Petaloo Chatreuse x 32
Petaloo Small Daisy x 4
Petaloo Burgandy Vine


· PAPER LOFT
· Easy Breezy See yOu later Alligator
· Hunky Dory
· KAISER—MISS MATCH
· RUMMAGE
· TREASURE
· ODDS
· CLUTTER
· ENDS
ANNA GRIFFIN
· AG1713 AG1710 AG1674
LYB - Saturdays—Cottage Dreams
CARTS BELLA - Beautiful Moment
Chickadee paper


CORE’DINATIONS CARSTOCK
· Wicker Chair
· Sun Coral
· Iced Cocoa
· Burnt Sugar
· Rivulet
· Flamingo Lilly
· Snowflake
· Persimmon


· LAKEHOUSE STICKER SHEET
· Tim Holtz Film Strip Ribbon
· Petallo Laser Gates
· Kaiser Brick Stamp
· Kaiser Miss Match Die Cuts
· Kaiser Pearls
· Distress Paint—Picket Fence
· Rock Candy


· Celebrations—White Flowers
· Bazzill Red Flowers
· Little Yellow Bicycle Paper Flower Kit
· American Craft– Anastasia
· Petaloo Florettes x 32

Check Out the amazing creations from the Creative Team


LinkWithin

Related Posts Plugin for WordPress, Blogger...