

This was a really fun tag to make! I hope you'll join me for this month's Swirlydoos Savagery Tag challenge. The supplies you will need are as follows:
Prima Julie Nutting tag or a tag cut to 3.5 x 8.5"
Aluminum foil
Embossing folder
Double sided tape
Stamp and Archival ink
Clear gesso
2 colors of mist
Black mist, if you don't have black, you could use a dark brown probably
Stencil and masking paste
Chipboard
Washi tape
Embellishments
Step 1:
Get a piece of aluminum foil large enough so that when it is folder in quarters it is slightly larger than your embossing folder.

Tag with foil secured.


Step 7:

Step 8:

Step 11:

Step 12:
Step 13:

Step 13:


Black mist, if you don't have black, you could use a dark brown probably
Stencil and masking paste
Chipboard
Washi tape
Embellishments
Step 1:
Get a piece of aluminum foil large enough so that when it is folder in quarters it is slightly larger than your embossing folder.
Run a couple strips of tape on one side of the foil and then fold in half.
Step 2:

Step 2:
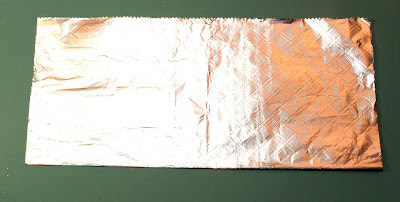
Run a couple more strips of tape down the foil and then fold in quarters. The tape is to hold the layers of foil together. Once it is embossed it will easily stay together. Place the foil inside an embossing folder and emboss.

This is what the foil looks like after it has been embossed.

Step 3:
Cut a tag 3.5 x 8.5" or use a Prima Julie Nutting tag. Do some stamping at the top with Archival ink. Use Archival ink so that when you add mist, the ink doesn't run or smear. I've used Creative Embellishments Distress Corner stamp.

Step 4:
Adhere the foil to the tag.
I used scor-tape on the back and folded the foil around the tag using
the scor-tape to secure it.

Tag with foil secured.

Step 5:
Paint the tag with clear gesso.

Step 6:
Select 2 colors of mist and mist the tag. Be sure to dry one color before adding the 2nd color.

Step 6:
Select 2 colors of mist and mist the tag. Be sure to dry one color before adding the 2nd color.

I used Lindy's Grab a Guy Gold and Tibetan Poppy Teal.

Step 7:
Now add some masking.
I used Crafter's Workshop mini time travel stencil and Art C gold embossing
paste.

Step 8:
Now let's prepare our chippy. I've used Creative Embellishments' Mantle Steampunk Gear Timepiece. Rub over the chippy with black archival ink. You don't want to cover the chippy, just inking here and there.

Step 9:
Then mist the chippy, I've use Lindy's Grab a Guy Gold.

Step 10:

Step 9:
Then mist the chippy, I've use Lindy's Grab a Guy Gold.

Step 10:
Mist the tag with black spray and then blot up the mist
leaving black ink in the crevices. Allow to dry before going to the next step.

Step 11:
I wanted to intensify the gold mist in the center so I misted again but I
covered up the parts of the tag that I didn't want misted.

Step 12:
Add a piece of washi tape at the seam between the foil and
tag.

Step 13:
Add ribbon or trim at the top and add the chipboard piece. Now the tag is ready to embellish.

Step 13:
The back of my tag was a mess with dribbles of mist etc so an easy way to cover that is to use washi tape and trim to fit the tag.


The finished tag after I embellishments. I used an old Making Memories metal piece for the quote. It was pewter so I used a gold rubz to change the color. Then I added some metal pieces that I got off eBay. I really love that winged heart in the center of the chippy!


When I received the Swirlydoos Kit Club May kit, I wanted to make a tag with it just to show you a different look but using the same techniques. The only thing I didn't do on this tag was spray with black mist. As often happens, I ended up covering a large part of the foil but you can see it a bit near the top and on the side. I used the pink and antique gold mists from the mediums kit on the foil.


Supplies:
From the Main Kit -
Oh so Lovely Specialty Paper Gloss - This is the frame paper and I fussy cut the flowers from this sheet.
Creative Embellishments Mini Frames
Prima Wood Icons
Bo Bunny Double Dot Jewels
From the Mediums Kit -
Kaisercraft Mists in antique gold and pink
Prima Elementals Weaving stencil
From the Flowers Kit -
Petaloo Mums & Butterflies pink
Petaloo Calla Lilies & Berries pink
From my stash -
Teal seam binding
Petaloo mini Botanicas teal and pink (from an old kit)
Prima Manhattan Times Square flower (from an old kit)
Coffee Archival ink
Silver Staz-on
Lindy's Winter Jasmine Gold
Prima Finnabair small doily stamps (from an old kit)
Clear gesso
aluminum foil
Art C gold molding paste
I hope you'll join my challenge at the Swirlydoos Kit Club Forums. You do not have to use Swirlydoos kits to participate in the challenge. And there will be a randomly awarded RAK of some of my favorite tag making supplies to someone.
Thanks for stopping by!
.png)

I love the Creative Embellishments mini frames that came in the main kit and I used one to frame the cameo. I used the same technique as I did above on the Steampunk clock but this time I stamped on a little silver Staz-on ink and then misted with Lindy's Winter Jasmine Gold. The effect doesn't show up great in this photo but it is a mottled antique look. I flipped one of the silhouette wood icons over and stained it with dark brown stain. You can see some of the gold masking behind the silhouette and the foil on the right side.

There at the bottom of the tag you can see where I stamped with archival ink and misted over it with pink mist.

Supplies:
From the Main Kit -
Oh so Lovely Specialty Paper Gloss - This is the frame paper and I fussy cut the flowers from this sheet.
Creative Embellishments Mini Frames
Prima Wood Icons
Bo Bunny Double Dot Jewels
From the Mediums Kit -
Kaisercraft Mists in antique gold and pink
Prima Elementals Weaving stencil
From the Flowers Kit -
Petaloo Mums & Butterflies pink
Petaloo Calla Lilies & Berries pink
From my stash -
Teal seam binding
Petaloo mini Botanicas teal and pink (from an old kit)
Prima Manhattan Times Square flower (from an old kit)
Coffee Archival ink
Silver Staz-on
Lindy's Winter Jasmine Gold
Prima Finnabair small doily stamps (from an old kit)
Clear gesso
aluminum foil
Art C gold molding paste
I hope you'll join my challenge at the Swirlydoos Kit Club Forums. You do not have to use Swirlydoos kits to participate in the challenge. And there will be a randomly awarded RAK of some of my favorite tag making supplies to someone.
Thanks for stopping by!

The tags are amazing, Maggi! Thanks for the great tutorial.
ReplyDelete