Pages

Friday, September 22, 2023

Gnomes for the Seasons with Spellbinders Gnome Hugs Die Set

I had a blast creating with the Gnome Hugs Die Set; gnomes are so cute!  The die set is really for Christmas gnomes but I decided to use the die set to creat gnomes for all seasons.   Here are 4 seasonal cards created with the same die set, Gnome Hugs from Spellbinders. (S6-213)


Since this is a Christmas die set, let's start with the Christmas Card.  I used Stamperia Christmas paper scraps and a journaling card to create this card.  


The sentiment is printed on a transparency and glued to a small tag.  


Halloween is coming soon so I thought some "spooky gnomes" were in order.  I don't think gnomes are very spooky, they're too cute to be scary!  This card is made with left over bits of Haloween paper.  In addition to using the Gnome Hugs die set, I used Autumn Wonder for the pumpkins, and Notched Corner Frames for the inner black print layer.


The gnome on the left is wearing a witch's hat that I fussy cut instead of the die-cut hat.  The two larger pumpkins are cut with Autumn Wonder and the smaller is from an older 2018 die set, the pickup truck bed.


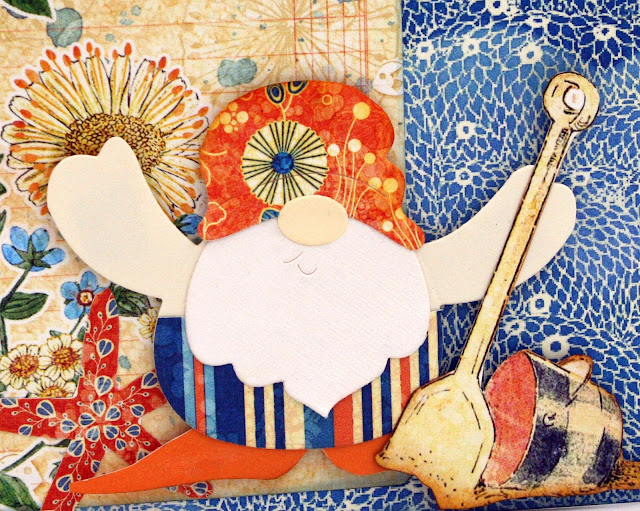
Of course, I needed a beach gnome for the summer!  I used Graphic 45's Sun Kissed collection for this card.  Our gnome is playing in the sand with a fussy cut shovel and bucket.


I rounded off the hat die cut from the Gnome Hugs set to make what I hope resembles a swim cap.  And his feet, well they're  supposed to be swim flippers that I just cut freehand.  Ha!  Whatever... they look a bit like feet or flippers. 😄


And finally, the spring gnomes in their garden of flowers, die cut using the Envelope of Wonder flower dies and papers from Graphic 45's Once UPon a Springtime collection. 


...And that's a wrap for Gnomes for the Seasons!  Thanks for joining me and my gnomes today!

xoxo Maggi


Supplies


ENVELOPE OF WONDER ETCHED

Tuesday, September 12, 2023

Halloween House with Eileen Hull's Slotted Treat Box

This is Eileen Hull's Slotted Treat Box cleverly transformed into a haunted house. (Well, I think it's clever 😁!) Best of all, the roof flips up so you can stash candy inside!

I used Graphic 45's Midnight Tales paper collection, black cardstock, and chipboard to put this together.


To make this I assembled the treat box without the lid.  Here's what the treat box looks like in it's "normal" state: 


 Instead of using the lid, I built a roof  using the side walls of the lid to form roof peaks.

Steps for building the house and roof:

House
  • Die-cut 2 sets with the Slotted Treat Box die.
  • Assemble the bottom portion of the box as usual. Cover the slot by placing the die-cut piece back in the slot and tape in place.  We'll cover that with paper later.
Roof
  • We'll use the 2nd set of die-cuts to build the roof.
  • Fold the side wall die-cut pieces of the lid assembly in half and cut to the shorter length. Don't fold the long flaps down on the scored lines.

  • Using a craft knife, score the ends of the cut edges @ 3/8", being sure both ends are exactly the same and that you don't cut all the way through the chipboard.


  •  This will create tabs on either end and are used to make the roof peak.  Adhere the tabs underneath the roof floor, which is the die-cut piece that is normally the top and bottom of the box.  It is better to adhere this with the scored flaps inward rather than outward as shown in the photo below.  Its doesn't make a big difference but inward is better.


  • Now its time to cover the gable ends of the roof.  Now for a little geometry!  😄 Cut two pieces of paper 6 1/2" w x 4 1/2 h as shown in the photo below and score on the inner triangle lines.  Adhere to the roof assembly folding the  flaps and adhering over the roof assembly. 


  • Die-cut one more side piece for the lid and trim and discard the tab and shorter piece as shown in the photo below.  Adhere the wide part of the long piece inside the box, then adhere the roof to the tab.  Be sure that the scored part is facing the side wall in the the box so that the lid can be opened. 


  • Now cut a piece of paper for the roof 5 3/4" x 10 1/4" and score at 5 1/8" and cover the roof centering from front to back.  I used black cardstock for this step and then covered with design paper just to make the roof a little more substantial although not really necessary.  But, since I like to add lots of flowers etc. I thought I might need a little more heft to my roof! (You could also use a folded piece of chipboard but I didn't think it was necessary.)

Box opened.  The black object holding the box open is just something I put there so I could photograph the inside.


View from the back.


The front door and skull are pieces from Creative Embellishments and the door knob is Tim Holtz.

I'll be doing a Facebook Live with Eileen October 3rd at 6 pm EDST showing you how to make this so be sure to tune in!  You can catch the replay here.

Thanks for stopping by!

xoxo
Maggi

SUPPLIES 


Graphic 45 Midnight Tales
Light Weight Chipboard


Tuesday, August 29, 2023

The Bigz Plus Slotted Treat Box by Eileen Hull for Sizzix

When I first saw the Bigz Plus Slotted Treat Box I immediately thought of a Piggy Bank because of the slot in the front.  Well them my mind wandered about and I remembered that Graphic 45 had a collection with flying pig images; so of course, this piggy bank was born!

The Bigz Plus Slotted Treat Box measures 6 1/2” x 5” x 3 1/2” and aside making a cute piggy bank, it can be some many other things. It can hold a set of cards, journals, doll clothes, ephemera storage or you can even use it as a gift box! This is a Scoreboards die which is specially designed to cut and score thick material like matboard, chipboard, leather, felt, fabric and metal.  Take note, this is important, an A 9” wide machine is required to cut this die.  It works with the Sizzix Switch and Big Shot Plus, Spellbinders Gemini & 8.5" Platinum, and others with a wide mouth platform.


I used Eileen's Alphanumeric Thinlit die to cut the "My Piggy Bank" letters.  The piggy is fussy cut from a design paper from Graphic 45's Olde Curiosity Shoppe collection.


I hinged the back to keep the lid in place.


Then I just embellished it with fun piggy images and begging words!


The great thing is you don't have to use the slot, you can cover over it and then it's just a cool box!


Supplies 


Graphic 45 Olde Curiosity Shoppe


Thanks for joining me today!  Be sure to stop by Eileen Hull's blog and see all the great projects from the design team.

xoxo
Maggi


Tuesday, August 22, 2023

Eileen Hull's 3D Embossing Folder & Starlit Village and Card Panel Thinlits

 We live in a growing neighborhood so there are always new people moving into new houses.  This card is just the thing for that occasion!


I started the card with an embossed background made with the Keys 3D Embossing Folder. I used Core'dinations cardstock to emboss the keys and then sanded the embossed keys to make the keys stand out.


Next I die-cut some houses using the Starlit Village and Card Panel Thinlits Dies and layered them over each other.  Note that this Eileen Sizzix die is very special, in that it is only available at Scrapbook.com. A vintage key from Graphic 45, a bow and flower finishes the look.

Supplies


Thanks for joining me today!  You can find many Eileen Hull Designs by Sizzix on Scrapbook.com.
Also be sure to stop by Eileen's blog where you will find lots of inspiration from the design team.

xoxo
Maggi


Tuesday, August 15, 2023

Using Elements from Eileen Hull Designs by Sizzix Chapter 3 Dies

As always, Eileen Hull's latest release is fabulous!  I love that her dies work together like on this card where I used elements from 3 different dies in her Chapter 3 release. 


I started my card with a black cardstock base and covered the front with design paper from Graphic 45's Love Notes collection.  I love the Keys embossing folder so I thought a card with keys as the focal point would be fun. I used the Keys embossing folder on a strip of black cardstock and rubbed over the raised embossing with gold Sizzix luster wax to make the keys pop.  I also cut corner elements from the embossed keys using the XL Scoreboard Slotted Treat Box die.


Keys Embossing Folder

Slotted Treat Box

I printed my sentiment, "You own the key to my heart" on a clear transparency and glued it to a tag that came with the Love Notes collection.  Now to tie my sentiment all together with keys and hearts, I die-cut 3 hearts using the Envelope, Folder & Flowers Thinlits dies and added some faux stitching to make them pop.  


To finish it off, I added a Graphic 45 Staples key.


Envelope, Folder & Flowers Thinlits dies 


Thanks for visiting today!!
Maggi xoxo


Sizzix Supplies by Eileen Hull Designs


Tuesday, August 8, 2023

New Field Notes and Specimen Card Die from Eileen Hull Designs by Sizzix

Hi everyone!  Today I am sharing a new style mini album/journal from Eileen Hull.   It's the Scoreboard XL Field Notes and Specimen Card Die and it holds  5” x 7” pages and photos!  I used 49 and Market's Artopia Rouge paper collection to make this mini.

I love the scalloped edge!


On this page you can see the Specimen Card which I've used as a frame.  The letters are Eileen's Alphanumeric set and the heart is from the new Envelope, Folder & Flowers thinlits set.


I made a pocket on the right with an older die, the Folio Page Pocket, and tucked in tags I made with Eileen's stamps.


More tags on the right made with Eileen's stamps and a cute little envelope made with the new  Envelope,, Folder, & Flowers Thinlits dieset.  Inside the envelope are stamps diecut with the mini slimline tickets die.

On the right side I made a pocket with a Eileen's Fashionable Button Card stamp. I just stamped, then cut out the card and glued on 3 sides forming a pocket, easy peasy!  Inside I tucked a cute little tag.


I love Eileen's new Envelope, Folder & Flowers Thinlits dies! It includes that adorable file folder on the left. I used a metal closure to hold the file folder closed. There are lots of tags on these 2 pages made with the older Card, Waterfall, and Tags thinlits set and a pocket on the right from the Folio Page, Pocket, Flowers Thinlits set.


I used the Journaling Card & Envelope dies to make the left page and on the right, I used an ATC card and cut out an oval using a die included in the  Journaling Card & Envelope set.


More tags and a file folder.


The library pocket (on the left) works so well in minis. It's a great place to stash photos, ephemera, or tags. The pretty flower on the pocket was made with dies in the new Envelope, Folder & Flowers Thinlits dies.


Eileen's newest 3D embossing folder is Keys.  I used Luster Wax to bring out the key details.  Then another file folder held closed by a keyhole on a brad so that it swivels.


Another of those cute little envelopes topped with a circle embellie made with one of Eileen's stamps.


On the left, 2 photo mats made with the Mini Slimline Tickets die.  And on the right, a pocket made with the Card Panel from the Starlit Village set.


Two ATC photo mats on the left and a library pocket on the right. The 5¢ stamp is made with one of Eileen's stamps.


On the right is another pocket I made with the Starlit Village set and on the left, another folio pocket, an ATC card, and more tags.


Last pages!  I used a diecut from the Heart Mandala die to stencil on the left page.


I used a key topped with a cameo on the spine. And that's all folks.😄


Supplies


Whew, long post!  Hope you enjoyed this mini album and maybe got inspired a little!
xoxo
Maggi

LinkWithin

Related Posts Plugin for WordPress, Blogger...