Pages

Showing posts with label Tutorials. Show all posts

Saturday, December 14, 2019

Die-cuts, fussy cutting, and paper scraps = Beautiful Tag!

The Funkie Junkie Design Team has a special post for our regular Showcase Saturday series.  Sll og us have created a special tag and tutorial for you showcasing some of our favorite Funkie Junkie items.  Stop by The Funkie Junkie Boutique Blog to see all the DT tags.


How to Make a Tag with Less Than Perfect Papers!

It's not that the papers aren't perfect, it's that I can't bear to throw a scrap away and this is how I use them.
  1. Use a Graphic 45 large ivory tag or recycle a large packaging tag as I did.  Sometimes the edging on the recycled tags looks fine but in this instance, I didn't like the look, so I just painted around the edge.
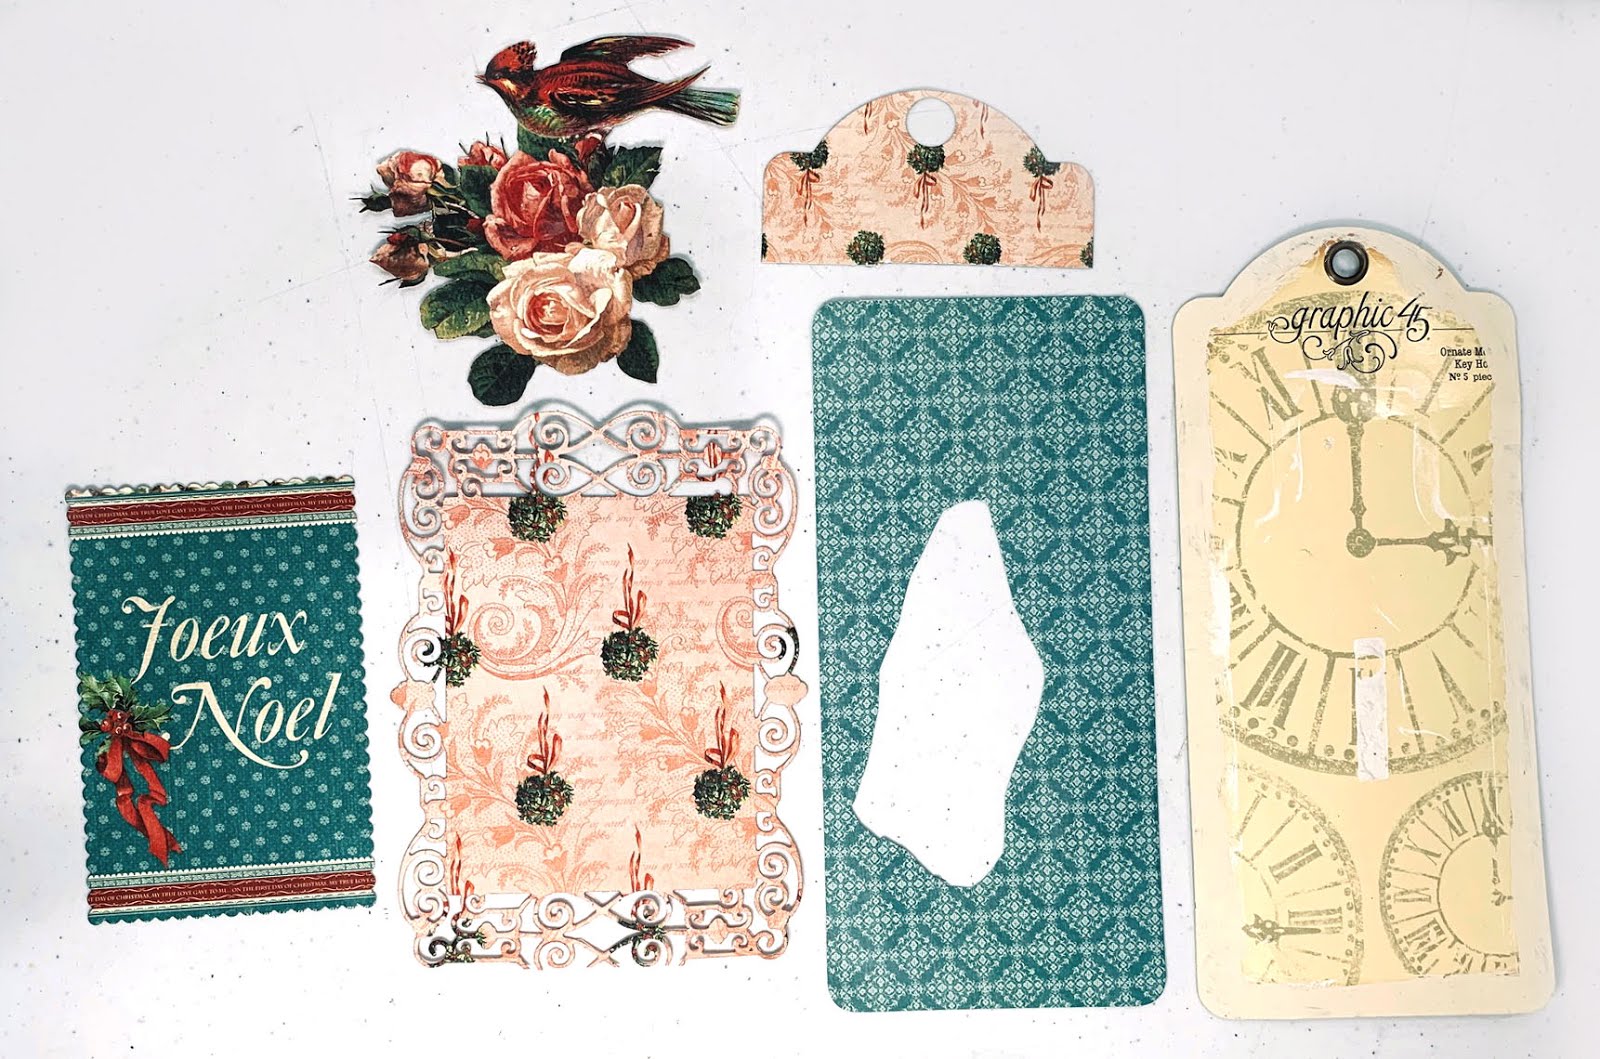
Assemble the pieces shown in the photo below:
  • Trim a cut-apart to about 3 1/8" x 4 3/4". (I used a scalloped die to cut mine).
  • Die-cut a frame that is approximately 4 1/2" x 6".
  • Fussy cut a bird and roses cluster as shown.
  • Use the Graphic 45 large tag die to cut a base for the tag.  Notice that my blue base has a hole in it and the top is missing.  Yep, I utilize EVERY scrap of paper.  The center is going to be covered so who cares if there's a hole in the middle.  And, my paper scrap wasn't long enough to cut the entire tag.  Soooo, no problem, I used the tag die to just cut the top portion and covered my tag with the two pieces.  (see the 2nd photo.)


  2.  Assemble the tag -
  • Glue a strip of beads at the bottom of the tag.
  • Then cover the base with the blue patterned paper and the separate pink top.
  • Pop up the die-cut frame and adhere about 1 1/2" from the bottom. Yes, I know the paper is upside down, but the die-cut at the bottom is a little messed up and that's not a problem because the bottom will be covered.  No one will notice that the paper is upside down after its all finished.


  • Pop up the Joeux Noel cut-apart and adhere over the center of the frame.
  • Pop up the fussy cut bird and place over the right side of the tag as shown in the photo.  Add some pretty flowers and a bow at the top.  
  • Tie a pretty Christmas tree charm to the bow.


Graphic 45 - 12 Days of Christmas Deluxe Collector's Edition
Silver Tone Christmas Tree Charms - Set of 5Graphic 45 - Large Tag Album - Ivory
Burlap String - 12 Colors
Spellbinders Romantic Rose Spellbinders Romantic Rose (very similar to the frame die I used)


Tuesday, February 5, 2019

The New Treasure Box Die by Eileen Hull Designs for Sizzix

The New Treasure Box Die

Hello friends, I'm back with another Valentine's box and I've used Eileen Hull's Treasure Box die to make this awesome little box that is perfectly sized for so many things.  I'm going to fill this one with chocolate and give it to my hubby  I am sure that he will love it, being as how he is a connoisseur of all things chocolate! 

I tried not to get too feminine with this but you know that is hard!

This box is just the right size to use for recipes, wouldn't a recipe box make a fun gift?  And, guess what, you know those cute little stacking drawers I showed you last week, well a stack of 3 fits perfectly inside this box!  Isn't that awesome?


Tutorial

Let's take a look at how to assemble this box.

Supplies:


12 x 12 Design paper - 2 sheets
Strong Quick Drying Adhesive
Ink

Step 1:

Cut the 12 x 12 papers in two pieces, each 6" x 12".  You will need two pieces of chipboard as you will need to cut two pieces of each pattern on the die.  Adhere the paper to the chipboard using something like Sizzix Adhesive Sheets.  Be sure to burnish the adhesive paper down well before pulling the backing off.  If you want the inside of the box covered in design paper, you will need to cover the chipboard on both sides.  Once you have adhered paper to both sides of the chip or mat board, place the paper with the box's outside design down on the die and run it through your die-cut machine.


Step 2:

You will need two pieces of each design so you should end up with the pieces shown below.  (I have shown both the inside and outside of the pieces.)  Take care when running through your die cut machine that you have the same side down on both pieces.


Step 3:

The largest piece is the body of the box.  Carefully bend at the score lines and join the two pieces together by adhering the tab on one piece to the non-tab end of the 2nd piece.  Form a box and adhere the 2nd tab.  A clothespin works great for holding it together while the glue dries.


Step 4:

Take the two smaller pieces and for the lid for the box, joining together in the same manner as the box body.


Step 5:

The two rectangle pieces are for the top of the lid and the bottom of the box.  Adhere such that the tabs are on the inside of the box lid and box bottom. You can see this in the next photo.

Step 6:

Adhere the hinge to the body of the box first.  I would suggest using something really strong for the hinges as they have a tendency to tear over time.  Tim Holtz's Substrate Sheets work really well as would fabric (felt) or any kind of leather.  When adhering the lid to the box, be sure that you have it positioned such that the lid opens fully.  If you join the box and lid too closely, the lid will not open very well.


If you don't like the look of the tabs showing inside the box and lid, you can cut a rectangle to fit inside the box and lid covering the tabs.  You could also mount the tabs on the outside of the box but I thought that would put more stress on the tabs and thought they would eventually pull away from the box.


Thanks so much for joining me today!  Keep an eye on Eileen's blog to see more great projects from the Eileen Hull Inspiration Team using the Stacking Drawers and Treasure Box dies.

Tuesday, January 22, 2019

Eileen Hull Designs New Stacking Drawer Die by Sizzix

Have you seen the new Stacking Drawers Die by Eileen Hull Designs for Sizzix?  I am just loving that die.  Here' s a simple Valentine's project and tutorial to get you started using this die.

Aren't these so sweet for Valentine's favors?  Just fill them up with chocolate and you will surely please the recipient!

Here's another way you can use these drawers, stack them up.  You can view the full post on this drawer stack here.


Tutorial

Supplies
1 sheet 12 x 12 paper
Sizzix Little Sizzles - 6" x 13" Mat Board Pack, 6 White Sheets  or Lightweight Chipboard (More about this in the tutorial)
Sizzix Adhesive Sheets - 6" x 6", Permanent, 10 Sheets
Ink
Strong Quick Drying Adhesive
Embellishments

Step 1:

Cut 12 x 12 paper in two pieces, each 6" x 12".  Adhere the paper to a similarly sized piece of chipboard using something like Sizzix Adhesive Sheets.  If you want your drawers to have design paper inside, cover the chipboard on both sides.  Now place the paper with the outside design down on the die and run it through your die-cut machine.


Step 2:
You should have these pieces.  Note:  I cut an extra bottom.

Step 3:  
Carefully bend at the score lines and fold the piece on the left into a rectangle using strong glue to secure the tab on the inside.  Clothespins are great for holding it together while the glue dries.  This forms the outer body of the drawer set.

Step 4:
Again, carefully fold the drawer assembly (the one with the notch cut out) on the score lines and glue the tab on the inside.


Step 5:
Now here's the important part. If you make this from matboard or medium chipboard, you have to glue the box bottom on the inside of the box so that the tabs are on the outside of the box bottom.  If you glue the bottom such that the tabs are on the inside, the drawer will not fit into its slider.

In this photo the tabs are glued on the inside.  I used lightweight cardboard, similar to a cereal box or shirt packaging, to make this drawer.  Using this lightweight cardboard, allowed me to glue the bottom of the box such that the tabs are inside the box.

Step 6:
Remember that second drawer bottom from Step 2?  I glued it inside the drawer, so that the drawer would have a nice finished look inside.


Slide the drawer into its sleeve and that's all there is to it.  Now you can embellish however you wish and you've got such a fun little box that makes a great party favor.


Thanks so much for stopping by today.  Keep an eye on Eileen's blog to see more great projects from the Eileen Hull Inspiration Team using te Stacking Drawers and Treasure Box dies.

Tuesday, July 10, 2018

Using the Wrapped Journal Die by Eileen Hull Designs to Make a Purse

When we make a big purchase, it needs to have more than one use, right?  Well friends, take a look at this because this is Eileen Hull's Wrapped Journal "disguised" as a purse! It is just the cutest little purse and, bonus,  it's really easy to make!  Check it out below and make one with me in this complete process video! (Here's a link to another purse mini I made. )


After you die-cut Sizzix Mat Board, you can  run it through your die-cut machine and emboss it as I did here.  The mat board embosses so nicely  and it doesn't take a special embossing folder.  I just used an old Cuttlebug folder that I've had for years. Then I had fun inking it all up with Eileen Hull's ColorBox Blends inks.  Blends are unique as they are an inker, re-inker and applicator all in one.  

The flowers die-cut into the Wrapped Journal are made with Floral Cutouts which is a Movers & Shapers die that is part of this Book Club 2 release.  The Wrapped Journal die has a cut out space where you can fit in a mover and shaper die and give your journal cover a custom cutout or edge.  For this cut, I simply dropped the Floral Cutout die onto the Wrapped Journal Die and ran it through my Vagabond to cut out the journal with the floral cutout all with just one cut.
What I love best about this purse is that Eileen's Passport Book fits perfectly into the Wrapped Journal purse.  How cool is that?   This would make a great gift for Moms and Grandmothers.  Use Christmas colors to make a Christmas keepsake.

You can view my tutorial to make a Passport Book on YouTube here.  In the video I am using a different paper collection than you see pictured here, but I do show you how to make the cover, string the mini to hold the inside booklets and lots of different ways to make pages.
I used a tag from the Credit Card Sleeve & Tags set to make the closure.  It was the perfect size to make a pretty closure for this bag.

Supplies:


Thanks so much for visiting me today and a special thanks to those of you that leave a comment.  I really appreciate it!  I hope you have a great day and find time to do whatever it is you love most!


Saturday, April 28, 2018

Eileen Hull Designs by Sizzix Passport Mini Album Tutorial

This is Eileen Hull's Passport Mini Album made with Graphic 45's Sun Kissed Collection which is just so GORGEOUS!!  I wanted to show you how to make the mini using Eileen's die, so here is a step by step video showing you how make the mini and two different ways of stringing elastic to hold the pages.


Tomorrow I'll share a video flip through of the completed mini album.


Supplies:

Sizzix Scoreboard XL Die - Passport Book
Sizzix Little Sizzles 6" x 13" Mat Board
Sizzix Little Sizzles 6" x 6" Adheisve Sheets

Graphic 45 Sun Kissed Collection:
8' x 8" Paper Pad
Ephemera Cards
Stickers
Staples Large Tag, ATC Tags & Flower Dies
Staples ATC Tags
Creative Embellishments Seagrass
Creative Embellishments Palm Trees

Stop by tomorrow for a flip through of the finished mini.  Thanks so much for joining me today!

Thursday, December 21, 2017

A Mini Album and Tutorial for Mini Album Makers Challenge

I am thrilled to be guest designing for the Mini Album Makers Challenge Blog this month! This is a great place to go if you're looking for mini album ideas and tutorials.
Now, I know it's December and  I know many of us are deep into holiday projects, but I thought it would be fun to take a break from that and do something really colorful and fun.  Bright and bold colors are my favorites and so I've chosen Graphic 45's World's Fair collection to make a really fun mini with lots of interactive pages.
In the process video tutorial below, I show you how I made all the pages and share some of tips and tools with you.  If you like my tutorial, please subscribe to my channel and give me a thumbs up, I surely would appreciate that!


Now here's a look at some of the pages inside.
This page features a set of photo mats that are layered over each other and flip up; this is called a waterfall.  These are great fun to build and I used a Spellbinder's Tammy Tutterow  die set to make my waterfall.
I also incorporated a couple of Graphic 45 Policy Envelopes in my mini.  They are great for holding little loose objects that you don't want to lose.  You can use most envelope in your mini, it does not have to be a Policy Envelope.  On the right side there's a tuck spot and a flap that opens up to reveal another photo or journaling spot.

The left page has a flip up that hides a pull out that can hold 5 photos.  The right side is the front of another Policy Envelope.

The right side has a flip up that hides a journaling spot.  It's also a pocket page and you can see the red pull tab peaking out at the top right.

I think this is my favorite set of pages.  The left features a simple pocket, but the right has lots of fun flips.  The below photo shows the page with the first part flipped open.
 After flipping the horizontal layer out, you can flip the floral page up and underneath that is another page that also flips up.  You can better see all the action on this page in the video tutorial.

Supplies:

Graphic 45 Worlds Fair Collection
Cardstock
Light weight chipboard
Zip Dry Glue
1/8" thick foam tape
Scor-Tape assorted widths, 1/8", 1/4", 1/2"
Miscellaneous Petaloo flowers
Cinch machine for binding - Note you could easily punch two or three holes and bind with rings.


Monday, August 21, 2017

Eileen Hull's Notebook Pocket by Sizzix

Yesterday I shared a pretty friendship card with you and today I want to share this Notebook Pocket that I made to hold the card.  I used Sizzix's Notebook Pocket die designed by Eileen Hull to make the pocket along with Graphic 45's new collection, Penny's Paper Doll Family.

I've recorded a video to show you how I made the pocket and to give you some tips on using this die.


The card measures 3 1/2" across and fits perfectly in the pocket.


Supplies:

Garden Path
Fathers and Sons
Beyond Borders

Other Supplies:
Graffix medium weight chipboard
Yellow Cardstock
Yellow Seam Binding
Jute String
Petaloo Botanica Bloom-yellow

Thanks for stopping by today!

Thursday, April 14, 2016

Tutorial to make a fun top hat!

I was fortunate enough to go on the Caribbean Graphic 45 cruise with Craftours, and oh what fun we had crafting, sunbathing and visiting the fun island ports.  While cruising, I did a make an' take top hat that I want to share with you.  The basic hat is really easy to make and the fun part is embellishing it with feathers, flowers,  and whatever your imagination dreams up!  You can use any papers to make the hat and in my video I'll show you several hats, all made from different collections.


I made this hat with Graphic 45's DCE Times Nouveau collection.    For me, the fun part is adding tons of embellishments ending up sometimes with a rather interesting piece but so fun!


I made some flowers for my hat and I show you how to make these simple and quick flowers in my video.

I also used some great Petaloo burlap blooms on my hat and a stickpin that I made.


I also love things that dangle so I added some chipboard pieces cascading off the back of the hat along with the long ribbon tails.


 Graphic 45's keys are great for tucking into clusters as I did here with a couple of Shabby Chic Ornate Metal Keys.


 Supplies List  -
Graphic 45 Times Nouveau Deluxe Collector's Edition:
  Wallflower
  Hot Tomato
  Copacetic
  Lollapalooza
  Chipboard
  Cardstock Stickers
Shabby Chic Ornate Metal Keys
Other:
Petaloo Burlap Blossoms 1201200
Petaloo Burlap Blossoms 1200200
Feathers
Kaisercraft Pearls
Sizzix Alterations Tattered Floral die
EK Success Retro Flower
Prima resin bird
Handmade stickpin
Really Reasonable Ribbon

Here are some other hats I made using this same template:

More elegant hats using Gilded Lily and Mon Amour:


Two fun hats from World's Fair:


LinkWithin

Related Posts Plugin for WordPress, Blogger...