Today I'm making cards with the newly released Eileen Hull Sizzix Framelits Set. Both of these cards were easy and quick!
I love easel cards because they display so nicely as they stand on their own. I made this one using the 2 larger arches from the Tunnel Arch set and Eileen's new 3D embossing folder, Lacy Leaves.
Here's a quick video showing how its done.
Here's a view from the side, illustrating how it stands on its own.
I used the Tunnel Arches and Windowsill Flowers & Vase Thinlits set to make this card along with the Lacy Leaves embossing folder. To frame the adorable flowers and vase I heat embossed a chipboard frame. Under the vase is an embossed arch (same process as the easel card), then a larger cardstock arch, over a layer of design paper. (Graphic 45 Let it Bee.) You can add a sentiment either on the front or inside. I left it blank for now so I can use it as an all occasion card.
I love Eileen Hull's new release! It includes a gorgeous A5 3-D embossing folder, Lacy Leaves, 2 Thinlits Sets, Windowsill Flowers and Vase and Home Sweet Home, and a Framelits Set, Tunnel Arches.
I used the Arches and Windowsill sets along with the embossing folder to make this fun Halloween decoration.
Have a look at this quick process video to see how I used these dies.
The Home Sweet Home set includes 24 pieces just right for designing your own woodlands scene. I used the deer and trees dies to embellish this layout.
I really love this new Lacy Leave embossing folder. I used it to cut arches for both of these cards.
I'll be posting more details about these makes later in the month, be sure to stop by. Visit Eileen's blog and Instagram page to see what the rest of the team has created.
I love ALL of Eileen Hull's journal. There are so many of different sizes and designs. But what I love even more, are all the elements she's created to be used with her journals that I can use over and over with so many different things. This month her creative team is mixing the old with the new.
I used her recently released Handbound Journal to create this mini album packed with elements created using many of her older dies, mostly Thinlits. On the front of the journal, I tucked in a bookmark and a butterfly; these are both made with recent die releases.
Have a look at this quick video flip through and see how many of Eileen's diecuts you can spot.
I'll help you out in these photos!
On the right side I used the waterfall die for lots of photo storage. You can add 10 photos here!
On the left side I used the Library Pocket, Faux Postage, and Floral, Pockets & Paperclips set.
Here, I used the Envelope, Folder, and Flowers set to make a tuck spot for two little cards on theleft and a file folder that can hold most anything.
There's a little pocket on the left from the Bookmarks & Pockets set and on the right I embossed the red cardstock with the Floral Damask embossing folder. I love that floral design!
I love this page with the crinkle cut slits and tiny tags, all cut with the Bookmarks & Pockets thinlits set.
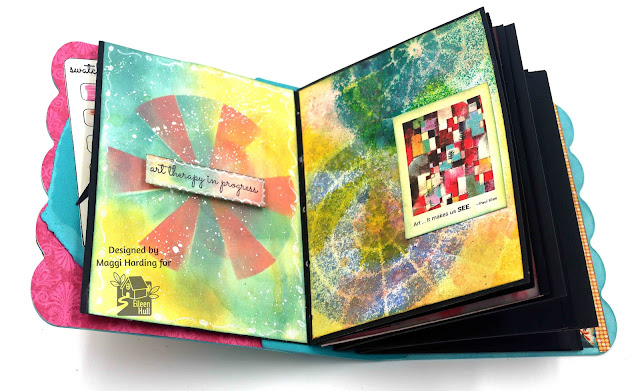
We're using embossing folders this month in our projects and I included a couple embossed pages in my art journal that I made from the May release, Handbound Journal.
The left side page below is white cardstock embossed with Eileen's Floral Damask embossing folder. Then I sprinkled on Ken Oliver's Color Burst powders in several colors, spritzed with water, and this is the result. I love it! I did the same thing on the right side except that I did not emboss the paper. Instead, I used stamps from Eileen's Swatch Card set to label the colors I used.
I love the randomness of the color burst spreading around the embossing.
Here's another page where I was playing with Sizzix Lustre waxes on black cardstock embossed with Eileen's Lace embossing folder. I love how you can really bring out the details in the embossing with the metallic waxes.
Here's a quick flip through of my art journal.
On these pages, I was just playing with Oxide inks and mists using bits and pieces from the Rainbow Wheels thinlits set and the layered stencils.
I had a fun play with Eileen Hull Designs new stencils! I used her newest release, Color Wheel, as well as Plate and Pattern that was with her previous release. I stenciled with markers and molding paste. While that was drying, I stamped a sentiment on a die cut from the new Journal Hardware Scoreboard die to go on the front. Have a look at my video to see how.
Here's another card I did using the same techniques. I used a stencil that was just laying around my studio for the background and then the Color Wheel stencil over top that.
There are many ways you can add pages to Eileen's newest Handbound Journal. I went with traditional signatures and then sewed them onto the spine. Watch my video to see how I did it.
The May Sizzix Release is here! The Handbound Journal is a ScoreBoards XL die designed to cut and score thick materials like matboard, leather, and felt. It includes built-in score lines, holes, a spine piece, and large labels—no measuring needed! At 6" x 5", you can customize the book’s thickness and choose hand or quick binding, all with a pretty scalloped edge. One of the most versatile designs yet.
The Bigz Journal Hardware Die offers latches, hinges, and pen loops, perfectly sized to coordinate with the journal, and cuts a variety of materials.
The Colour Wheel Stencil is a three-layer stencil that creates a continuous color wheel—use traditional ROYGBIV or customize your palette. Pair it with the Rainbow Wheel Die, which cuts the framework, segmented circle, and arrows for a functional color wheel.
The Swatch Card Stamp Set includes a round palette, rectangular and pie-shaped swatch cards, plus color-themed phrases perfect for cards or journals.
UFO's? Well, in the craft world UFO's are UnFinished Objects, i.e. projects of any kind! In the spirit of our organizing campaign this year, Eileen Hull's creative team is also urging you to finish those left behind things that you just never got around to finishing.
If you're one in a million and don't have any unfinished projects lying about (not sure I believe you!) then pull out an old project and play it again. Make another or change the one you made and didn't like. You know what, it doesn't matter, just do something crafty, you won't regret it!
Now I'm not going to lie and say I don't have any unfinished projects but I don't know where they are. 😁 So, I'm doing a rerun. I love this little notepad and keep it beside me all the time because I am forever looking for a sticky note.
This notepad comes together super fast so it's something you could make as party favors or little gifts.
I spent Thanksgiving in Antarctica aboard an expedition ship and all I can say is WOW!! I have never been so awestruck in my life. Antarctica is ethereal, defies the imagination; it was truly the trip of a lifetime!
So, Eileen Hull's creative team is celebrating spring this month and I just had to be "different". 😄 I wanted to show you some ways that you can use Eileen's products on layouts. I tend to use her designs when making mini albums and such, but really, they are great to use with so many things.
We had lovely spring weather while there, the sun was out and the temps hovered around freezing. (We had some snow too!)
I made the title using Eileen's Alphanumeric dies and mounted them on a scrap of paper. Above the title I placed a die-cut bird, flower, and floral cutout from the Floral Pockets set to add some spring elements!
I also used a stencil from the Plate and Pattern set to add the concentric circles. That is a fun set with circles and flower details.
Near the bottom, I die-cut a pocket, from the Floral Pocket set, to hold our identity cards for the trip. I like to include bits of ephemera from our travels.
I love to make tags. I love to drink wine. So of course they go together, right? Now, if you didn't think so, have a look!
I think that tag looks lovely with this bottle of wine! And bonus, the tag holds a piece of yummy chocolate and there's a hidden bookmark. Perfect gift for my bookworm friends!
Here's a quick video of how I put this tag together.
Eileen's Full Size Journal XL Scoreboard die is so perfect for making mini albums. This one is dear to me as it is my great niece and nephew and I made it for their grandmother, my sister-in-law.
I made a very quick video showing you how I made the journal with the edges completely paper wrapped. Sometimes I apply the paper to the chipboard before I die-cut and that works well EXCEPT when using that gray industrial looking chipboard and no matter how much I ink it, it still looks, well, industrial. AND, sometimes chipboard pulls apart from the paper so when I do it this way the chipboard is completely covered in paper, adding an outside layer of paper to help hold everything together.
Two simple pages; the page on the right is a pocket page and you can see a tag peeking out the top.
I die-cut star charms from the new Charms Thinlits set for embellishments on the left side.
I embellished the photo by cutting a label tag in half and topping with a button.
I created a background on the right side page using Eileen's new Plate and Pattern stencils.
Here's a quick video showing you how the stencils work.
On the right bottom is a pocket created with Eileen's new Bookmarks, Pockets, Toppers Thinlits.
The pocket is a perfect place for me to tuck a photo and my "trademark" poodle quote. It's just something I do in most of my mini album gifts.