Pages

Showing posts with label tags. Show all posts

Wednesday, January 22, 2020

Graphic 45 Le Romantique Tags for The Funkie Junkie Boutique Blog Challenge

The Challenge - Repeat Performance

Hello friends, time for a new challenge on The Funkie Junkie Boutique Blog.  Sara Emily is hosting this time around and she calls her challenge, Repeat Performance.  Her description, " A popular New Year's resolution is to save money. I challenge you to save money (and the environment) by using at least one thing you would normally throw out on your vintage or shabby chic project. Please be sure to let us know what that one (or more) item is."  

My Tags

I recycled some packaging tags from Graphic 45.  They are exactly the same size as the ones they package for selling so their dies cut a perfect tag to overlay on the recycled tag.  

These are the tags I started with.


I turned them into this with cardboard, layers of paper and flowers, of course!  Graphic 45 released their collection, Le Romantique, as a Deluxe Collector's Edition and that is what I used to fashion my tags.  This is a beautiful romantic collection that is great for all your love stories.  The Funkie Junkie Boutique carries this collection as well as many other Graphci 45 collections and staples.


Making these tags was simple, first I diecut two tags using Graphic 45's regular tag die to cover the base tag.  Then I just layered on the papers, diecutting some onto pretty shapes to add interest to the tags.  

I used cardboard to add dimension between my layers.  Cardboard is a great alternative to dimensional foam as it is free and provides a good sturdy base.  You can see the cardboard layer in the photos below.


On this tag, I diecut a clock face with Graphic 45's clock die from Tim Holtz metallic paper.  I think this clock is one of the prettiest diecuts ever as the design is so intricate.

The top layer is a sticker from the DCE collection.  Add some flowers, a pretty bow and you've got a great tag that could be made entirely from scraps.


I used a fussy cut image as the top layer on this tag and layered it onto a diecut frame. I diecut lace with Tim Holtz Crochet Lace dies for this tag. I love how delicate these cuts are.  I wanted to give some extra emphasis to the flowers so I placed a diecut medallion underneath.  The flowers really stand out against that dark background. 


How to Enter the Challenge

Create a vintage or shabby chic project and link it up to The Funkie Junkie Challenge Blog Challenge, Repeat Performance. The Design Team will choose their top four picks, with the winner being invited to be a guest designer in one of our Funkie Junkie Challenges. The other three winners will receive Top 3 badges to display on their blogs. Everyone who enters and follows the rules will be entered into a draw to have the chance to win a $25 spending spree at The Funkie Junkie Boutique.

Thanks so much for stopping by today. Be sure to take a look at the creations of my talented teammates, you can see their creations here, at 
The Funkie Junkie Blog.


Supplies from The Funkie Junkie Boutique

Graphic 45 - Le Romantique Deluxe Collector's Edition
Graphic 45 - Staples - Regular Tag and Gears Dies
Graphic 45 - Staples - Square Tag and Clock Dies
Tim Holtz Thinlits Crochet Lace
Tim Holtz Idea-ology 8x8 Kraft Stock Paper Metallic 3 - Champagne/Onyx 
Sizzix 3-D Impresslits Embossing Folder - Burst  (I used the Medallion which is out of stock but this one is very similar)
Ranger Tim Holtz Distress Oxide Pad - Tattered Rose


Saturday, December 14, 2019

Die-cuts, fussy cutting, and paper scraps = Beautiful Tag!

The Funkie Junkie Design Team has a special post for our regular Showcase Saturday series.  Sll og us have created a special tag and tutorial for you showcasing some of our favorite Funkie Junkie items.  Stop by The Funkie Junkie Boutique Blog to see all the DT tags.


How to Make a Tag with Less Than Perfect Papers!

It's not that the papers aren't perfect, it's that I can't bear to throw a scrap away and this is how I use them.
  1. Use a Graphic 45 large ivory tag or recycle a large packaging tag as I did.  Sometimes the edging on the recycled tags looks fine but in this instance, I didn't like the look, so I just painted around the edge.
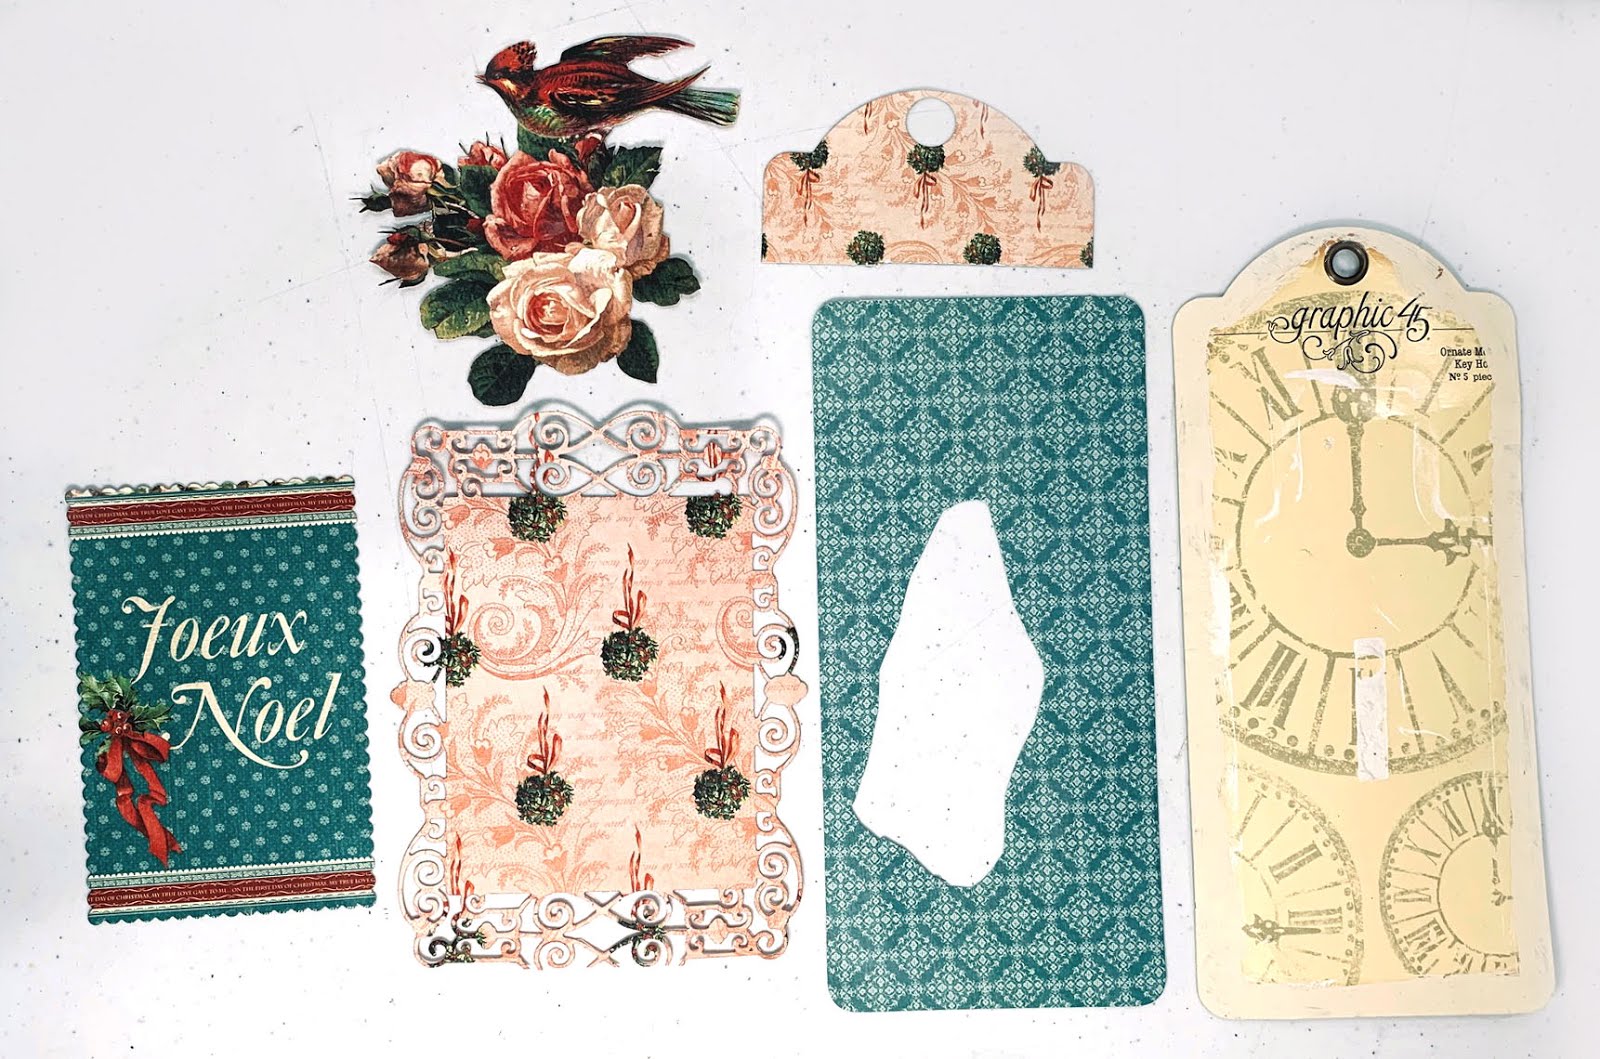
Assemble the pieces shown in the photo below:
  • Trim a cut-apart to about 3 1/8" x 4 3/4". (I used a scalloped die to cut mine).
  • Die-cut a frame that is approximately 4 1/2" x 6".
  • Fussy cut a bird and roses cluster as shown.
  • Use the Graphic 45 large tag die to cut a base for the tag.  Notice that my blue base has a hole in it and the top is missing.  Yep, I utilize EVERY scrap of paper.  The center is going to be covered so who cares if there's a hole in the middle.  And, my paper scrap wasn't long enough to cut the entire tag.  Soooo, no problem, I used the tag die to just cut the top portion and covered my tag with the two pieces.  (see the 2nd photo.)


  2.  Assemble the tag -
  • Glue a strip of beads at the bottom of the tag.
  • Then cover the base with the blue patterned paper and the separate pink top.
  • Pop up the die-cut frame and adhere about 1 1/2" from the bottom. Yes, I know the paper is upside down, but the die-cut at the bottom is a little messed up and that's not a problem because the bottom will be covered.  No one will notice that the paper is upside down after its all finished.


  • Pop up the Joeux Noel cut-apart and adhere over the center of the frame.
  • Pop up the fussy cut bird and place over the right side of the tag as shown in the photo.  Add some pretty flowers and a bow at the top.  
  • Tie a pretty Christmas tree charm to the bow.


Graphic 45 - 12 Days of Christmas Deluxe Collector's Edition
Silver Tone Christmas Tree Charms - Set of 5Graphic 45 - Large Tag Album - Ivory
Burlap String - 12 Colors
Spellbinders Romantic Rose Spellbinders Romantic Rose (very similar to the frame die I used)


Wednesday, June 5, 2019

Embellishments, Trinkets and Trims Frilly and Funkie Challenge

Time for another challenge over at The Frilly and Funkie Blog and this time hosted by Jenny.  Her challenge is Embellishments, Trinkets and Trims and she says "Linda sells a huge array of beautiful embellishments, trinkets and trims in her store (The Funkie Junkie Boutique), from metal filigree pieces and charms to buttons, laces and ribbons. They can be the important focal point on a project or the final finishing touches that complete it. However you wish to use them lets see those embellishments, trinkets and trims in action on your vintage or shabby chic entries."

My Take on the Challenge
I totally love Stamperia papers and The Funkie Junkie Boutique carries many of their collections.  One of my favorites is Alice, what a wonderful fun collection.  I also happened upon Tim Holtz's Big Talk Snarky quote collection.  Oh there are some great quotes in there, many of which I've said in my head, but fortunately not aloud!  Anyway, I thought this quote worked with the Alice papers.

As usual I've used a Graphic 45 large tag in kraft.  Then I layered up some of the design papers.  Alice is fussy cut and popped up over a cut-apart card that is also popped up with cardboard.  (I use cardboard when I am popping up larger pieces as it provides a sturdy base without have to use so much foam tape.  It gets expensive ya know?)

I used charms, a button and ribbons to embellish my tag.   The two teacups are fussy cut from the design paper and popped up with foam dots.


I stenciled on the word Adventure before adding Alice to the tag. The Big Talk Snarky quote is printed on bright white paper which just doesn't work.  A quick inking with Distress Antique Linen fixed that right up.


Take a look at that ever so cool white rabbit charm down in the lower corner.  Isn't that just the coolest charm? (click on the photo for a better look.)  I used a silver filigree metal piece and heat embossed it with Ancient Amber embossing powder.  I layered on a flower and topped it with this cool rabbit charm from the store.  


The metal teacup and teapot charms are from my stash and I've no idea where they came from or how long I've had them.  They work nicely with this tag though!

 I wanted a gold button over my gingham ribbon but didn't have one so I used Eileen Hull's thick embossing powder to make my own.  I just dabbed on some embossing ink, sprinkled on the powder and heated.  I think it turned out great!  


How to Enter the Challenge

Create a vintage or shabby chic project  and link it up to the Frilly and Funkie Challenge Embellishments, Trinkets and Trims. The Design Team will choose their top four picks, with the winner being invited to be a guest designer in one of our Frillie and Funkie challenges. The other three winners will receive Top 3 badges to display on their blogs. Everyone who enters and follows the rules will be entered into a draw to have the chance to win a $25 spending spree at The Funkie Junkie Boutique.

Thanks so much for stopping by today.  Be sure to take a look at the creations of my talented teammates, you can see their creations here, at the Frilly and Funkie Blog.

Supplies from The Funkie Junkie Boutique

Round Silver Tone Filigree Embellishments - Set of 4 (similar to the filigree flower I used)
Graphic 45 Large Tag (this one is ivory, I used kraft)

Saturday, September 22, 2018

Saturday Showcase at the Frillie and Funkie Challenge Blog

Join me at the Frilly and Funkie Challenge Blog for a tutorial to make these 2 cards and tag from Stamperia Christmas papers.  The Funkie Junkie Boutique has lots of Stamperia paper collection in stock so stop by and see the goodness!

Christmas Cards & Tag Tutorials Stamperia Christmas PapersChristmas Cards & Tag Tutorials Stamperia Christmas Papers

Monday, January 15, 2018

A Collage Tag

Do you have a creative game plan for 2018?  I do, of a sorts.  I want to explore that "other me", the one who likes to go off on tangents to see if something "works" or not.  Yep, this often results in projects destined for the trash but it really is the only way for me to grow as an artist.  At this point, I think I've scrapped all the photos that I want to scrap at least twice, so it's time to channel my creative interests in a different direction.  Of course, I will ALWAYS love Graphic 45 and I will always make pretty things with their papers but I can do that while I also play at other things!


On this giant Creative Embellishments tag (it's 5.5" x 10") I decided to try my hand at collage work.  First I painted the tag with white gesso and then gathered up some fun images and glued them on with gel medium.  After that dried I used some clear crackle Texture Paste over some of the images.

I'm entering this project in the "Three is Not A Crowd" challenge at the Frilly and Funkie Challenge Blog.  The challenge is to create a vintage or shabby project that includes multiples of 3 of something.  I've used 3 chipboard flourishes, 3 dimensional flowers and 6 different mediums, gesso, texture paste, gel medium, ink, Distress Stain, and mists. Frilly and Funkie always has fun challenges that are sure to stoke you imagination!

Tim Holtz has a great botanical images ephemera pack and I used a lot of those along with some miscellaneous items from my stash.
The Creative Embellishments chipboard pieces were colored with Lindy's mists and then crackle paste was applied here and there to give an aged effect.

After applying the crackle paste and letting it dry, I went over it with Distress ink to bring out the crack created by the paste.

Supplies Used:
Creative Embellishments Chipboard:
  Large Tags
  Flourish 2
  Flourish 30
  Flourish Corner 4
TCW Gel Medium
TCW White Gesso
Prima Clear Crackle Texture Paste
Lindy's Mists - Gator Gumbo Olive
Prima beads
Petaloo Darjeeling Flowers
Tim Holtz Idea-ology Botanical Layers

Thanks for stopping by today, I appreciate it!!


Thursday, January 15, 2015

January 12 Tags of Savagery!

Join me every mid-month for a tag tutorial and challenge at Swirlydoos Kit Club.  We're going to explore different techniques each month with our tags and hopefully have lots of fun!

This month we're going to think about layers.  When I make tags, I love lots and lots of layers and dimension.  With a tag, you don't have to worry about it being too thick to fit in an album so I say pile on the goodies!

Let's talk about layers on tags for a minute.  I use alot of diecut frames on my tags for layers.  I love to layer different size frames over each other, thereby creating lots of layers.

Ok let's get started on this month's tag.  Below I've listed the supplies I used, most of which, comes from the January Swirlydoos kit.  You can certainly go free style and use whatever you want!

Supplies:
  1. Tag - 3.5" x 8.5" cut from Bo Bunny Double Dot Shadow Vintage
  2. 3" x 4" card - your choice cut from BFS Calling Cards paper
  3. Fussy cut birds - from Blue Fern Studios (BFS) Birdsong paper
  4. Green cardstock for leaves
  5. Masking paste - Art Anthology Sandstone from the Mediums kit
  6. Mask - Art Anthology Cracked from the Mediums kit (I used Prima's crackle mask as I did not get the mediums kit.)
  7. Mask - Crafter's Workshop chicken wire (from my stash)
  8. White paint or gesso (from my stash)
  9. White lace or trim (from my stash)
  10. leafy vines - diecut with Die-namites large ivy die from a kit several months ago. You could use a chipboard vine, leaves, or a floral vine in its place.
  11. Mist - two colors, I used Lindy's Ponderosa Pine Olive and Frosty Forest Green (from my stash)
  12. ribbon (from my stash)
  13. 5" white doily -  diecut with Kaisercraft's doily die, (from my stash) you can use a commercial 6" doily, as I don't think I've seen a 5" doily
  14. Cheesecloth - from the embellishment addon
  15. Cardboard or sticky foam to pop up layers
  16. Flowers - I've used roses from I Am Roses (stash) and Petaloo Chantilly Velvet Hydrangeas (blue) from the main kit. ( I sprayed them with a blue mist to make them a bit darker.)
  17. Prima Velvet Baubles - from the main kit
  18. Ink - Prima Old Road, I believe this came in an earlier kit, it goes perfectly with these Blue Fern papers.  If you don't have it, black or brown would work fine.
  19. Glue

Step 1:
Use the Cracked mask and Sandstone paste to randomly mask on your tag.  Let that dry and then using a chicken wire mask, pounce white paint randomly on the tag. 

Note:  The masking and paint dribbles are almost covered up in the final tag - that happens to me alot!  :-)  It is nearly invisible in the final photo but it shows a bit more IRL.  You can omit these steps if you wish.


Put a little white paint on your craft mat and then add a few drops of water to make it thinner and then flick onto your tag.


Step 2:
Distress the edges of your tag,  I did not ink my edges as I wanted a white edge. Cut a piece of white lace or trim and glue to the bottom of your tag.


Step 3:
Diecut several leafy branches from cardstock and then color with two different mists.  I use two mists because leaves in nature are not a flat single color so using two colors makes the leaves more realistic in appearance.  I use a dabber top on my Lindy's but you can spray on your mist or use a paintbrush to apply.  Be sure to allow the mist to dry before adding the 2nd mist.


After the leaves are dry, give them some shape with a stylus ball.  If you don't have one of these,  I have used the end of a mechanical pencil and I bet the end of a Sharpie pen would work.


Step 4:
Take one of the notecards and give it a good wrinkle as shown and ink the edges. We are going to layer some flowers under the wrinkle so be sure you have room to nestle in some blooms.


Step 5:
Add a doily to the tag, letting it hang off the right side.  Then cut a couple of pieces of cheesecloth and glue over the doily.  Pull the threads and "mess it up" a bit.


Step 6:
Now add the note card.  The only adhesive I used at this point is a foam square on the upper left corner and on the lower right corner.


Step 7:
Fussy cut the birds and ink the edges.  Then add two layers of foam or cardboard so that when you place them on the tag they will fit over the popped up notecard.  (Note, I ended up cutting the leaves off the bottom.)  Place on the left side of your tag so that they cover part of the notecard.


Step 8:
Arrange the leafy vines on the tag, tucking some under the birds so that it appears they are sitting in the flowers.


Step 9:

Now add flowers.  On the right side be sure to tuck some flowers under the notecard such that they are peaking out.  Tuck some hydrangeas under the bird and around the upper right corner of the notecard.    In the lower right rose cluster I've tucked a couple of Prima Velvet Baubles into the cluster.

I tucked a bit more cheesecloth under and around the birds.  And to finish it off, I added a bow that I tied with the Bow-it-all.


If you want to use the tags that came in the main kit, here's a simpler version of the January Savagery tag. 

Here are the two tags together.  Note that I changed the ribbon on the larger tag.


Now I know some of you are wondering what do I do with all these tags?  Well I give them away by including them in my RAKS, attach them to gifts, use them as cards by simply writing a note on the back or cutting a cardstock card large enough that I can attach the tag to the card, voila, instant card, or attach to a layout.  And sometimes I just put them in my treasure box and take them out and admire them now and again!


Sunday, October 19, 2014

Fabscraps newest collection, Elegant Chic!

I don't like to let a single scrap of my gorgeous Fabscraps paper go to waste and so I save all my scraps and use them to make tags and cards.  This tag was made completely from left over scraps from Fabscraps new collection, Elegant Chic, and a scrap of white cardstock!


For this project you will need:
  • Fabscraps Elegant Chic C71 collection: 001 Pink Elegance, 004 White Lace, 005 Shabby Flowers, 007 Fleur,
  • Fabscraps ST71 001 and 002
  • Fabscraps DC071 009 Frame
  • White cardstock
  • Embossing enamel
  • Distress ink Victorian Velvet
  • Flowers, ribbon, cameo, etc. of your choice
  • Border and corner punches

Instructions:

  1. Cut a tag 3.5 x 8.5" from white cardstock.  Ink around the edges of the tag with Victorian Velvet or color of your choice.
  2. Cut a rectangle 3.25 x 7.25" from 001 Pink Elegance.  Border punch across the bottom.  Ink the edges.
  3. Cut a 4.5" circle from 005 Shabby Flowers and use a corner punch to punch around the circle creating a doily effect (You could also use a doily instead.)  Ink the edges.
  4. Take the large corner sticker (triangle shaped) from ST71 001 and stick onto white cardstock and then fussy cut the sticker.
  5. Border punch two strips 6.75" long and about .75" wide.  Glue these under the rectangle in step 2 so that the strips are peeking out from under the rectangle.
  6. Glue the rectangle with the border strips from the previous step onto the cardstock tag just up from the bottom of the tag.
  7. Now take the fussy cut sticker from step 4 and adhere to the top of the tag.
  8. Adhere the circle from step 3 about .75" from the bottom of the tag.
  9. Pop out the center piece from the Fabscraps 009 Frame.   Place the centerpiece on 004 White Lace and trace around it, then cut it out and glue the paper to the chipboard piece.  Add a Happy Birthday sentiment from ST71 002 sticker sheet.
  10. Heat emboss the frame with embossing enamel.  I used Stampendous Shabby Pink. 
  11. Arrange and glue the frame over the circle.  Then add the center chipboard piece popping it up with pop dots or foam squares.
  12. Embellish by adding a cameo to the center of  the corner sticker that you placed at the top of the tag.
  13. Add a ribbon at the top and embellish with flowers as you wish.  I've used flowers from Wild Orchid Crafts.
Thanks for stopping by!!  Maggi


Wednesday, October 1, 2014

It's Raining Cats and Dogs!

It rained cats and dogs at my house all weekend long as my bff scrapping gals all came for the weekend and made Graphic 45 Raining Cats and Dogs mini tag albums like this one that I shared with you a few days ago.  I made a couple more pages for my tag album too and I must get those photographed so I can share with you.

 After finishing up our minis we decided that we needed to make a tag using this Prima Julie Nutting stamp and die set ( you can get this set at the Swirlydoos Kit Club boutique)!  This is Halie with her cute little poodle and you know I had to have this set!!


 This is a simple tag to make.  I used Cats Meow paper to make the base of the tag which is 3.5"W x 8.5"L.  I cut the oval from off-white cardstock with the largest Spellbinders Floral Ovals die and then stamped it with a script stamp.    The doll, her clothes and the poodle are all cut from Raining Cats and Dogs scraps left from making our mini tag albums.  The poodle's hair is accented with Ranger Antiquities Weathered White embossing powder.  I've used a button sticker from the collection behind the poodle and mounted that on a small Spellbinders Teardrop Circles diecut popped up with foam dots.   The other two pieces are also stickers from the collection that I've popped up.  I added some beads and punched strips at the  bottom and a ribbon at the top to finish it off.

Here you can see how I've popped up the various layers to give the tag some depth.


I just adore this tag with it's cute little paper doll and poodle, it appeals so much to my inner child, LOL!  I loved paper dolls when I was a kid and I guess I'm still a kid at heart!!

My scrappy girls just before leaving.  These girls are the best, love all of you!


LinkWithin

Related Posts Plugin for WordPress, Blogger...