Pages

Showing posts with label Fabscraps. Show all posts

Saturday, February 18, 2017

My Sweet Furbabies

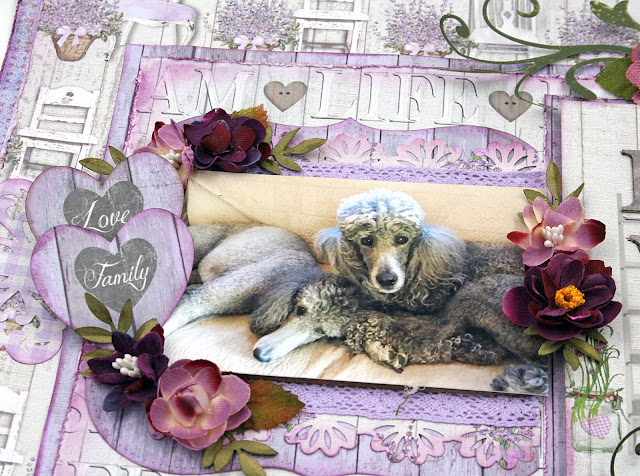
Today I'm sharing a layout I did of my sweet furbabies, Nika and Tisha.  They love each other so much and they're always together, sleeping, playing or begging!  🐩 😍


While I was at Creativation in Phoenix I stopped by the Fabscraps booth and visited with Bea and Cait.  Knowing that they are dog lovers like me, I showed them this sweet photo and  they said you and must scrap this photo with our new collection, Lavender Breeze.  And WOW, it worked so perfectly with my photo!

Even better, Petaloo's Briar Roses look fabulous with this collection.  I tucked in some Cheery Lynn Designs diecuts to finish off my clusters.


These hearts are diecuts that are included in the collection and I thought they looked really great nestled in with my Petaloo blooms.


Petaloo Supplies:
Craft Trim - purple
Mixed Texture Mini blossoms lavender

Other:
Fabscrap Lavender Breeze paper collection
Cheery Lynn Designs Flourish #7
Lindy's Gator Gumbo Olive Starburst Mist

Thanks for visiting me and the poodles on my blog today!

Sunday, March 13, 2016

New collection from Fabscraps and DT Call

Check out this new collection from Fabscraps, Vintage Elegance.  I love the pretty florals and doesn't Tisha look so pretty nestled in all those flowers?


I used my Cameo to cut the title and frame.  Then I outlined them with a white Sharpie pen and dry brushed on some white paint.  Then I used pop dots to pop them up to add some dimension to my layout.


For This Project You Will Need:
Fabscraps C84 Vintage Elegance:
·        003 Love is in the Air - 1 sheet
·        002 Enchantment - 1 sheet
·        005 Friendship - 1 sheet
·        MC84 001A Card Kit - 1 sheet 6 x 6 white paper (or use white cardstock)
·        MP4 04 Pearl Cluster Embellishments
                                                                     
Other:
·        White cardstock
·        Embellishments:  flowers, leaves, letters, etc.
·        Sharpie White Paint Pen


Instructions:

    1. Tear a half inch paper strip from all 4 edges of 002 Enchantment.  Set that aside for the moment.
    2. Distress the edges of the remainder of sheet of 002 Enchantment and then dampen all around the edges with water.  Use your fingers to wrinkle and pinch the paper.  Dry with a heat gun, ink the edges if desired. 
    3. Paint some white gesso, taking care not to completely cover the patterned paper,  in the area where your photo and title will be placed.
    4. Cut a butterfly from the center of the floral side of 003 Love is in the Air.
    5.  Dry 002 Enchantment,  and glue over the non-floral side of 003, Love is in the Air.
    6. Take the strips from step 1 and fit underneath the edge of 002 Enchantment with the torn edge facing out.
    7. Cut a title and frame from 005 Friendship.  I've used a Silhouette Cameo cut file to cut my frame.  You could use something similar or cut several circles and arrange them in a frame pattern.
    8. Edge the frame and words with a white detailing pen and then dry brush on some white gesso or paint.  Use pop dots to pop up the letters and place as shown in the photo.
    9.  Cut a white layer from the 6 x 6 Card Kit, about 1/2" larger all around, than your photo and glue to the layout about 1 1/2" from the left side.
    10.  Mat your photo with any scrap from this collection, then cut a piece of cardboard or use foam tape, to pop up the matted photo and adhere over the white layer.
    11. Add the frame over the photo and embellish with the fussy cut butterfly from step 4.
    12. Embellish with flowers etc.  I've added 3 pearl cluster embellies in the upper left corner. 

Fabscraps is looking for their new design team.  It's a great company, give them a try!


Wednesday, November 25, 2015

Fabscraps #Teens collection a CAS layout.

This collection lends itself to so much more than teen layouts.  Since I don't have teens or any human children for that matter, I've resorted to using animals with this collection.  I think this zebra photo goes really really well with #Teens.   I love the different patterns in the paper along side this beautiful zebra dressed in such a pretty coat!  :-)

Now then, I call this a CAS layout, i.e. clean and simple, because it is just that.  I've used a few simple layers to put this together; start to finish, it took me 45 minutes plus another 30 to make the flowers.  The photo is still the star of the show, as it should be, and the flowers and ribbon keep it from being overly plain.  This is my brand of CAS!


For This Project You Will Need:
Fabscraps  C80 #Teens Collection:
·       002 Zero Tasking - 2 sheets
·       005 Type T - 1 sheet
·       006 Togethering - 1 sheet

                                                       
Other:
·       Black cardstock - 1 sheet
·       Embellishments:  flowers, leaves, letters, etc.


Instructions:
  1. Cut the center out of the black cardstock leaving a 1" frame all around.
  2. Border punch 002 Zero Tasking all around the paper.  If you don't have border punches, you can trim the paper to 11.5 x 11.5".
  3.  Cut a rectangle about 5.5 x 5.75" from the center of the page in step 2.  Set aside for now, we'll use it later for as another layer.
  4. Layer 002 Zero Tasking from step 2 over the black cardstock frame.
  5. Cut a piece 8.75 x 8.5" from 002 Zero Tasking.  Layer this over the paper from step 4, placing the opposite side of the paper face up,  about 1.5" from the left side and 1.75" from the top.
  6. Cut a strip 2 5/8 x 12" from 006 Togethering.  Adhere a ribbon on the center of the strip, layering this in the center of the page as shown.
  7. Now layer on the small rectangle from step 3.
  8. Mat your photo onto black cardstock and add your photo to the layout as shown.
  9. Add a title over the photo.
  10. Embellish with flowers, leaves etc.  I handmade the striped flowers from 005 Type T with a McGill Floriano punch.
Thanks for stopping by today!


Tuesday, November 17, 2015

Puppy Love with Fabscraps #Teens Collection

I love scrapping my poodles and Fabscraps #Teen collection sure works well with my photos!  My girls love to go out in the yard and play.  We are lucky to have a very large fenced  (almost a half acre!) area where they can run and chase to their heart's desire.

I used alot of mixed media on my background.  Scroll down to the bottom to read my process.


For This Project You Will Need:
Fabscraps Jungle C80 #Teens Collection:
·       005 Type T
·       006 Togethering
·       007 Staycation
·       008 Hash Tag
·       MC80 001A Carder's Pack
                                                       
Other:
·       Mask and masking paste
·       Paint
·       Black ink and texture stamp
·       Martha Stewart Cherish Punch Around the Page punches
·       Embellishments

Instructions:
  1. For the base page, 005 Type T:  Stamp all over with a texture stamp and black ink.  Then, use a mask and do some random masking with white masking paste.  After that dries, stamp on some green color to match the green in 006, Togethering.
  2. Cut an 8" circle from 005 Type T and adhere to the left side of the page as shown.
  3. Fussy cut a stripp 1.75" x 12' from 006 Togethering.  Adhere this over the circle near the center of the page as shown.
  4. Mat two photos onto 007 Staycation.
  5. Cut a rectangle 5.375 x 7.25" from 006 Togethering. Notch the edges if you wish.  Adhere over the circle as shown.
  6. Cut a rectangle 5 x 7" from 007 Hash Tag and lap over the rectangle from step 5 as shown in the photo.
  7. Cut a rectangle  5 x 6.75 (or whatever fits with your photos) and border punch the edges.  Adhere your photos to this and then use cardboard or foam tape to pop it up and adhere about 2.5" from the right side.
  8. Pop out two arrows from the tags in the Carder's Packm pop up with foam tape and place them as shown on the right side.
  9. Add a title, and embellish with flowers etc.
Thanks for visiting with me today!

Sunday, November 15, 2015

#Teens Collection from Fabscraps

Have a look at this new collection from Fabscraps, #Teens Collection.  Its perfect for scrapping your teens or for some grungy layouts.  Oh but wait, I paired grunge with glam for my layout of my sweet poodles playing in the yard.  The grunge is splatters and the glam is the Manor House florals.


For This Project You Will Need:
FabScraps C80 #Teens Collection:
·        002 Zero Tasking - 1 sheet
·        004 Free Range - 1 sheet
·        007 Staycation - 1 sheet
·        DS 040 Stencil

Other:
·        Black cardstock - 1 sheet
·        Mask and white masking paste
·        Black ink
·        Black mist or paint
·        White and yellow paint paint

·        Embellishments - flowers etc.

Instructions:
  1. Trim 002 Zero Tasking to 11.5 x 11.5".   Cut a  10" square from the center and set aside for another use.  Distress the edges and then moisten and crinkle the remaining frame..
  2. Trim 004 Free Range to 11 x 11".  Distress the edges and then moisten and crinkle.
  3. Do some random stenciling on 004 Free Range using  Fabscraps Stencil DS 040 and white molding paste.
  4. Adhere the frame from step 1 to the black cardstock.
  5. Cut a rectangle 2 x 5.75" from 004 Free Range.  Cut this from the center part of the paper that will be covered by 007 Staycation (black brick wall - see the photo)
  6. Layer and adhere 004 Free Range over 002 Zero Tasking.
  7. Cut a rectangle 6.5 x 9" from 007 Staycation.  Splatter with white paint or use a paint splatters stencil.
  8. Adhere the rectangle from step 7 on the left side of the page as shown in the photo.
  9. Tuck the small rectangle from step 5. under the right side of 007 Staycation as shown in the photo.
  10. Mat your photo with black cardstock.
  11. Use foam tape or cardboard to pop up your photo and position as shown in the photo.
  12. Add a title.  Embellish as desired with flowers etc.


Tuesday, November 10, 2015

Fabscraps Christmas Memories

I love this sheet of music paper from Fabscraps Christmas Memories collection.  It's a perfect background for just about any layout.


I made the poinsettias using a Sizzix die to cut all the petals.  I sprayed them with Lindy's Blazin' Sun Glitz Spritz to give them a gold sparkle and I used gold stickles for the centers.

For This Project You Will Need:
FabScraps C78 Christmas Memories Collection:
·        005 Christmas Kiss - 1  sheet
·        007 Christmas Children - 1 sheet
·        008 Christmas Tags - 1 sheet

Other:
·        Red and brown cardstock
·        White and/or clear gesso
·        Gold mist
·        Gold and red Stickles
·        Greenery punches or dies
·        Tim Holtz Alterations Tattered Pinecones die
·        Sizzix Flower Petal and Centers poinsettia die
·        Die-namites Holly Branch

·        Elizabeth Craft Designs Spring w/Berries

Instructions:

  1. Trim 007 Christmas Children to 11.5 x 11.5".  Distress and ink the edges.
  2. Paint 007 Christmas Children with a mix of white and clear gesso.  After that dries, randomly spray on some gold mist.
  3. Cut the center out of a 12" piece of red cardstock leaving a 1" frame.  Set the center aside to make the flowers..  Adhere 007 Christmas Children onto this red cardstock frame as shown in the photo.
  4. Cut two 5" circles from 007 Christmas children. I have used a Kaisercraft doily die for my circles.  Adhere one circle about 1.5" from the left and about 2" from the top.  Adhere the other circle about 2" from the right and 2.5" from the bottom.
  5. Pop up your photo with foam or cardboard and center on the page over the circles.
  6. Fussy cut two tags from 008 Christmas Tags and adhere to the upper right of the photo leaving room to add flowers and greenery.  Pop up the tags with some foam tape.
  7. Arrange large and small flowers around the photo along with some greenery and pinecones.  Use gold stickles for the centers of poinsettias and red stickles to make holly berries.

Monday, November 9, 2015

Christmas Memories with Fabscraps!

I'm having fun scrapping with Christmas Memories from Fabscraps!  It's such a pretty paper collection with traditional colors of red and green. Love pairing it with gorgeous red roses!


For This Project You Will Need

FabScraps C79 Christmas Memories Collection:
·        001 Father Christmas
·        005 Christmas Kiss
·        006 Christmas Holly
·        008 Christmas Tags
·        MC79 001A Carder's Pack

Other:
·        Cream cardstock
·        Prima or Kaisercraft doily die
·        Die-namites Holly Branch
·        Red Stickles
·        Sizzix frame
·        Stampendous shabby white embossing enamel

·        Embellishments, flowers, berries, etc.

Instructions:
  1. Cut a 12" frame from 008 Christmas Tags 1" wide.  Ink and distress the edges if desired.
  2. Trim 001 Father Christmas to 11.5 x 11.5" and then cut a frame 1" wide and layer this frame over the frame from step 1.  Ink and distress the edges if desired.
  3. Trim a 12 x 12 cream cardstock to 11 x 11".   Ink and distress the edges if desired.
  4. Layer the cream cardstock over the two frames from steps 1 and 2.
  5. Cut a decorative mat about 11" x 11" from 006 Christmas Holly.  I've use a WRMK Lucky 8 Classic Wreath punch.  You could cut something similar with a Cricut or Cameo. Ink and distress the edges if desired.
  6.  Cut two doiles from 001 Father Christmas.  Adhere one in the lower left corner as shown and adhere the other in the upper right corner as shown in the photo.
  7. Cut a mat 4.25 x 6.5" from 005 Christmas Kiss.  Ink and distress the edges if desired.  Adhere about 1.5" from the right side and 1" from the top.
  8. Cut a smaller mat, 4 x 6" and border punch with Martha Stewart punch around the page punches.  Ink and distress the edges if desired.  Adhere over the mat from step 7.
  9. Die-cut a frame similar to what I've used.  Dabble embossing ink randomly on the frame and sprinkle with Stampendous shabby white embossing enamel, heat set.
  10. Glue the frame over your photo and use foam tape to pop up the photo and frame.  Adhere over the layers in step 8.
  11. Adhere the 2nd doily in the bottom left corner about 1" from the left side and 1.5" from the bottom.
  12. Fussy cut a tag from 008 Christmas Tags and layer over the doily at the bottom.
  13. Embellish with flowers, holly leaves, berries, etc.  Use red stickles to enhance the berries.

LinkWithin

Related Posts Plugin for WordPress, Blogger...