Pages

Monday, January 31, 2022

Blog Hop Featuring New Products from Eileen Hull Designs


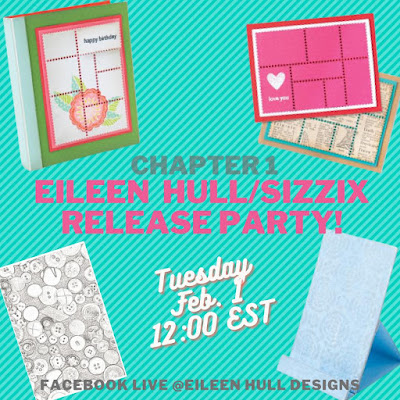
I am so excited to share Eileen Hull Designs Chapter 1 release with you! The dies in this collection are versatile, practical and fun to embellish.

The Phone Stand, an XL ScoreBoards die, is a MUST- you need one for every room! Make for yourself, family, friends, for gifts, or to sell.  The die cuts the Phone Stand in one pass and is very easy to assemble.

The Book Box can be used to make a book or a box that holds A-2 greeting cards. What a great way to package handmade cards ... or a quick and easy book!

Add the Vintage Buttons folder to create vintage backgrounds for cards, journals, pages and tags. The 3D effect is stunning when you add a little Luster Wax to bring out the highlights...

The Snail Mail Thinlits die cuts a postal pane that coordinates with two of Eileen's Snail Mail Maker Forte stamps. This die was designed to use on the front of an A-2 card!

To celebrate this great new release, we're having a blog hop and it starts tomorrow (Tuesday, February 1) on Eileen's blog, so hop on over!


The Book Box by Eileen Hull


The new Book Box die is amazing!!!!!  I am loving it. I made this adorable button box using the new Book Box die and a new Vintage Buttons embossing folder.  At 5" x 6.5", the box is just perfect for stashing my collection of vintage buttons.  It's also perfect for holding small gifts, candies, oh so many possibilities!


Facebook Live

Join me and Eileen Hull February 3 at 4 pm EST for a Facebook Live.  I'll show you  some fun techniques using the Textured Impressions Vintage Button Embossing Impressions and an easy closure for the box!


I used a stamp from Eileen's Maker Forte Stamp Set, Buttons, Cards and More, to make the "Sunshine Buttons" title.


I found this adorable sewing machine charm on Amazon.  


I made a Vintage Buttons embossed panel to use in the bottom of the box.


Products from Eileen Hull


Hope to see you on Facebook Live February 3rd.  If you can't make it, there will be a video playback available.

Maggi xoxo

Tuesday, January 11, 2022

Gel Press Collaboration with Eileen Hull Designs


Eileen and Teams are collaborating with GelPress all through January to see what magic can be made when both products are combined. Make sure to check in at Eileen's blog at http://eileenhull.com each week to see what comes of our GelPress journeys. And check out the GelPress blog too to see what the Gel Press team is doing with Eileen's journal bases at https://gelpress.com/.  It's a match made in heaven 💓!

I've been having tons of fun with the Gel Press! I started out with a simple technique using an 8" x 10" Gel Press Printing Plate to create a background print for to use with Eileen's Full Size Journal.

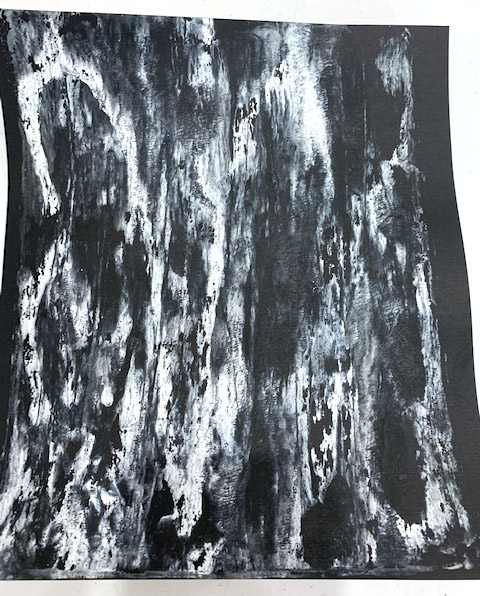
I started out with black, white and silver paints dripped onto the printing plate.


Next I used a Gel Press brayer to roll the paint over the Prining Plate.


 Then I pressed a piece of black cardstock onto the printing plate being sure to press all of the paper into the plate.  I pulled up the paper and this is the result.  Looks a bit like marble doesn't it?

I printed several sheets so that I would have enough paper to cover both the inside and outside of the journal covers.


To make the journal covers I cut chipboard panels 7.5" x 9.25",  just slightly larger than the Full Size Journal cover.  I also cut the Gel Press printed black cardstock to the same size.  Now I put the journal covers together in my normal fashion.  That is, applying adhesive to the back of the cardstock and then adhering the cardstock to the chipboard journal covers.  

Tip:  I find that sometimes when I go to pull the adhesive paper backing off my cardstock, it starts pulling the cardstock apart or it doesn't adhere to the cardstock at all.  One of the cures for this is to rub the adhesive soqn really well before pulling the backing away.  Here's an easier way, just run the adhesive covered cardstock through your diecut machine without a die and presto, it is rubbed down quite nicely and the adhesive backing pulls away leaving a perfect adhesive covered piece of cardstock.

Prepare 4 pieces of cardstock covered with adhesive and adhere it to the chipboard pieces, front, back, inside and out.  Now lay the chipboard frontside facedown on the journal die and run it through your diecut machine. 

This is what I ended up with!  Note, I wanted to add just a smidgen of color to the black/white and I wanted it to be translucent so I used a bit of Ken Oliver's Chartreuse Color Bursts.  I picked through my stash and found the chartreuse ribbons and bling.  

The two corner pieces and the bow are Creative Embellishments chipboard covered with Eileen's Molten Dimensions embossing powder in Polished Silver.  It's kinda funky but I like it!


Inside I changed up my painted colors using black, red and ivory but used the same technique, just brayered the paint from side to side, instead of from top to bottom.


For my 2nd project I decided to get a bit more girly and created this.  I used the very same technique with blue, white and yellow acrylic paints.  


I used a thinlit die from an older set of Eileen's, the Bookplate, Hinges & Label Die Set, to make the title.  I diecut the label from some of the Gel Press printed papers and then stamped it using a sentiment stamp from Eileen's Snail Mail Inspiration stamp set.  The little flags were also punched from papers I printed.


That gorgeous doily you see is a fairly new die release from Eileen; again I diecut it from papers I had printed with the Gel Press.  A fussy cut bird, flowers, and a pretty bow finish the look.  Oh yes, and that cute little wooden fence!  I think this is classic me, LOL!  


Eileen Hull Products Used


Gel Press Products

Other Supplies

Black, White, Silver Acrylic Paint
Black Cardstock
Blue, Green, Yellow, White Acrylic Paint
Stamperia Dream Paper Collection
EK Success Banner Punches
Grafix 12 x 12 Chipboard


Tuesday, December 28, 2021

Large Tag for Creative Embellishments

 This is a bittersweet post as it is my last project for Creative Embellishments.  My life in retirement is just so busy that I don't have much time for crafting.  We have an RV and travel a lot.  This summer we will be gone for 3 months traveling to Newfoundland.  So time for me to step down.  Nicolle of Creative Embellishments is the best, this has been a wonderful journey and a great design team!

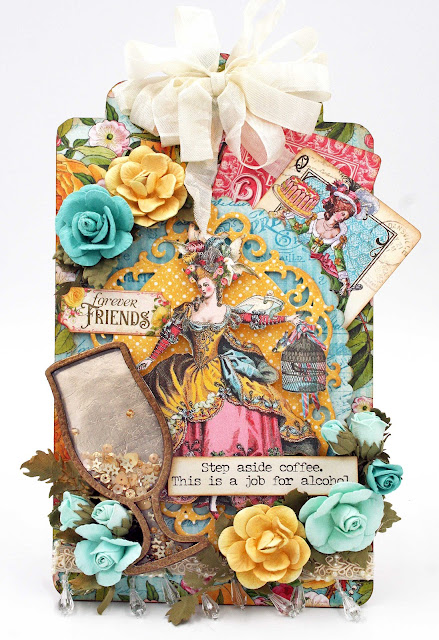
For my last project I turned to one of my favorite things, a large (5.5" x 10") to make this fun tag for a dear friend.  I used Graphic 45's Ephemera Queen and layered up lots of papers.


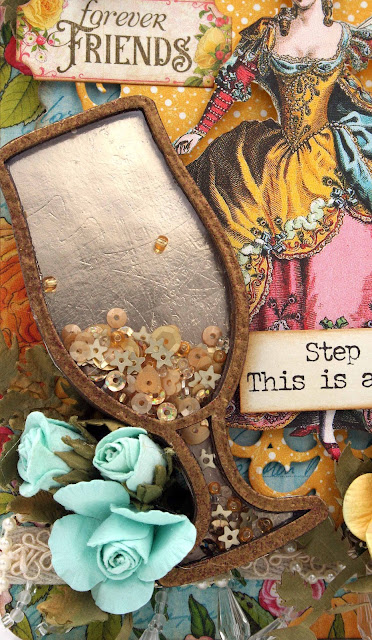
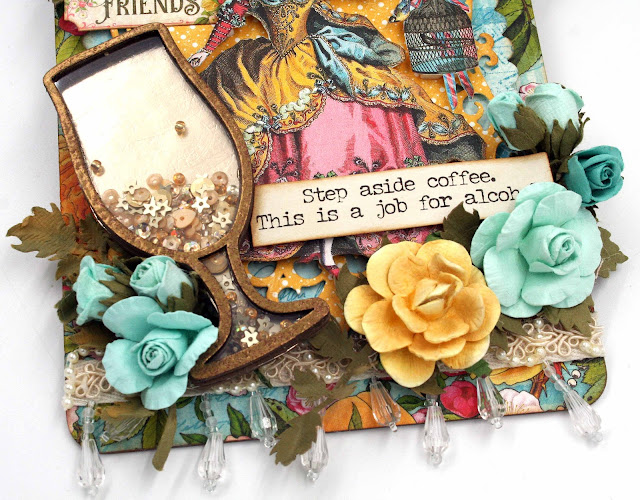
Then I put together  a shaker wine glass from Creative Embellishments and filled it with shaker material from Buttons Galore and More (check out their store, they have great shaker materials!)


Creative Embellishments has a whole line of shaker sets, you're surely find something you have to have!!

I used metallic champagne colored paper inside the wine glass to mimic the color of wine.  The snarky comment is a Tim Holtz Big Talk sticker.  I love his "Big Talk" , it goes well with my sarcastic nature!


Products from Creative Embellishments

Large Tags

Glass 2 Shaker

Other Products

Graphic 45 - Ephemera Queen Collection - 12 x 12 Collection Pack

Tim Holtz - Big Talk - Snarky


Thanks so much for coming along on my Creative Embellishments journey over the last few years.  

Wishing you a very Happy New Year and good health!

xoxo Maggi

Tuesday, December 7, 2021

Art Journal using Eileen Hull's Full Size Journal

 This was a really fun project to do and different from my usual style.  I used mixed medias to create the cover and a little paper from Stamperia's Cosmos Collection.


Here's a video that I did with Eileen Hull showing you how I made the cover.  (Instructions begin at 4:33 in the video.)


The covers are done with mists, Luster Wax amd paper and finished off with Glitter Dust.


I used stencils and Luster Wax to create stars and rays.


I started with a black chipboard cover and used just 3 colors of mist the create the night sky.


I heat set gold embossing powder on the floral element in the center to give it more shine.  


Products Used to Create this Cover

Sizzix ScoreBoards Plus Die - Full Size Journal

Skip to the beginning of the images gallery Sizzix Effectz - Luster Wax, Gold

Stampers Anonymous - Tim Holtz - Christmas - Layering Stencil - Burst

The Crafter's Workshop - Stencil - Random Stars

Ranger Ink - Inkssentials - Dylusions Ink Spray - Black Marble

Ranger Ink - Tim Holtz - Distress Oxides Spray - Wilted Violet

Prima Mist - Empress Gold

Stamperia Cosmos Paper Collection 

Glitter Dust Thermoweb Ultra Fine Glitter Spray, Gold

Eileen Hull Red Liner Tape, 1/4", Clear

Eileen Hull Golden Rod Embossing Powder


Thursday, December 2, 2021

Door Hanger for Creative Embellishments

Here's a fun gift idea from Creative Embellishments, a door hanger.  I'm sure their are lots of kids out there that would love to have a "Keep Out" door hanger!  I went with something a bit nicer, it says "Admit One". 

The door hanger is from Creative Embellishments Home Decor line and is made of plywood.  I first adhered a piece of black cardstock from Graphic 45's Come One, Come All collection to the wood piece and then  stenciled on a pattern using black modeling paste.


Next I added one of my favorite chipboard pieces, Grunge Gear Corner.  In keeping with the really bright color scheme of the G45 paper, I used yellow, black and chinese red embossing powders to color the chipboard.  I'm just feeling very colorful today!  😄


I diecut two shapes and popped them up to mount the "Admit One" ticket along with a Graphic 45 key.  I swiped a little bit of gold wax over the two keys to bring out the details in the keys. And of course, I finished it off with some Little Birdie flowers!


I think I'll give this to my great niece, she can drive her mother crazy with it, LOL!!!


Products from Creative Embellishments


Other Supplies

Ranger Antiquites Embossing Powder - Chinese Red
Zing Embossing Powder - Mustard


Thanks for stopping by today!


Wednesday, December 1, 2021

Spellbinder's Amazing Paper Grace Die of the Month Club for December

The Amazing Paper Grace kit for December makes the Enchanting Pocket Card Tag and Envelope.  Isn't this amazing and what's more, it certainly something I need this time of year.  I always end up gifting a few gift cards at Christmas and though the gift is not original, I do love to present the gift card in a really special way.  This fits the bill for sure!


I made 3 different gift card envelopes with tag liners and they are so pretty!


The one on the left is line with gold foil and is so elegant.  Unfortunately, gold foil is really difficult to photograph and I'm sorry I really didn't capture it's beauty.

I added flowers that are made with dies that come in the kit and they are so petite and pretty.  They are perfectly sized for these gift cards.  I chose to leave the flaps open on these two as they were included inside a box.


I folded the third gift card holder as an envelope and again used hand made flowers to embellish. I diecut two tag inserts and cut the top off one and adhered to the outside of the envelope for this stunning look.
Inside the envelope


Supplies Used

Amazing Paper Grace Die of the Month

Graphic 45 Let it Snow Collection


Thanks for stopping by today!  xoxo Maggi

Final Creative Challenge of 2021!

This is a special card that I made for the wonderful gal that grooms my poodles.  They love her so much and delight in going in to have their "hair done"!  She is crazy about my girls and always makes them so pretty! 

This is the inspiration photo for the December Creative Embellishments challenge.  I was immediately inspired and headed straight for a Stamperia paper collection called "Pink Christmas".  It is a perfect match with this photo!  The twist is to use bling and I used a glittery embossing powder for the twist.


This is an easel card and I've used Merry Christmas words from Creative Embellishments to hold the easel in place.  My poodles are silver just like the one on the card (Cottage Cuts die I believe) so this came together in the most perfect way!


The Merry Christmas Titles set is great as it includes 5 title sets each in a different font that are perfectly sized for card making.  I heat embossed these with Stampendous Shabby Pink Embossing Enamel which has glitter in it.  Too bad you can't really see how sparkly it is in this photo.


Here you can see the mechanism that makes the easel.  These are simple cards to make.  Here's a link to a blog post that includes a video tutorial on making an easel card.


I heat embossed the fuzzy part of my poodle with Ranger Antiquities Cement embossing powder.  It makes the greatest "poodle hair"!


From Creative Embellishments 

Merry Christmas Titles


Be sure to join in our final 2021 challenge!  

Monday, November 29, 2021

Clean and Simple Layout for Creative Embellishments

Oh yes, I'm still working on that 8 x 8 mini album that was supposed to be a Christmas gift for LAST year!  The good news is that I finished it yesterday!  Hooray!! 

This is really a simple layout but simple is sometimes what you need when your goal is to present a set of photos. I love this set showing how my great niece has grown over time.  It's such a cute way to document how quickly babies grow!


At the top I used Creative Embellishments' word "Cute" from the Boy Word Set and as usual I have heat embossed with Stampendous Aged Ivory Embossing Enamel.  It's such a fast and attractive way to make your chipboard embellishments stand out.


I used Ranger Antiquities Rose Quartz Embossing Powder on this adorable heart chippy.  This powder is completely different from what I used on "cute".  It has a textured finish that I really like.


An adorable baby, some great chippies and a few flowers, that's all it takes to make a great layout!


Products from Creative Embellishments

Boy Word Set - Words

Love Arrow Set

Be sure to join in our challenges; they are always posted on the first of every month.  Thanks for stopping by!


Tuesday, November 9, 2021

Mixed Media with Eileen Hull's Full Size Journal by Sizzix

 This is a little tease because I'm going live with Eileen sometime the week of November 11th to show you how to make a mixed media journal cover using clear gesso, mists and Sizzix Luster Wax.  Til then here's a preview of what we'll be doing.

Here's the front cover.  It's still a work in process but the mixed media part is done.

This is the journal cover in its beginning stages.


And here I masked on some Luster Wax. (Tip, stamp cleaner works great to remove the wax from stencils and fingers.)


Cutting Full Size Journal Covers


Do you sometimes have difficulty getting your steel ruled dies to feed through your die-cut machine?  Here's a tip.  First I want to tell you that you can cut a Full Size Journal with your Spellbinders Platinum 'cause that's how I cut mine.  But, it wasn't the easiest thing I ever did!  I couldn't get the die to feed through the machine.  So, this is how I made it work.  Put the plates so that they extend over the end as in the photo below and feed the opposite end in first.


So, here are the steps in detail (this works with any machine that you're having trouble getting the die to feed)
  1. Cut mat or chip board slightly larger than the journal cover.
  2. Place the die face up on a cutting plate.
  3. Place the mat or chip board on the die covering the journal cover.
  4. Cover with another cutting plate.  Make sure the plates are completely extended over the end of the journal cover part of the die.
  5. Feed the opposite end into your machine.
I hope that makes sense!  It's a little hard to explain and I will go over it in my Facebook Live with Eileen Hull the week of November 14.  I'm not sure of the exact date but I will let you know on my Facebook page.  I will be making the back cover for this journal on the Facebook Live using the same techniques as the cover.  I hope you can join me!

LinkWithin

Related Posts Plugin for WordPress, Blogger...