Pages

Showing posts with label ColorBox Blends. Show all posts

Tuesday, May 21, 2019

New Products from Eileen Hull Designs and Therm- O-Web

New products!

Eileen has collaborated with Therm-O-Web to bring you some great products to use with her many Sizzix dies.  I used them all to make this travel journal which is special!  Now why is it special?  Well, I am getting ready to go on a 3 month RV trip with my husband and spoos to Alaska and this will be my "official" 2018 Alaska journal!

A little background...We lived in Fairbanks, Alaska from 1995 - 2000.  It is our most favorite place in the entire world.  We spent 6 weeks campground hosting at Denali National Park and that was a great adventure.  This trip we plan to travel around more, but who knows, we weren't planning to campground host in 2010 but just stumbled upon it!  If you are interested, I will be updating my Alaska Blog that I started in 2010,  Road Trip - Alaska Bound, with stories and photos from this trip.


A Tutorial

Step 1:
To make the journal I used Eileen's Journal Die by Sizzix and covered both sides of the covers with paper from Stamperia's Voyages Fantastiques collection.  If you haven't taken a look at Stamperia papers, you are missing out!  Their papers are just so gorgeous and vintage and fabulous!  The Funkie Junkie Boutique carries many of their lines, do stop and take a look.

One of Eileen's new products is the Easy-Cut Adhesive sheets by Therm-O-Web pictured below that are perfect for adhering paper to your die-cut journal cover.  If you haven't used this die before, this blog post goes through the steps for die-cutting and covering your journal cover with paper.  (I'll tell you about the diecut leaves in the center further down.)


This is what the covers looked like after covering with paper.


 Step 2:
Next I stenciled on a Steampunk design using a Stamperia stencil and a couple of great Therm-O-Web products, Metallix Gold Gel masking paste and Pixie Spray which is a repositionable tack spray for stencils that works great!


Step 3:

Next I wanted to try Eileen's Foam Adhesive sheets.  These are just like the Easy Cut Adhesive sheets except that they are made of foam so they are great to use for giving your die-cuts some dimension.  I die-cut the intricate flourish you see in this picture and I love how it came out.  First I adhered the paper to the foam, added my die and ran it through my Vagabond several times to get a good cut.  (You can see the cut above on the Easy Cut Adhesive photo)  I inked up the die-cut to make it a bit darker and added two of these flourishes to my cover.


Step 4:
Nest I die-cut from the same foam sheet a travel word from Eileen's journaling words set.  This time I decided to try out Eileen's new Molten Dimensions Embossing Powders.  I used Golden Rod and I love how thick these embossing powders are!  


Step 5:
I made a simple closure with ribbon, a key hole and Velcro.  Simply loop a piece of ribbon through the key hole as picture and then adhere the two ribbons together.


Then add a velcro closure to the ribbon, press in place on the back cover and voilà, you have a neat simple closure.


Step 6:

To make these way cool flowers, I started with plain bronze flowers and "fancied" them up by applying Eileen's Molten Embossing Powder in silver and gold to the petals.  Isn't that just the coolest effect?  Just paint a bit of embossing ink on the petals, sprinkle with powder and heat.  CAUTION!!  Use tweezers to hold the flowers and DO NOT touch the metal until it cools after heating as it gets really hot.   

I painted a little embossing ink on these burlap flowers and added some embossing powder around the edges.  Love this look!


Step 7:

Now it's time to put the covers together.  I used another product from Eileen's new Therm-O-Web line, Red Liner Tape.  This tape is so great for Eileen's journals because it creates such a strong bond.  Some people don't like it because you can't tear it.  Well think about it, you can't tear it so it must be REALLY strong right?  I'm a convert!

Just place a line of tape all down the back cover and adhere the front cover.  Press in place and you're good to go!


That's it, my journal is all ready to go, now I just have the huge task of packing up the motorhome for a 3 month trip.  It's a lot of work let me tell ya!  It's so much easier to pack a suitcase and check into a hotel but it's not nearly as much fun!  I love sleeping in my own bed every night and most of all, having our much loved poodles with us!


 Tisha and Nika love RVing too and are keeping a close watch on the road!

One more little note of interest, Therm-O-Web sent us a nice box of goodies along with all the new Eileen products.  I have to say my favorite thing in the whole box might just be these little metal tips.
Wow, I just screwed one onto the Ultra Bond glue they sent and it makes the nicest thin glue line I've ever seen.  Fabulous glue and tip!!  Thank you Therm-O-Web!


Supplies

Eileen Hull Designs by Sizzix Thinlits Die Set 5PK - Journaling Words
Therm O Web - iCraft - Deco Foil - Metallix Gel - 2 Ounces - Pure Gold
Eileen Hull Designs ColorBox Blends2 Refill - Clear

Tuesday, March 19, 2019

A Wrap Journal by Eileen Hull Designs Celebrating Spring

Hello friends!  It's nice to have semblance of normalcy in my life again!  We just moved from North Carolina to Tennessee and what a job that was.  Since mid-January, all I have done is pack and then unpack boxes.  I've moved more times in my life than I can possibly count (I am an Army brat so moving has always been part of my lifestyle) but this move was the hardest ever!  I think it has something to do with my rapidly advancing years.  😅

Finally, I found a few crafting supplies and was able to create this fun spring journal with Eileen Hull Designs Wrap Journal.  Ha ha!  Ok crafting in my new studio was a challenge.  So....here's how that goes, first I thought what I wanted to do, yes, 💡 make a wrap journal.  So then I spent 2 hours looking for my wrap journal die!  I was about to really panic when I couldn't find any of my XL Scoreboard dies when I spotted  2 Vagabond boxes.  At that point I realized that I only have one Vagabond because the first one broke and I threw it away.  Hmmm,now wouldn't that Vagabond box be a great box for packing XL dies?  Yes, aaaahhhh, there they were, all my wonderful, much loved, Eileen dies.  Whew, crisis averted!  Well repeat this process for nearly every supply I wanted to use...you get the picture?  Creating time - 3 hours,  looking for stuff time - 6 hours.  Sigh,  I hope to get my studio organized soon!

The Journal

So how did I make this fun, colorful quirky journal?

I started out by creating the background.  That was a simple process, I just grabbed some inks and paint and began blending in patches of color.  There was no rhyme or reason to how I did this, I just made splashes of color.


Next I rummaged around and found a few stencils and I used those to create patterns on the background.  I let all that dry and then stamped the floral/mushroom image with a fun new Dylusions stamp that I just got.  I liked how that looked, so I kept right on stamping and added that heart border.


I also just got Seth Apter's new Baked Texture embossing powders and wanted to try those out so I stamped on some embossing ink and used Blizzard Baked Texture.  Oh I loved the addition of white to offset the bright colors.

And then to give it some real wow, I die cut some flowers with Eileen's Thinlit flowers die, added some doodling to the petals and popped them on the cover.  Don't they look great and they add dimension AND character!

The Closure

I'm always trying to think of ways to hold my journals closed as the wrapped bands don't always work for me because I usually have flowers and other 3D doo-dads on my covers that get in the way of a ribbon or elastic wrap.    So I thought these two buttons made a great closure.  The orange button is simply sewn on the cover with eavy duty thread.  The button on the spine is sewn on with elastic.  Now here's the trick, after having made a couple of stitches to hold the button securely I made one last stitch BUT I did not pull the thread all the way through, thus creating a loop that could be secured around the orange button.  Pretty cool, right?   And SEW  (LOL!) easy!


The Signatures

I made three signatures to go inside, using tiny composition books that fit perfectly in the Wrapped Journal.  I used scrap design papers to cover the outside of the books and then added inks and stamping in keeping with the style of the cover.


Thanks for visiting with me today, now that things have settled down just a bit, I hope I can get back to crafting on a regular basis!


Eileen Hull Designs Products Used:

Colorblends Inks:  Beach, Hydrangea, Bay, Leaf, Sunflower and Melon

Other Supplies

Stencils

Sunday, January 13, 2019

Clearsnap Color Blends by Eileen Hull

Blends 

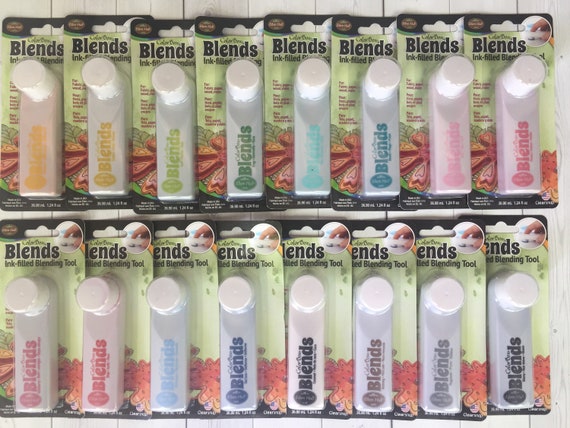
Blends are a fun ink product designed by Eileen Hull for ColorBox.  Blends are unique as they are an inker, re-inker and applicator all in one. The contain much more ink than your typical stamp pad and come in 16 colors.


This is a Journal that I made with Eileen's Journal die.  It makes a Traveler's Notebook style journal and is definitely one of my favorite things to make!  They are addictive.

The first step (sorry I don't have any process photos) after die-cutting and assembling the journal, was inking the cover.  I used several different Blends to do the color and used a little water to blend it all together nicely.    

Here's a great video where Eileen shows you how to use the Blends.  Also check out this blog post by fellow DT member Karen Bearse.

Next, I used a stencil from Stamperia and copper embossing paste to stencil on the clock faces.

After that dried I added those pretty flowers from Little Birdie Crafts, the Graphic 45 key hole, and the chipboard piece which is from Graphic 45's Steampunk Debutante Collection.


On the back cover, I used another Stamperia stencil and stenciled with nutmeg Blends.  I love how I was able to add the stenciled images over the blended background color without smearing.


Let's take a look at the signature covers inside.  I embossed the cover of the first one and then lightly inked over the embossed impression with Blends.  They work really well for this kind of application.


On this cover, again I used a stencil and lightly inked the background.  The Mannequin is a fussy cut image from the Steampunk Debutante collection that I adhered.  Then I stamped the image above and below using 2 different color Blends, Nutmeg and Ebony.


The image in the center is from a Stamperia stamp.  I stamped it on paper and then used a paintbrush and picked up a little color from the Blends and painted in the fine details.


 Be sure to watch Eileen's video on how to use the Blends for lots more information on this great product.


Supplies:


Stamperia Clocks Stencils
Graphic 45 Steampunk Debutante
Stamperia stencils and stamps


Thanks for stopping by today!


Tuesday, July 31, 2018

Sizzix Wrapped Journal and ColorBox Blends Tutorial by Eileen Hull Designs

Have you seen Eileen's new ColorBox Blends Inks by Clearsnap?  They are so unique as they are an inker, applicator and re-inker all in one and they come in 16 colors.


The Journal

 I did the background of this wrapped journal with green, pink and blue Blends.  Love how it came out!  Scroll on down for a tutorial on how I did the cover.

The Wrapped Journal die makes the cutest mini.  The covers wrap over each other and the inside holds 4 signatures (the booklets inside the journal.)  Ok, I just know you are wondering why the journals are on the right side and why they appear to open from the back instead of the front.  Well...I am left handed and sometimes my left handedness just takes over and compels me to make things for lefties.  😁 (In other words I goofed!  But, it is perfect for a lefty!)


Inside the cover and for the signatures, I used papers from Stamperia's Wonderland collection.


There are 4 signatures - these are what the interior booklets are called.  I used dies from Eileen's newest BookClub 2 collection that includes the Wrapped Journal as well as from her original BookClub collection to cut tags and flowers to use on the signatures.

One of my favorite dies from the new Book Club 2 collection is the  Credit Card Sleeve and Tags.  This die set makes to neatest pocket that is just perfect for holding gift cards and little notes.

Tutorial

 Diecut a Wrapped Journal from white mat board.  Tape the covers together with removable tape so that the covers align properly.  Then mark the placement of the brads on the two covers.  (You can do this after inking, but be sure you attach them before adding paper on the inside, otherwise the brad backs will show.)
Use ColorBox Blends to completely ink both the inside and outside covers.  The Blends stay wet long enough that you can easily blend your colors.   I used Bay, Beach and Leaf on my covers.
Tip:  When your Blends are new, you will need to press the pads down on a scrap piece of paper to get the ink flowing and to fill the inkpad with ink.


After the inks have dried you can add design paper inside and outside if you like.  I used some great Steampunk stamps from Stamperia to stamp images on my covers (4) but decided the one on the front cover looked to dark, so I stamped it again on white paper and fussy cut it out and glued to the cover.  I liked that much better (5)!  I also blended in a little Tutu pink ink to bring the cover and design paper together.

(6)  I added some flowers and clock charms to gussy up the cover.


I added design paper to the inside right cover and stamped that with another image from the same stamp set.

Eileen Hull Designs by Sizzix Products:


Other Supplies:
ColorBox Blends by Eileen Hull - Nutmeg, Leaf, Bay, Beach, Tutu
Stamperia High Definition Stamps


That's it for today, time to make something else!  Happy crafting.

Maggi


LinkWithin

Related Posts Plugin for WordPress, Blogger...