Pages

Tuesday, November 7, 2023

Comfort & Joy! With Eileen Hull Dies

 The holidays are just around the corner and it's time for our annual event, Comfort & Joy! This is the 4th year we've had Comfort & Joy, though this year we are not having a day of dedicated classes. No matter, the Inspiration Team is here to offer you lots "recipes" of Comfort & Joy!

A recipe is simply a list of ingredients and instructions, right?  So for today's comfort, we're making a recipe card that you can include with a delicious tin of cookies.


The "Recipe", you'll need:

  • Eileen Hull Journaling Card, Envelope, and Window by Sizzix
  • Plain cardstock, even large scraps will work, that is what I used
  • A sheet of decorative cardstock
  • Small element for decoration, fussy cut image, sticker etc
  • Adhesive
  • Food recipe printed so that it fits on 4" x 3" card 

Fold a piece of cardstock in half and place the Journaling Card die from the set over the crease such that the die will only cut on 3 sides, thereby making a card that is 4'w x 6" L. 


Then cut another Journaling Card, this time cutting on all 4 sides.


You should end up with two pieces like this:


Now glue your recipe to the Journaling Card.  Most likely your entire recipe will not fit on the Journaling card, so I adhered the ingredients to the journaling card and the instructions inside the card.
Fold the top of the card back half way as shown.


Now glue the top of the journaling card (ingredients) to the folded part of the card, creating an easel like below.  We've just created a recipe card that you can easily see while baking.


Then make an Envelope using decorative paper and the envelope die.  Now you have a nice card and gift for a lucky someone.  If you use my recipe, you'll have enough cookies to fill a tin and plenty for you too!


You really should try these cookies, they are my most most favorite in the world!!


Maggi's Brickle Drop Cookies

1    cup  butter softened
1    cup  granulated sugar
1    cup  light brown sugar  
1    tsp vanilla
½    tsp  salt
3     eggs
3 ½ cups all-purpose flour      
2    tsp  baking soda
2    tsp  cream of tartar    
8    oz   Heath Bits ‘O Brickle toffee bits (1 pkg)
1    cup peanut butter chips
1    cup  chopped pecans

·       Heat oven to 350º, lightly grease cookie sheets or use parchment paper.  They have a tendency to stick so I like using parchment paper best.

·       Beat butter, sugars, vanilla and salt in large bowl until blended.  Add eggs; beat well.  Stir together flour, baking soda and cream of tartar; gradually add to butter mixture, beating until blended. 

·       Stir in toffee bits, peanut butter chips, and pecans. I actually beat this in 'cause the batter is rather stiff and I just can't stir it in very well.  I have a Kitchenaid mixer that handles this well.

·       Drop by heaping teaspoons onto cookie sheet.  Bake 8 to 10 minutes or until lightly browned.  Cool slightly; remove to wire rack to cool completely.  About 6 doz cookies.


And here's another favorite, Texas Tornado Cake. This is so easy to make, I don't even get out my mixer. I just whip it up with a wooden spoon. The icing is divine, very similar to icing on a German Chocolate Cake, but not quite as rich.


Texas Tornado Cake


For the cake:
  • 1 ½ cups sugar
  • 2 eggs
  • 2 cups Gold Medal UNBLEACHED all-purpose flour (bleached flour toughens baked goods)
  • 2 cups fruit cocktail with syrup (16-oz. can) can use 2 cups of any kind of chopped canned fruit
  • 2 tsp. baking soda
  • 1 cup chopped nuts
  • ¼ cup brown sugar
For the icing:
  • 1 stick butter
  • 1 cup coconut
  • ¾ cup brown sugar
  • ½ cup evaporated milk or half-and-half
Instructions

1. Mix regular sugar, eggs, fruit cocktail, baking soda and flour.

2. Pour into greased and floured 9×13” pan.

3. Combine brown sugar and nuts; sprinkle over batter.

4. Bake at 325° for 40 minutes.

5. Prepare the Coconut Icing by combining the butter, coconut, brown sugar and evaporated milk in a medium saucepan. Bring to a boil over medium high heat and allow to boil for 2 minutes. Turn heat to low and keep the icing warm, stirring occasionally, until the cake is done baking.

6. Once the cake is done, remove from the oven and pour the icing over the top of the hot cake.

Note, seems fruit comes in 15 oz cans these days, so I just add enough water to make 16 oz fruit and liquid.  I have used light syrup and it is fine.


Thanks for stopping by, happy baking!
xoxo
Maggi

Saturday, November 4, 2023

Comfort & Joy with Eileen Hull Designs

This is our fourth annual Comfort & Joy event which started during the pandemic as a way to stay connected throughout the holidays even though we were separated from family and friends. Now it's a Eileen Hull Fan Club tradition!


Eileen's team will be creating with holidays recipes. Keep in mind "recipes" can include anything- actual baked goods, journals, banners, tags, cards, home décor, gift wrap and gifts to give and sell and should include an EH die or product!. Please make sure to share YOUR "recipes" in the Comfort & Joy 23 photo album- there will be prizes! We hope that you enjoy this event and look forward to seeing what we all create this holiday season!


Tuesday, October 10, 2023

Halloween Decor with Eileen Hull's Shadow Box Frames

 I love crafting Halloween projects, they are just so fun!  I think it takes me back to my childhood, and of course usually involves eating chocolate while I'm crafting!  😁 So here's a fun home décor project you can make with your kids using Eileen Hull Designs by Sizzix Shadow Box Frames. 


There are two sets of Shadow Box Frame dies and I used the #2 set but either would work.  It just depends on what size frames you want to make.  These are 4 3/4' x 6 1/4".  I constructed the frames from black cardstock and then added 5/8" strips around the frame to add lots of color.  I had some foam alphabet letters which were just the right size to stamp the letters with orange paint onto black cardstock that I cut to fit the frames. 

I used an old Tim Holtz product, Picket Fence Distress Stain, to color Mr. Bones.  I like the uneven coverage that it gives the chipboard.


The frames tended to be a little heavy on the front causing them to tip over so I added a simple chipboard stand to the back.  You can use any scrap chipboard; just cut a length 6" - 7", then score with a craft knife around 3" from the bottom.  Take care not to cut all the way through the chipboard, you just want to scored it enough so that it fold nicely.  Glue to the back and you're all set.


Iff you dig around in your stash I bet you'll find lots of left over Halloween bits and pieces.  I have a lot of great chipboard from Creative Embellishments so I pulled out the skeleton, pumpkins, and the ghost shaker.


I dyed some cheesecloth black.  Its easy to do, just put some cheesecloth in a plastic sandwich bag.  You can spray a little mist or ink up the cheesecloth in the bag, then mist with water and moosh it up!  Of course you can skip the bag if you don't mind inky fingers!


Again, I used Picket Fence Distress Stain to get the transparent look on the ghost  It covers just enough of the chipboard color to make it look sort of cloudy and translucent like I imagine a ghost would look.


Supplies


Cheese cloth - available at Walmart and supermarkets

Orange Paint
Black Cardstock

Thanks for visiting!

xoxo
Maggi


Friday, September 22, 2023

Gnomes for the Seasons with Spellbinders Gnome Hugs Die Set

I had a blast creating with the Gnome Hugs Die Set; gnomes are so cute!  The die set is really for Christmas gnomes but I decided to use the die set to creat gnomes for all seasons.   Here are 4 seasonal cards created with the same die set, Gnome Hugs from Spellbinders. (S6-213)


Since this is a Christmas die set, let's start with the Christmas Card.  I used Stamperia Christmas paper scraps and a journaling card to create this card.  


The sentiment is printed on a transparency and glued to a small tag.  


Halloween is coming soon so I thought some "spooky gnomes" were in order.  I don't think gnomes are very spooky, they're too cute to be scary!  This card is made with left over bits of Haloween paper.  In addition to using the Gnome Hugs die set, I used Autumn Wonder for the pumpkins, and Notched Corner Frames for the inner black print layer.


The gnome on the left is wearing a witch's hat that I fussy cut instead of the die-cut hat.  The two larger pumpkins are cut with Autumn Wonder and the smaller is from an older 2018 die set, the pickup truck bed.


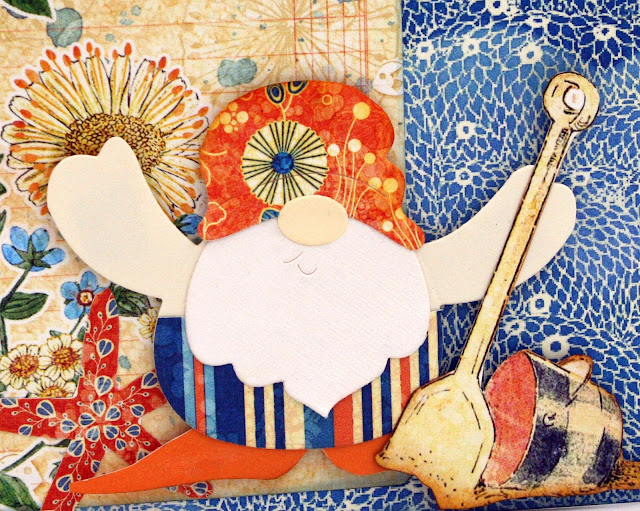
Of course, I needed a beach gnome for the summer!  I used Graphic 45's Sun Kissed collection for this card.  Our gnome is playing in the sand with a fussy cut shovel and bucket.


I rounded off the hat die cut from the Gnome Hugs set to make what I hope resembles a swim cap.  And his feet, well they're  supposed to be swim flippers that I just cut freehand.  Ha!  Whatever... they look a bit like feet or flippers. 😄


And finally, the spring gnomes in their garden of flowers, die cut using the Envelope of Wonder flower dies and papers from Graphic 45's Once UPon a Springtime collection. 


...And that's a wrap for Gnomes for the Seasons!  Thanks for joining me and my gnomes today!

xoxo Maggi


Supplies


ENVELOPE OF WONDER ETCHED

Tuesday, September 12, 2023

Halloween House with Eileen Hull's Slotted Treat Box

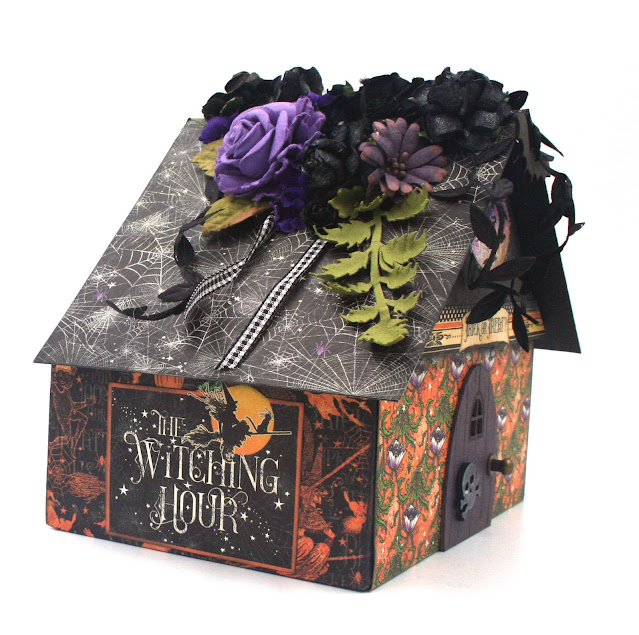
This is Eileen Hull's Slotted Treat Box cleverly transformed into a haunted house. (Well, I think it's clever 😁!) Best of all, the roof flips up so you can stash candy inside!

I used Graphic 45's Midnight Tales paper collection, black cardstock, and chipboard to put this together.


To make this I assembled the treat box without the lid.  Here's what the treat box looks like in it's "normal" state: 


 Instead of using the lid, I built a roof  using the side walls of the lid to form roof peaks.

Steps for building the house and roof:

House
  • Die-cut 2 sets with the Slotted Treat Box die.
  • Assemble the bottom portion of the box as usual. Cover the slot by placing the die-cut piece back in the slot and tape in place.  We'll cover that with paper later.
Roof
  • We'll use the 2nd set of die-cuts to build the roof.
  • Fold the side wall die-cut pieces of the lid assembly in half and cut to the shorter length. Don't fold the long flaps down on the scored lines.

  • Using a craft knife, score the ends of the cut edges @ 3/8", being sure both ends are exactly the same and that you don't cut all the way through the chipboard.


  •  This will create tabs on either end and are used to make the roof peak.  Adhere the tabs underneath the roof floor, which is the die-cut piece that is normally the top and bottom of the box.  It is better to adhere this with the scored flaps inward rather than outward as shown in the photo below.  Its doesn't make a big difference but inward is better.


  • Now its time to cover the gable ends of the roof.  Now for a little geometry!  😄 Cut two pieces of paper 6 1/2" w x 4 1/2 h as shown in the photo below and score on the inner triangle lines.  Adhere to the roof assembly folding the  flaps and adhering over the roof assembly. 


  • Die-cut one more side piece for the lid and trim and discard the tab and shorter piece as shown in the photo below.  Adhere the wide part of the long piece inside the box, then adhere the roof to the tab.  Be sure that the scored part is facing the side wall in the the box so that the lid can be opened. 


  • Now cut a piece of paper for the roof 5 3/4" x 10 1/4" and score at 5 1/8" and cover the roof centering from front to back.  I used black cardstock for this step and then covered with design paper just to make the roof a little more substantial although not really necessary.  But, since I like to add lots of flowers etc. I thought I might need a little more heft to my roof! (You could also use a folded piece of chipboard but I didn't think it was necessary.)

Box opened.  The black object holding the box open is just something I put there so I could photograph the inside.


View from the back.


The front door and skull are pieces from Creative Embellishments and the door knob is Tim Holtz.

I'll be doing a Facebook Live with Eileen October 3rd at 6 pm EDST showing you how to make this so be sure to tune in!  You can catch the replay here.

Thanks for stopping by!

xoxo
Maggi

SUPPLIES 


Graphic 45 Midnight Tales
Light Weight Chipboard


Tuesday, August 29, 2023

The Bigz Plus Slotted Treat Box by Eileen Hull for Sizzix

When I first saw the Bigz Plus Slotted Treat Box I immediately thought of a Piggy Bank because of the slot in the front.  Well them my mind wandered about and I remembered that Graphic 45 had a collection with flying pig images; so of course, this piggy bank was born!

The Bigz Plus Slotted Treat Box measures 6 1/2” x 5” x 3 1/2” and aside making a cute piggy bank, it can be some many other things. It can hold a set of cards, journals, doll clothes, ephemera storage or you can even use it as a gift box! This is a Scoreboards die which is specially designed to cut and score thick material like matboard, chipboard, leather, felt, fabric and metal.  Take note, this is important, an A 9” wide machine is required to cut this die.  It works with the Sizzix Switch and Big Shot Plus, Spellbinders Gemini & 8.5" Platinum, and others with a wide mouth platform.


I used Eileen's Alphanumeric Thinlit die to cut the "My Piggy Bank" letters.  The piggy is fussy cut from a design paper from Graphic 45's Olde Curiosity Shoppe collection.


I hinged the back to keep the lid in place.


Then I just embellished it with fun piggy images and begging words!


The great thing is you don't have to use the slot, you can cover over it and then it's just a cool box!


Supplies 


Graphic 45 Olde Curiosity Shoppe


Thanks for joining me today!  Be sure to stop by Eileen Hull's blog and see all the great projects from the design team.

xoxo
Maggi


Tuesday, August 22, 2023

Eileen Hull's 3D Embossing Folder & Starlit Village and Card Panel Thinlits

 We live in a growing neighborhood so there are always new people moving into new houses.  This card is just the thing for that occasion!


I started the card with an embossed background made with the Keys 3D Embossing Folder. I used Core'dinations cardstock to emboss the keys and then sanded the embossed keys to make the keys stand out.


Next I die-cut some houses using the Starlit Village and Card Panel Thinlits Dies and layered them over each other.  Note that this Eileen Sizzix die is very special, in that it is only available at Scrapbook.com. A vintage key from Graphic 45, a bow and flower finishes the look.

Supplies


Thanks for joining me today!  You can find many Eileen Hull Designs by Sizzix on Scrapbook.com.
Also be sure to stop by Eileen's blog where you will find lots of inspiration from the design team.

xoxo
Maggi


Tuesday, August 15, 2023

Using Elements from Eileen Hull Designs by Sizzix Chapter 3 Dies

As always, Eileen Hull's latest release is fabulous!  I love that her dies work together like on this card where I used elements from 3 different dies in her Chapter 3 release. 


I started my card with a black cardstock base and covered the front with design paper from Graphic 45's Love Notes collection.  I love the Keys embossing folder so I thought a card with keys as the focal point would be fun. I used the Keys embossing folder on a strip of black cardstock and rubbed over the raised embossing with gold Sizzix luster wax to make the keys pop.  I also cut corner elements from the embossed keys using the XL Scoreboard Slotted Treat Box die.


Keys Embossing Folder

Slotted Treat Box

I printed my sentiment, "You own the key to my heart" on a clear transparency and glued it to a tag that came with the Love Notes collection.  Now to tie my sentiment all together with keys and hearts, I die-cut 3 hearts using the Envelope, Folder & Flowers Thinlits dies and added some faux stitching to make them pop.  


To finish it off, I added a Graphic 45 Staples key.


Envelope, Folder & Flowers Thinlits dies 


Thanks for visiting today!!
Maggi xoxo


Sizzix Supplies by Eileen Hull Designs


LinkWithin

Related Posts Plugin for WordPress, Blogger...