Pages

Tuesday, February 14, 2017

Graphic 45 Love Candy Bucket


Graphic 45's Alpha Banners are really fun to work with and there are a lot of things you can do with them.  I 've used them for cards, tags, banners and even on layouts.  Today I have a Love Candy Bucket to share with you.


To make the banners:
I used the ATC size banners and first glued them onto wooden skewers.  Then I cut a 2.5" x 3" rectangle to go on the back of the tag.  I adhered the rectangle with foam tape that is the same thickness as my skewer and that way it creates a dimensional and shadow effect for the letters.  That looks cool right?  Tie a fun ribbon to the tag and decorate with flowers, fussy cuts and chippies.


For the bucket:
I cut a 3" styrofoam ball in half and glued the two halves  to the bottom of the bucket.  That gave me something to hold my banners.   On the outside I added a felt heart and daisy trim along with a pretty organza ribbon.  I cut a little piece from design paper and glued under the ribbon and added a couple flowers.   It is simple, but pretty, and I wanted the banners to take center stage.

Now stab your banner skewers into the styrofoam and fill the bucket with chocolates!  It's a great centerpiece or gift for friends, neighbors, teachers or your sweetie.  You can easily do something like this with any kind of container.


Graphic 45 Supplies:
Graphic 45 Nature Sketchbook Collection 12 x 12:
Diary of a Botanist
Monarch Majesty
Seasonal Splendor
Wildflower bouquet
6 x 6 Patterns and Solids
Flowers
Journaling Chipboard
Staples Alpha Banner - ATC Red

Other Supplies:
Galvanized tin bucket
Wooden skewers
Petaloo Darjeeling Mini Daisy x 7
White organza ribbon
Green Felt trim
McGill small Retro Flower punch
McGill Floriano flower punch
Foam tape

Thursday, February 9, 2017

Cheery Lynn Designs Valentine with new Bohemian Dies


The new Bohemian collection of dies is just fantastic.  I've used several of the dies from that collection to create this Valentine card.

The black and white overlay is the Paisley Frame - 2 Die Set.  On the right I added a diecut flower using the Indie Bouquet die set.


 I also made a pretty rose using the Large rose dies.

It's alwyas nice to do the inside of a card too.  I diecut flowers, again with the Indie Bouquet dies and I stamped a sentiment onto the smallest diecut from the French Flair Pierce And Cut Tool - LG Silver Pierce Tool 6 Piece Die Set.


Thanks for joining me today!

Wednesday, February 8, 2017

Valentine Cards with Creative Embellishments


The day of love is fast approaching so I've made a couple of Valentine cards for you.  This first one is a stepcard.  These card are so great for display because they stand up by themselves.

Here's a side view, you can see the mechanism that makes it stand.

I used a Creative Embellishments Oval Frame  to accent my oval diecut layered beneath the Carte Postale pocket.  The oval diecut and the oval frame make a pretty pair!

I heat embossed the frame with Stampendous aged ivory embossing enamel and added some sugared Petaloo blooms as the perfect accent.


Inside the pocket is a tag where you can write a personal message.

Inside the card is a large space where you can write a nice love note to your sweetie!


Next up, a simple layered card  I added 2 paper layers to my card base and then topped that with a Cheery Lynn Designs diecut.  That makes a great background for Creative Embellishments' Love Heart Flourish Corner.  I love the scroll work on this chippie and it looks so pretty on the paper layers.
Some tiny Petaloo blooms along with a bright red anemone add just the right finishing touch to that pretty swirly chippy!


Thanks for joining me today.  Be sure to stop by the Creative Embellishments store and see what's new. Nicolle is always adding new designs!


Friday, February 3, 2017

A Petaloo Valentine's Gift

What could be sweeter than a pretty box of chocolates and a pretty tag to accompany it?


 I altered  a small Graphic 45 matchbox for my chocolates.  It  holds 8 Lindt Lindor chocolates perfectly!  I used foam to pop up the center chipboard piece and then worked flowers around and underneath it along with the pretty bow. 

 Aren't these vintage velvet cherry blossoms so pretty?  I love how soft they are and vintage.  The velvet they are made from is really pretty and classy looking.

The Baby's Breath picks are such a great accent for the cherry blossoms.  I love their delicate appearance.

On the back of the box I worked in a couple of large Botanica blooms, they are the prefect filler for my box top.

I used a Cheery Lynn Designs diecut heart to take center stage on my tag.  I wanted to pop up the heart but its so delicate there was no where to hide the foam pop up tape. Soooo, idea!  I grabbed a large Tim Holtz acrylic square and place that underneath the heart.  That worked so well to give the dimension I was looking for.

Here you can see from the side how the center of the tag is build up.

That's it for me today, thanks for stopping by.  Petaloo has so many beautiful blooms to enhance your Valentine.  It's just so hard to choose which ones to use! 😊😊😊

Petaloo Supplies:

Other Supplies:
Graphic 45 Mon Amour Collection
Graphic 45 matchbox
Graphic 45 black tag
Cheery Lynn Designs Lattice Heart & Vines Die
May Arts ribbon

Wednesday, February 1, 2017

Creative Embellishments February Challenge

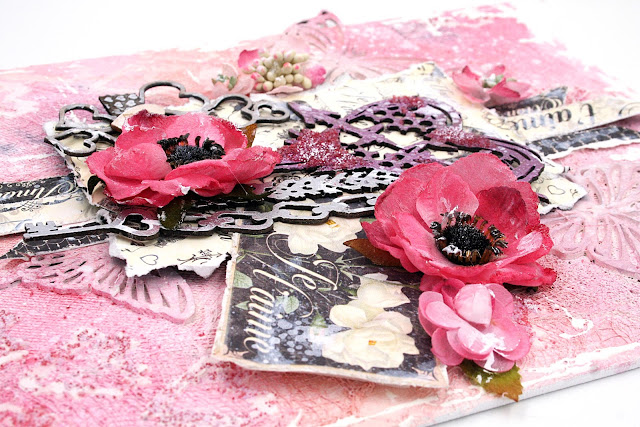
Happy February!  It's time for a new Creative Embellishments photo inspiration challenge.  Since it's the month of love, I decided to make a love canvas.  The photo inspired me to just play with mixed medias and see what would result and this is it. 

 I started out with a blank canvas and used white gesso to paint over and glue down netting and cheesecloth for some fun texture.  Then I stenciled on some hearts.   Next, I added 3 butterflies from the Butterflies (set of 5) and again painted them with white gesso.  I added color with several Lindy's mists in pinks and peachy pinks.  At this point I was happy with my background and started building the center piece.  

 I used Graphic 45's Mon Amour collection and tore some  banner strips.  I used foam tape to pop up the distressed rectangle to add dimension.  Then I added the Grunge Heart Corner which I painted with Viva metallic paints.  I dabbed some Glossy Accents onto the grunge heart and on the canvas background and pressed in some microbeads. 
 I topped a Washi Tape Shape Cluster  with a wood veneer heart from the Conversation Hearts


  Then to gussy it all up I added some pretty Petaloo flowers and a cut-apart "Je t'aime" (I love you) from the Mon Amour collection.  To finish it off, I used a pallette knife to lay down gesso around the edges creating a frame look of sorts and then raqndomly dry brushed white gesso over the entire canvas.

Creative Embellishments Supplies:


Our challenges are fun and easy and best of all, you could win a $50 gift certificate to the Creative Embellishments store.  The winner is picked randomly AND if you use our products you get an extra entry!  Everything you need to know about the challenge is in the monthly challenge post on the Creative Embellishments blog and the challenge post is always at the top.

Thanks for joining me today!


Tuesday, January 31, 2017

Cheery Lynn notebook cover

I made this to slip into the plastic sleeve of a small 3 ring binder.  I'm using the book in an assisted living facility so that visitors can make a note of their visits.


I created several layers to give this lots of visual appeal.  Starting at the back I used the largest die to from Coved Rectangle Stitch And Cut Tool - LG Silver Stitch Tool 6 Piece Die Set.

Next I layered in a cut-apart from the Graphic 45 Secret Garden collection.   The pretty flowers were  diecut with the Floral Bouquet Kit 8 Piece Die Set - B777.  I added leaves with  Flourish #7 Die - CAFLRS7.

On the bottom left corner I used Nesting Doll- Circles #1 3 Piece Die Set to diecut a circular doily to place behind my sentiment card.  I also used the Ivy Corner Flourish Die to accent the corner flowers.


Cheery Lynn Designs Dies Used:


Grapic 45 Secret Garden

Thanks for visiting today.


Monday, January 30, 2017

A Layout for Creative Embellishments with Graphic 45 Nature Sketchbook

Meet my new favorite paper collection, Graphic 45's Nature Sketchbook and Creative Embellishments has so many wonderful chippies that accent this collection so nicely!


At the top I've used a Pine Cone Branch and Pine Cone Clusters underneath my Petaloo flowers.  I used Lindy's mists to color the branches. Love using mists for a coloring agent because it does not fill in the etching designs.


On either side of my photo I used Vintage Flourish Set 3 that I heat embossed with Stampendous aged ivory embossing enamel.  Then I layered Pine Cone Clusters over the flourishes.


Those flourishes make such a pretty cluster when layered with other chippies and flowers!


Creative Embellishments has lots of word chippies and I chose this one from the Adventure Word Set.   I also heat embossed it with Stampendous aged ivory embossing enamel.

Creative Embellishments Products:

Other Products:
Graphic 45 Nature Sketchbook
Stampendous Aged Ivory Embossing Enamel
Lindy's Frosty Forest Green
Lindy's Gator Gumbo Olive
Lindy's Mission Bells Brown
Petaloo Teal Mixed Textured Blossoms 
Petaloo Vintage Velvet Dogwood Ivory
Petaloo Mini Burlap Antique Green

Thanks for stopping by today!


Saturday, January 21, 2017

Cheery Lynn Designs step card with Graphic 45 Nature Sketchbook

One of my favorite card designs is a step card and Cheery Lynn makes it easy for you with their step card die, Step Card Bundle Set #4.  Then add in some diecuts from the new Bohemian collection and Graphic 45's new Nature Sketchbook collection and you're sure to have a winning card!

I've used dies from the new Bohemian collection enhance this card.


I used the Mandala Doily 2 back with a  diecut from the Nesting Doll- Circles #1 3 Piece Die Set. I really like how the Nesting Doll diecut provides a backing for the Mandala Doily diecut.

 On the right face I've used Bohemian Collection - Indie Border, althugh it is hard to see because of the printed paper.  The flowers were made with the Bohemian Collection - Indie Bouquet - 6 Die Set.


Thanks for stopping by today!


LinkWithin

Related Posts Plugin for WordPress, Blogger...