
Eileen has a great new Thinlets Die Set, Wreath & Snowflake. It's perfect for card making and I bet you can think of other uses too. Below I have a tutorial for you that you can adapt to make any size card.

I made a slider easel card with the set using an older Graphic 45 Christmas collection, A Christmas Carol.

The die set includes a wreath bow and a sweet little cardinal.

Slider Easel Card Tutorial
1. Cut a base for your card. Mine is 5 1/4" x 7 1/8". The base is the blue dotted paper in the photo below.
2. Cut a piece 5" x 6 7/8". This is the red patterned paper and is the 2nd layer from the bottom. Then cut out from the center of the red patterned paper 5/8" from the bottom and left and right sides forming a flap, i.e. do not cut at the top.
(To adapt: Make the bottom base any size you want. The piece on top of the bottom can be the same size or you can cut to leave a 1/8" border all around as I have done. Just be sure to cut out the center 5/8" - 3/4" from the sides and bottom of the top piece.)

3. Cut a piece 4 1/8" x 6 1/4". This is the blue patterned piece (not the dotted blue) you see above. If you are adjusting the sizes, this piece needs to be a little wider than the opening that forms the flap.
4. Score the flap at 1/8" at the bottom and score at the top where the flap folds up. Then fold the flap bottom to the top of the flap opening - see below photo.


6. Now put glue JUST around the edges of the left, right and bottom of the red patterned paper and glue to the blue dotted base. YOu can only glue around the edges, otherwise the slider will not work. You should be able to pull the blue patterned paper up forming a "mountain" with the red patterned flap as below.

7. Side view showing the flap mechanism. Attach a pull of some sort to the top of the pull out slider mechanism. I made a circle tab from red patterned paper.
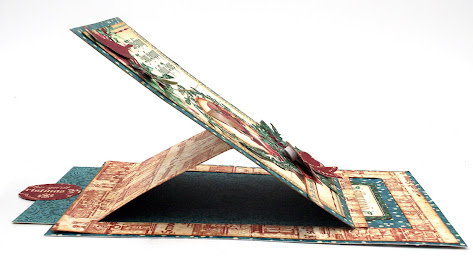
8. Now you can decorate the slider as you wish. I added a cut apart from the Paper collection to a 4' x 6" rectangle and then glued to the bottom part of the easel only so that it stands up when the easel is pulled out. I used the wreath around the cut-apart and topped it with the pretty little bow. In the upper corner I added some greenery and the cardinal, all from this die set.
View of finished card laying flat.

Now you have a really pretty interactive card all ready to be mailed!
Here's a simple card made with the same Thinlits. I used 3 cuts of the wreath to make it nice an lush.


Eileen also has a new XL die out called the Box Ornament. Isn't this so cute?

I cut the ornament and used it to make a cool card with a Steampunk twist. This is Graphic 45's 2020 Christmas collection. I used platinum paper with gold paper accents so that the dimension would show.

I love that the bow is 2 parts. Cutting the outline from a different paper helps give the bow dimension.


Supplies
Graphic 45 A Christmas Carol Collection
Both the Wreath & Snowflake Thinlits Set and the Box Ornament are great dies for your holidays crafting. The Wreath and Ornament Set is designed such that it is sized to work with the Box Ornament, so you can mix and match these sets.
Thanks for joining me today!
Maggi xoxo


