Pages

Saturday, May 2, 2020

Step Card Tutorial with Little Birdie Crafts

Step cards are one of my favorite styles because they stand up so well and are so pretty with their dimension shape.    Today I will show you how to make these pretty cards.


Tutorial

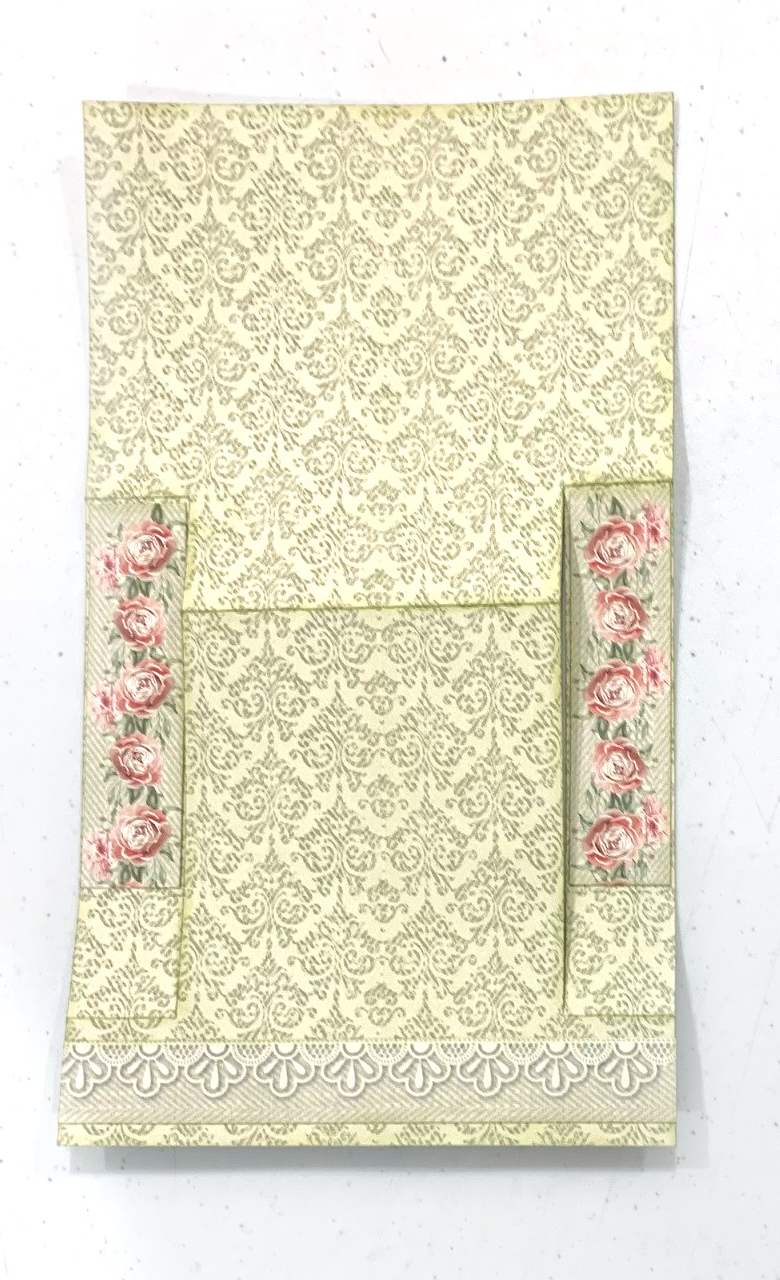
1.  Begin by cutting a card base. I am using Little Birdie's beautiful Shabby Chic Bouquet Collection for my card.  Here is the template for cutting the card base that measures 6.5" x 5.25".  Here is a link where you can download this file.  You just need to carefully measure and cut and fold as shown on the template.  If you have a Cameo or similar machine, you can draw this file in the program and save it to use in the future.  That way you could also adjust the size of the card.


2.  After you have cut out your base and folded where indicated, it should look something like this.


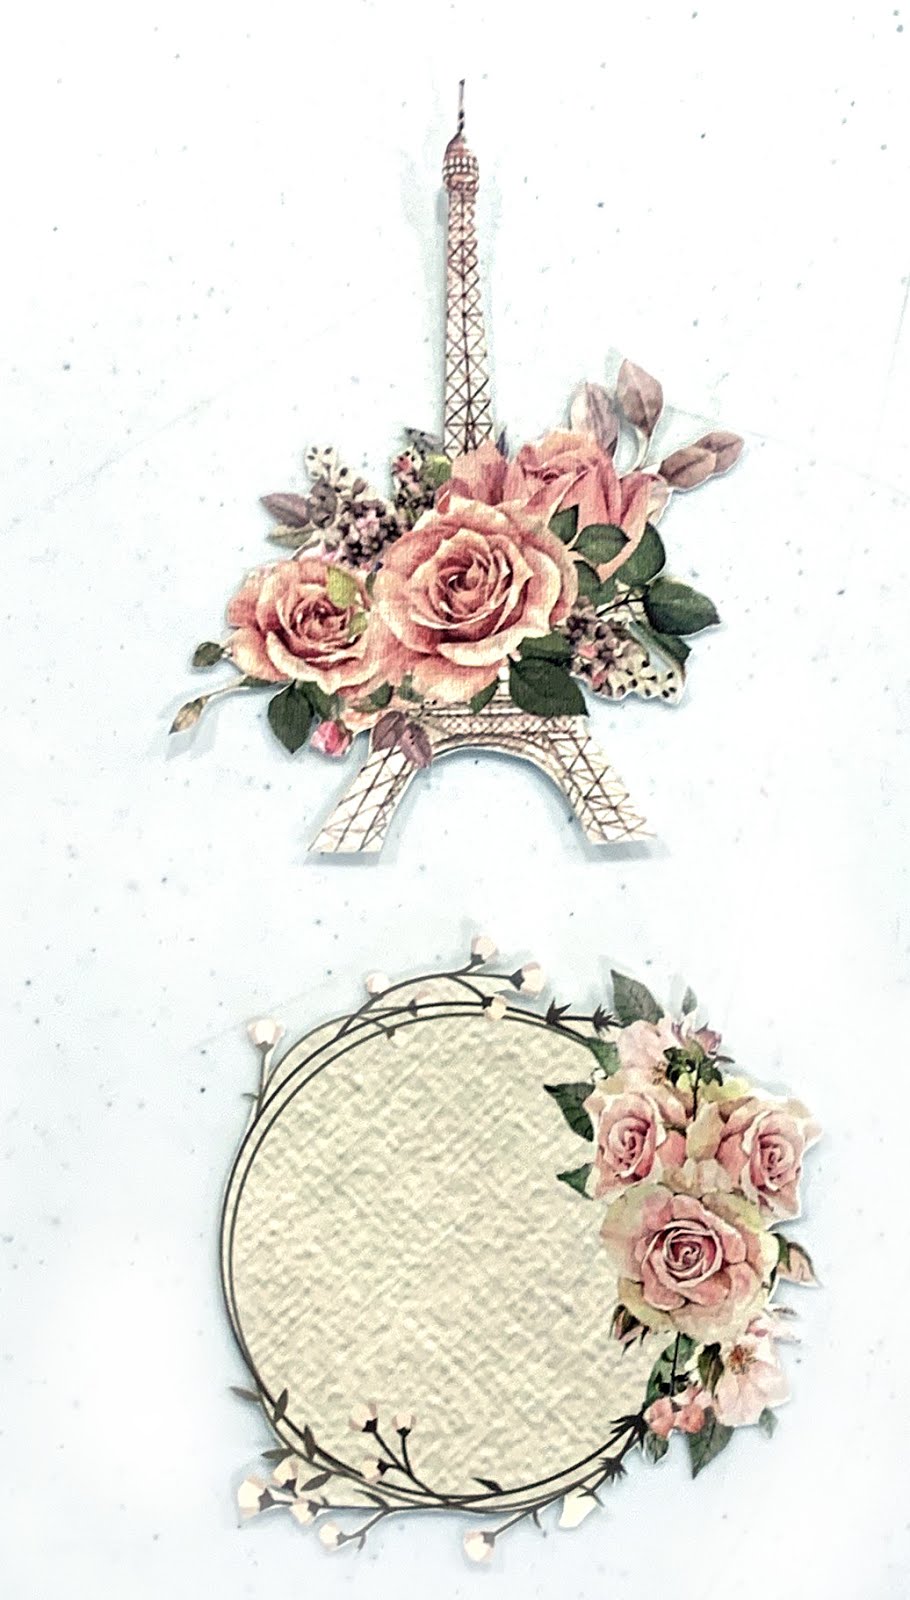
3.  Now fussy cut these two items out from the design paper.


4. Cut 2 floral strips 1 1/16" x 4 1/4".  Cut the long lace piece 6 1/2" x 7/8".  Punch out the doily from the doily sheet and select and clip a cut-apart from the cut-apart sheet.


5.  Adhere the two floral strips on the sides down from the top fold line and adhere the lacy piece at the bottom as shown in the photo below.

6.  Now it's time to decorate the front of the card.  Adhere the two circle elements as shown in the photo below.  Be sure that you only adhere to the center panel and not the side pieces.  Pop up the Eiffel Tower with foam tape and adhere on the left side.  


7.  Add a cluster of flowers on the left corner, again being careful not to adhere to the side panel.  (The card will not open if anything is glued there.)  


7.  Now let's do the inside of the card.  Cut a piece of design paper 4 1/8" x 6 1/2" and adhere to the center of the card.  Adhere the cut-apart from step 4 in the center.  Cut two pieces 1 3/16" x 4 3/8" and adhere on the sides as shown.  That's it, the card is finished!


Your card should look like this when it is finished and standing.


Little Birdie Crafts Supplies:


Thank you for joining me today!


Friday, May 1, 2020

It's a New Challenge at Creative Embellishments

A new challenge is up on the Creative Embellishments Blog and here's the inspiration photo.  Lots of  directions you can go with this!  The twist is to add numbers to your project.


My Take on the Challenge

The browns in the photo inspired me to go with a nature layout so I dug out this photo of a moose.  He crossed the road in front of us last year while on our drive to Alaska.  I used a title phrase from the CE Shop to title my layout as it was a "Magical Moment."  In all the years I lived in Alaska I don't think I ever saw a bull moose outside of Denali National Park though I saw lots of cows, even in my yard.


The twist was to ad numbers to your project.  Well my numbers are small, but they are there in the journaling.


I used two styles of chipboard trees on this layout.  I first covered them with Little Birdie Crafts Fiber Paste.  After that dried, I colored them with Lindy's mists using several green colors.


The title chippy is heat embossed with Emerald Creek Baked Texture in Ancient Amber.


The Creative Embellishments pine cone clusters make a great base under the burlap flowers.  They are colored with Lindy's mists also.  I use mists a lot on chipboard because when the chipboard is etched like the pinecones, the mist doesn't fill in the etching lines like a paint would .  I also tucked in a cute little wood veneer pinecone that I left in its natural state.  Those pretty burlap flowers are from Little Birdie Crafts.


Creative Embellishments Products:

Other Products:
Stamperia Forest and Cosmos Paper Collections
Lindy's Mists
Emerald Creek Baked Texture Embossing Powder - Ancient Amber
Distress Oxide Ink - Walnut Stain


How to enter the challenge


The monthly challenge is always the first post on the Creative Embellishments Blog.  Be sure to check it out, you could win a great gift certificate to the store!  Here are the rules:
  • Create a NEW project layout, mini album, tag, card, canvas, etc….as of  May 1st, 2020.
  • It is required that you mention in your blog post that you are playing along at Creative Embellishments together with a link back to our blog page. Please make sure to reference our challenge. Please, no old projects. (meaning projects from previous months that may fit the challenge) Please share only new projects.
  • Please add your entry to the inlinkz tool below to be eligible for the prize. You have until the last day of each month 11:55 pm eastern time to enter.
  • Simply add a link to your FB photo (if you do not have a blog) featuring your challenge entry. Let us know how you were inspired by the photo.
  • Combining with other challenges is permitted.
  • We would love to see you USE AT LEAST 1 OF CE products on your projects but it isn’t required to play along.
  • WINNERS will have 2 weeks to claim their prize. The winner will be announced on this post the day after the challenge ends. Keep an eye out to see if you are a winner.


Thanks for joining me today!


Wednesday, April 29, 2020

Sew Sweet Challenge at The Funkie Junkie Challenge Blog

The Challenge

There's a new challenge up at The Funkie Junkie Boutique Blog, it's called the Sew Sweet Challenge and Cec is hosting.  Her challenge is to, "Create a shabby chic or vintage project with a sewing theme incorporating items and/or images related to sewing - think rubber stamps of sewing machines or dress forms e.g., fabric, pattern tissue and even notions such as buttons, zippers, thread, etc."

My Take on the Challenge

I decided to create a card and used the beautiful Stamperia Atelier paper collection which has lots of sewing inspired images.
I started by die-cutting 4 pieces of paper lace using a die from the Tim Holtz Crochet Lace die set and adhering around all four sides.  I cut a piece of design paper 4" x5 3/8" and adhered that on the right side of the card.  Next I cut piece from the front of the paper packaging showing the thimble and layered over the larger piece. Then I popped up a fussy cut dress form with foam tape and adhered on the left side as shown.


Have you seen the new dies and stamps in Graphic 45's Staples line up?  They have some stamps and dies that know I'll use over and over!  On this card front, I used two of their word dies to create my sentiment, "Hello Friend."


Inside the card, I adhered a file folder that I cut with Graphic 45's new folder die.  I stamped the front with a sentiment stamp, yes, from Graphic 45's new Sentiments Stamp set.  It's such a pretty stamp!


When you open the file folder there's a fussy-cut thread card from the Stamperia collection with a die-cut Graphic 45 "thanks" word adhered to it.  The thread card is large enough so that you could attach a gift card to the back of it.


That's it!


How to Enter the Challenge

Create a vintage or shabby chic project and link it up to The Funkie Junkie Challenge Blog Challenge, Sew Sweet.  The Design Team will choose their top four picks, with the winner being invited to be a guest designer in one of our Funkie Junkie Challenges. The other three winners will receive Top 3 badges to display on their blogs. Everyone who enters and follows the rules will be entered into a draw to have the chance to win a $25 spending spree at The Funkie Junkie Boutique.

The guidelines for entering are simple; create a new vintage or shabby chic project following the challenge theme, link to your post (not just your blog) and also include a link back to this challenge in your post. You can combine our challenge with up to 10 challenges (including this one) to be in with a chance of winning. If you are entering through a public forum (such as Instagram) you'll need to include the words 'Funkie Junkie Boutique Challenge'. Also, please be sure to turn off your Word Verification so our Design Team can leave comments on your blogs. Make sure you follow these rules as unfortunately, we have had to eliminate entrants from the prize draws in the past.


Other Products
Little Birdie Flowers 


Thanks so much for stopping by today!  Be sure and stop by The Funkie Junkie Boutique Blog to see all the great projects from all our designers.

Tuesday, April 28, 2020

Kitchen Decor from Creative Embellishments and Graphic 45


I think this chipboard cuttting board may be my next crafting addiction 'cause it is just so stinking cute!!  It's 6" x 10" and just so perfect for making kitchen decor!  

Graphi 45 has a great new collection, Farmhouse, that I thought was perfect.  It has everything I love, my favorite colors and chickens!!  Have I told you that my kitchen looks like a barnyard?


I used two Distressed Chevron Pieces to accent the focal point of the board, the "Happy Place" ephemera card.  I heat embossed them with mustard color embossing powder.  Perfect color match with the design paper!


Of course, nothing I do is complete without some lovely Little Birdie flowers.  Aren't these just exquisite?


I used cardboard and foam tape to pop up various pieces in my composition to give it lots of dimension.


Products from Creative Embellishments Store:

Other Products
Graphic 45 Farmhouse Collection
American Crafts Zing Embossing Powder - Mustard


Thanks for stopping by today, I sure do appreciate it!


Monday, April 27, 2020

Treat Box with Eileen Hull's Tiiny Book Case Die

Have you used Eileen Hull's new Tiny Book and Tiny Book Case dies yet?  They are just so cute and make the sweetest little book and box.

Today, I want to share a special treat box that I made for a friend with a new puppy.  What could be better than a new puppy anyway?  I made two Tiny Book Cases and glued them together back to back.

Treat Box


Tutorial

1.  Cut two pieces of chipboard about 6" x 8 1/2".  Cover both sides of the chipboard with paper of your choice and then die-cut two boxes.  My intention was to use the same paper on the outside of both boxes but I goofed and ran one piece through my die-cut machine with the wrong side down.  (You want to place the front of your box down on the die)  Well, you know, sometimes you just goof up and so you make lemonade from lemons right?  Ink you edges before assembling, its a bit easier that way.   I use a Faber-Castell Big Brush pen to ink in the creases.  It does a great job  BUT you have to be really careful that the pen doesn't slip, 'cause if it does you'll have "artwork" on your project, perhaps in a place you didn't want it!  Now assemble the boxes by folding in the sides and adhering to to the bottom flap.
2.  Cut two pieces of ribbon about 22" long.  Place double sided tape on the back of one of the boxes and then adhere one piece of ribbon over the back center.  Adhere the other piece of ribbon over the center of the 2nd box.  Then place another piece of double sided tape over one piece of ribbon as shown below.


3.    Now stand the boxes up on their ends and push together being sure to line them up perfectly on the sides.  The should look something like this with ribbon coming out the top and the bottom.


 Now you can decorate the boxes however you wish!  I actually like that the two sides are different.


I used some fun dog quotes that I had to decorate the boxes as well as a few fussy cut images.


Fill the boxes up with puppy treats and tie the ribbons to hold the contents secure.  Of course, you could use different papers and make a gift box for any occasion.  How a bout a Mom's Day gift with earrings on one side and a necklace on the other?


Thanks so much for stopping by.  Want to know who liked this project best?  My two poodles 'cause they got to eat the photo props!  Love my girls!


Saturday, April 18, 2020

Graphi 45's new Staples and Farmhouse Collection

Stop by The Funkie Junkie Boutique Blog to see my creations with the new Graphic 45 Farmhouse Collection and some great new Staples dies from Graphic 45.  Click here.


Wednesday, April 15, 2020

Layout for Little Birdie Crafts

Go9od morning friends!  I hope you are all well and managing through these trying times.  Many of us have nothing better to do but but stare at the 4 walls of our shelter in place abode.   It's really odd, I've had the hardest time concentrating on anything lately.  I think the weight of the world is weighing me down.  I am really heartsick at all the sadness present in the world today.  However, staying busy is the best therapy so I urge you to go make something!!

Today I am sharing another layout featuring the beautiful Little Birdie Crafts Songs of the Sea collection.  The layout is deceptively easy, just lots of layers of pretty papers and some mixed media.


1.  Let's begin with the bottom layer, it's just this sheet of paper inked around the edges.


2.  The next layer begins with this paper.   First stencil on a pattern with Mixed Media Paste 2 in 1 Gesso over the entire 12 x 12 paper and allow it to dry.  Then randomly mist with Color Splash  in Lime Splash and Ocean Mist.  Allow that to dry and then randomly ink with some purple ink, I used Distress Wilted Violet.    


3.  Cut a 1" border off each side so that you have 2 - 1" x 12" strips.  Then cut 1" off the remaining sides so that you have a 10" square left.  Cut 4 1/2" x 12" strips from the two long strips.  Adhere the 10" square in the center of the page.


4.  Take the 4 - 1/2" strips and glue around the page about 3/8" from the outer edges making a frame.  Miter the corners for a finished look.  (Note that you will be removing a small piece of the strip from each end so don't glue that part securely.) See the layout photo for reference.

5.  Trim this paper to 8 1/2" square.  Border punch around the edges if you like.  Center this paper over the previous layer.


6.  Trim a 6" square from this paper OR use a sheet from the 6" x 6" pad and adhere over the previous layer about 2 1/2" from the left side and 3" from the top.


7.  Now add your photos.  My photos are 5 1/2" wide and I mounted them on some of the design paper.  Choose one of the doilies and use for journaling.  Adhere as shown on the bottom right corner. 


8.  Now my favorite part, flowers!!  Choose several sizes of flowers and arrange in a pleasing manner.  Tuck in some chipboard leaf sprigs to add variety.  I also die-cut some flourishes and layered them underneath the floral clusters.


Thank you for joining me today!  If you are in the USA you can order online from our US based warehouse, check it out!


LinkWithin

Related Posts Plugin for WordPress, Blogger...